
1. הקדמה
The SINGER® HD0400S Heavy Duty Overlock Serger Sewing Machine is designed for durable performance and professional finishes. This machine offers speed, strength, and precision for various sewing projects, from finishing seams to creating decorative edges. It features a heavy metal frame, 2/3/4 thread capability, and a high stitching speed of up to 1,300 stitches per minute.
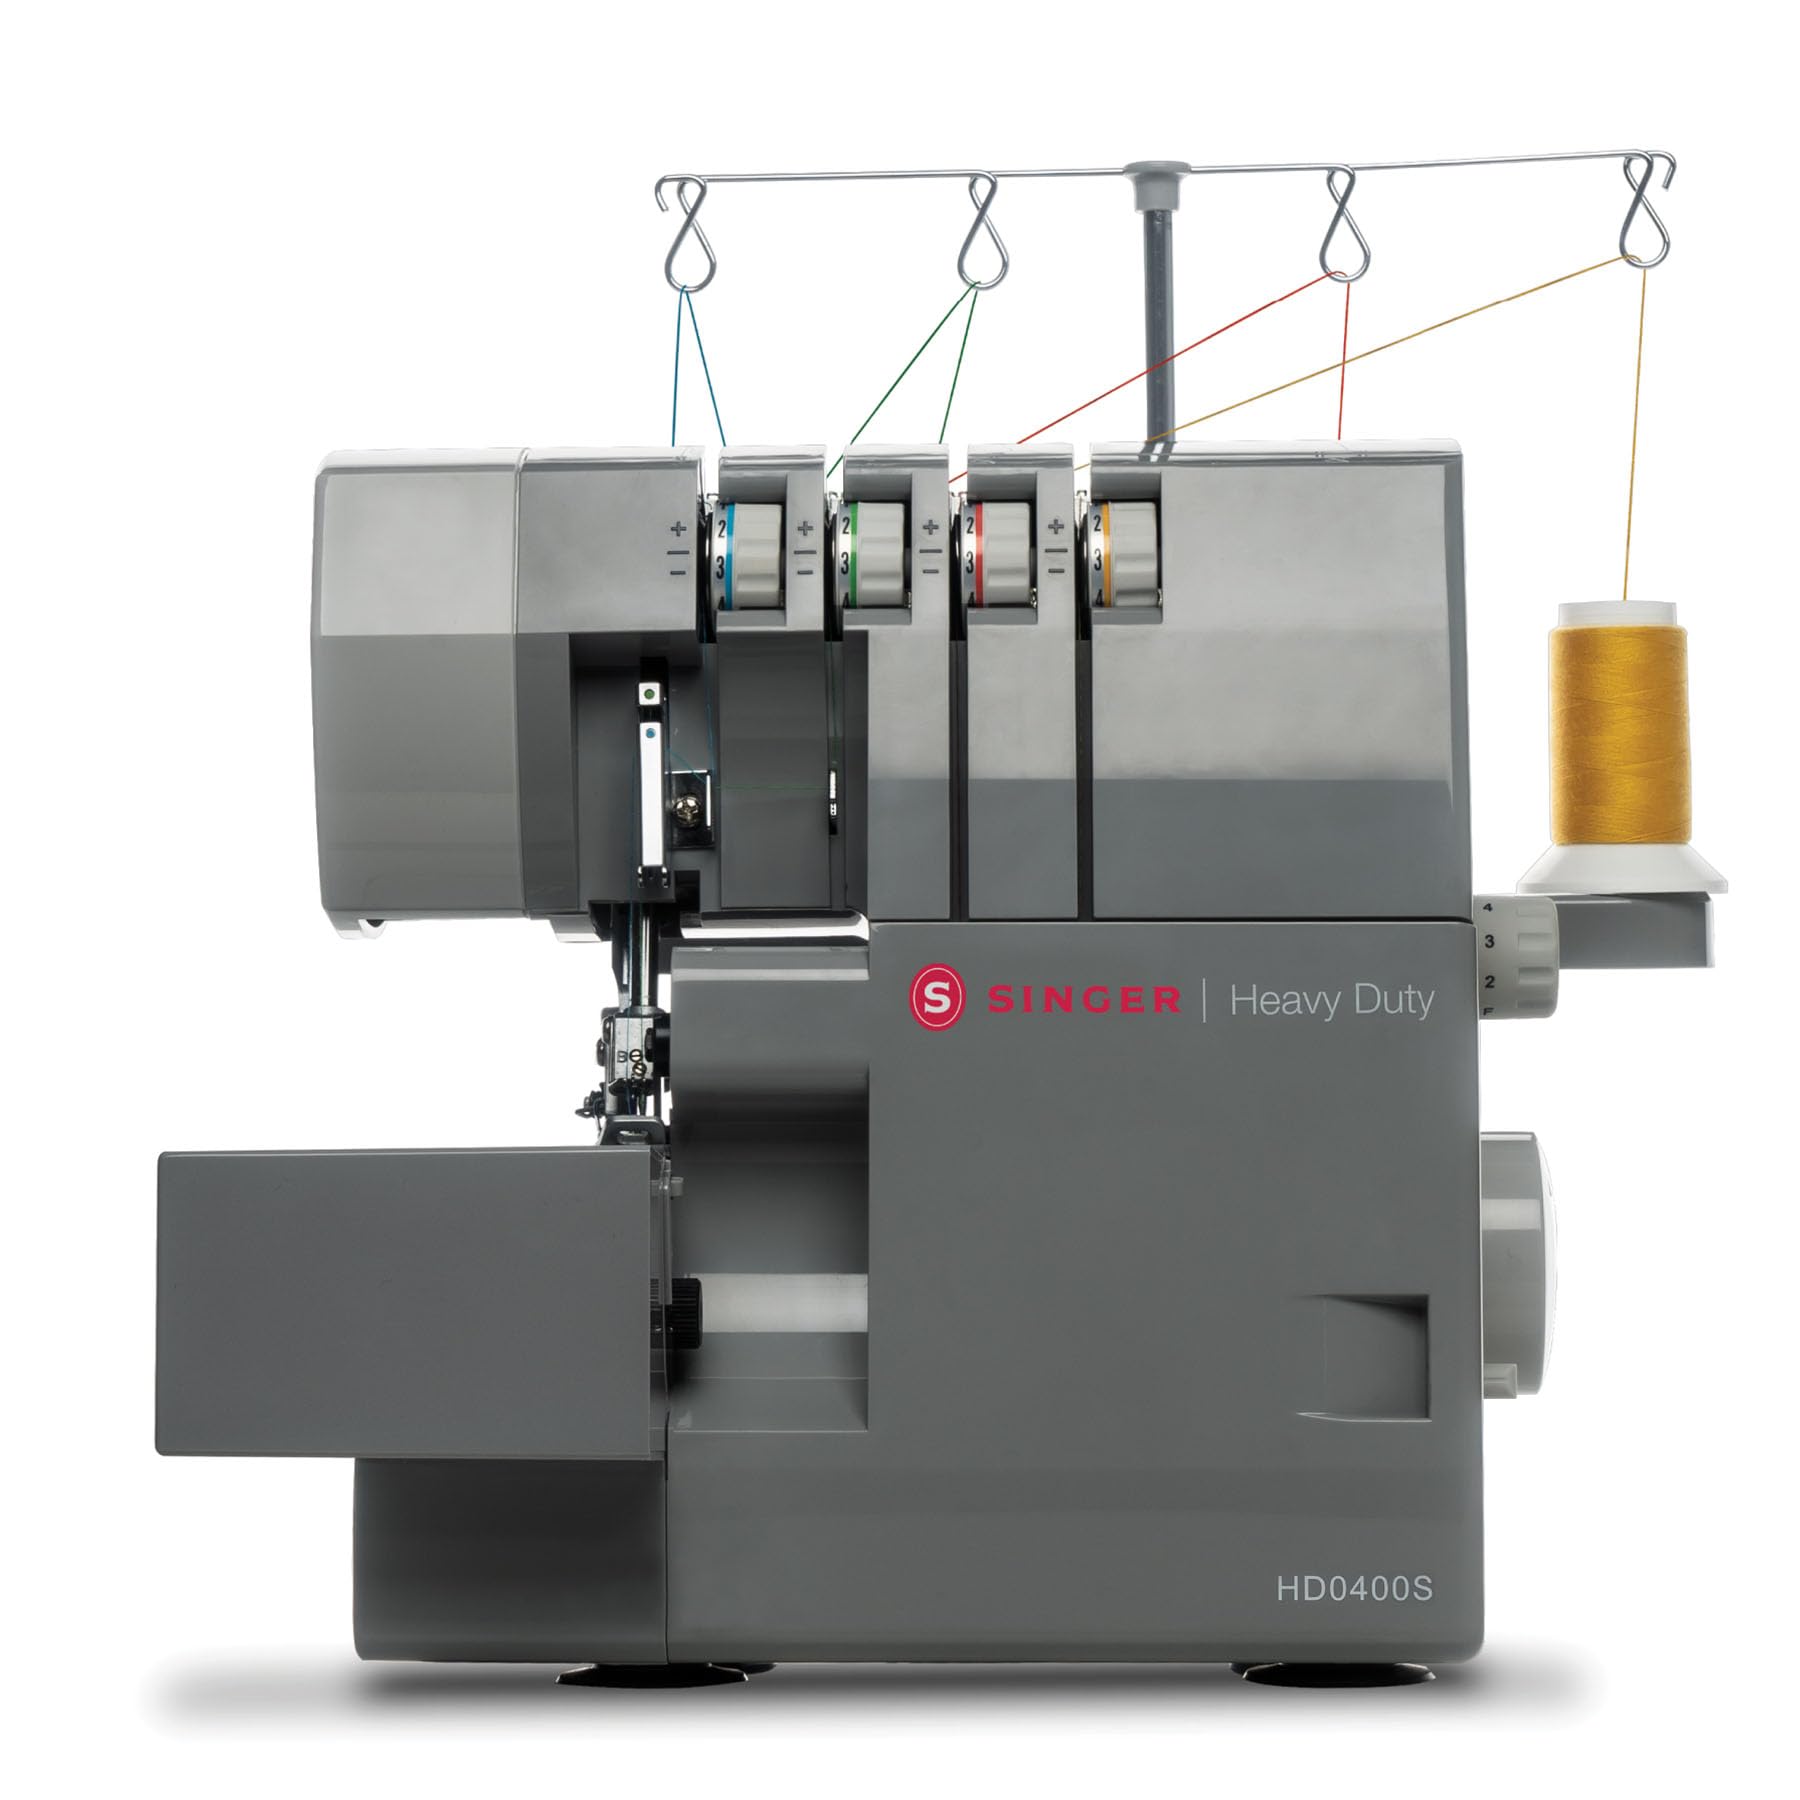
פיגורע 1: The SINGER HD0400S Heavy Duty Overlock Serger Sewing Machine, showcasinג זײַן ראָבוסט דיזײַן.
This manual provides instructions for setting up, operating, and maintaining your SINGER HD0400S serger to ensure optimal performance and longevity.
2. וויכטיק סאַפעטי אינסטרוקציעס
Before using the SINGER HD0400S serger, please read all instructions. Keep this manual for future reference.
- שטענדיק ארויסנעמען די מאַשין פון דער עלעקטרישער אַוטלעט גלייך נאָך באַניץ און איידער איר רייניגט, אַראָפּנעמט דעקל, אדער מאַכט קיין באַניצער סערוויס אַדזשאַסטמאַנץ.
- Do not allow children to operate the machine without supervision.
- ניצן דעם אַפּפּליאַנסע בלויז פֿאַר זייַן בדעה נוצן ווי דיסקרייבד אין דעם מאַנואַל.
- Never operate the machine if it has a damaged cord or plug, if it is not working properly, or if it has been dropped or damaged.
- Keep fingers away from all moving parts. Special care is required around the serger needles and cutting knife.
- שטענדיק נוצן די געהעריק נאָדל טעלער. די אומרעכט טעלער קענען אָנמאַכן די נאָדל צו ברעכן.
- ציט אדער שטופט נישט דעם שטאָף בשעתן נייען. דאָס קען אָפּדרייען די נאָדל און מאַכן אַז זי זאָל צעברעכן.
- Turn the serger off when making any adjustments in the needle area, such as threading the needle, changing the needle, or changing the presser foot.
3. Machine Components and Included Accessories
3.1 מאַשין איבערview
Familiarize yourself with the main parts of your SINGER HD0400S serger.

פיגורע 2: איבערview of the SINGER HD0400S serger with key components labeled, including tension indicators, stitch length display, and differential feed adjustment.
- Right Needle Thread Tension Selector (Green): Adjusts tension for the right needle thread.
- Left Needle Thread Tension Display (Blue): Displays tension for the left needle thread.
- Upper Looper Thread Tension Indicator (Orange): Indicates tension for the upper looper thread.
- Lower Looper Thread Tension Indicator (Yellow): Indicates tension for the lower looper thread.
- Stitch Length Display: Shows the current stitch length setting.
- Differential Feed Adjustment Lever/Button: Controls the differential feed ratio.
- Cloth Plate: The working surface where fabric is placed.
3.2 אַרייַנגערעכנט אַקסעססאָריעס
The following accessories are included with your SINGER HD0400S serger:
- 4 Thread Spool Holders
- All-Purpose Foot
- לינט בראַש
- נעעדלעס
- Scrap Bag
- שרויפנ - ציער
- Spare Lower Knife
- ספּרעדער
- סטאָרידזש אָפּטייל
- פּינצעט
4. סעטאַפּ
4.1 אַנפּאַקינג און פּלייסמאַנט
- Carefully remove the serger from its packaging.
- שטעלן די מאַשין אויף אַ סטאַביל, פלאַך ייבערפלאַך.
- Ensure there is adequate space around the machine for fabric handling and accessory storage.
- פֿאַרבינדט דעם עלעקטרישן שנור צו דער מאַשין און דערנאָך צו אַ פּאַסיקן עלעקטרישן ווענטיל.
4.2 אויספֿעדמען די מאַשין
The SINGER HD0400S features a color-coded threading system and on-machine diagrams to simplify the threading process.

פיגורע 3: The color-coded threading paths on the SINGER HD0400S serger, designed for ease of use.
- Raise the presser foot and turn the handwheel towards you to raise the needles to their highest position.
- Follow the color-coded guides on the machine for each thread (blue for left needle, green for right needle, orange for upper looper, yellow for lower looper).
- Use the included tweezers to assist with guiding threads through small openings.
- Ensure all threads are correctly seated in their tension discs and guides.
Refer to the detailed threading diagrams printed on the machine for precise instructions.
5. אַפּערייטינג ינסטרוקטיאָנס
5.1 Basic Operation and Stitch Options
The HD0400S offers 2, 3, or 4 thread stitch options for various professional finishes.

פיגורע 4: Key operational features of the SINGER HD0400S, including high-speed stitching, the larger cutting knife, and versatile thread capacity.
- Stitching Speed: The machine operates at up to 1,300 stitches per minute, allowing for efficient completion of projects.
- 2/3/4 Thread Capability: Select the appropriate number of threads for your desired stitch type (e.g., 4-thread overlock for strong seams, 3-thread for general finishing, 2-thread for delicate rolled hems).
- שטאָך לענג אַדזשאַסטמאַנט: Use the stitch length dial to set the desired stitch length for your fabric and project.
5.2 Differential Feed Control
The differential feed system controls the movement ratio between the front and back sections of the feed teeth. This feature is crucial for managing various fabric types.

פיגורע 5: A hand adjusting the differential feed dial, which helps prevent fabric stretching or puckering.
- Preventing Puckering: For lightweight or stretchy fabrics, adjust the differential feed to a higher ratio (e.g., above 1.0) to prevent puckering.
- Preventing Stretching: For knit fabrics or bias-cut materials, adjust to a lower ratio (e.g., below 1.0) to prevent stretching.
- Even Stitching: For most woven fabrics, a 1:1 ratio (1.0) is suitable for even stitching.
5.3 Built-in Rolled Hem
The HD0400S features a built-in rolled hem plate, allowing for quick conversion to rolled hem stitching without changing the stitch plate.
- Locate the lever for the rolled hem conversion.
- Flip the lever to engage the rolled hem setting.
- Adjust tension settings as recommended for rolled hems (refer to the full user manual for specific tension guidelines).
5.4 Free Arm Design
The free arm design facilitates sewing tubular items such as cuffs, sleeves, and small openings.
- Remove the accessory storage compartment to expose the free arm.
- Slide the tubular fabric item onto the free arm.
- Proceed with stitching, ensuring the fabric moves smoothly around the free arm.
5.5 Dual LED Lighting
Two integrated LED lights illuminate the work area, reducing shadows and improving visibility, especially when working with dark fabrics or in low-light conditions.

פיגורע 6: A user operating the SINGER HD0400S, demonstrating the illuminated work area provided by the dual LED lights.
6. וישאַלט
Regular maintenance ensures the smooth operation and longevity of your serger.
6.1 רייניקונג
- מאַכט אַוועק: שטענדיק אויסלעשן און ארויסנעמען די מאשין פון עלעקטרישן פלאטפארמע איידער איר רייניגט.
- Remove Lint: Use the included lint brush to remove lint and thread scraps from the feed dogs, looper area, and under the needle plate.
- Scrap Bag: Regularly empty the scrap bag to prevent accumulation of fabric trimmings.
- עקסטעריאָר רייניקונג: ווישט די אויסערליכע ייבערפלאַכן מיט אַ ווייכן, טרוקענעם שטאָף. ניצט נישט קיין שטרענגע כעמיקאַלן אדער שרײַבנדיקע רייניקונגסמיטלען.
6.2 Replacing the Lower Knife
The serger includes a spare lower knife. Replace the knife when it becomes dull to ensure clean fabric cuts.
- זיכערקייַט ערשטער: מאַכן זיכער אַז די מאַשין איז אַנפּלאַגד.
- Access Knife: Open the front cover to access the lower knife.
- אַראָפּנעמען אַלט מעסער: Use the screwdriver to loosen the screw holding the lower knife in place and carefully remove it.
- אינסטאַלירן נייַ מעסער: Insert the spare lower knife, ensuring it is correctly positioned, and tighten the screw securely.
- טעסט: Close the cover and perform a test stitch on scrap fabric to verify proper cutting.
7. טראָובלעשאָאָטינג
די סעקציע באהאנדלט אלגעמיינע פראבלעמען וואס איר קענט באגעגענען. פאר מער דעטאלירטע פראבלעם לייזונג, זעט די פולשטענדיגע באנוצער מאנואל.
| פּראָבלעם | מעגלעך סיבה | לייזונג |
|---|---|---|
| סקיפּט סטיטשיז | פאַלשע נאָדל, געבויגענע נאָדל, נישט ריכטיקע פֿעדעם, נישט ריכטיקע שפּאַנונג. | Replace needle with correct type/size, re-thread machine carefully, adjust tension settings. |
| פאָדעם ברייקידזש | High tension, poor quality thread, burrs on thread path, incorrect threading. | Reduce tension, use quality thread, check thread path for obstructions, re-thread. |
| Fabric Puckering/Stretching | Incorrect differential feed setting. | Adjust differential feed ratio according to fabric type (see Section 5.2). |
| מאַשין ניט סטאַרטינג | Power cord not connected, power switch off, safety features engaged. | Check power connections, ensure switch is on, verify all covers are closed. |
8. ספּעסאַפאַקיישאַנז
| שטריך | דעטאַל |
|---|---|
| סאָרט | זינגער |
| מאָדעל נומער | HD0400S |
| קאָליר | גרוי |
| מאַטעריאַל | Metal (Heavy Duty Frame) |
| פּראָדוקט דימענשאַנז (ד רענטגענ וו רענטגענ ה) | 14"ד רענטגענ 11"וו רענטגענ 11.5"ה |
| מאַכט מקור | עלעקטריק |
| Stitch Options | 2/3/4 Thread |
| Stitches Per Minute (SPM) | אַרויף צו 1300 |
| קאַטינג מעסער | 60% Larger than standard models |
| דיפערענטשאַל פיטער | אַדזשאַסטאַבאַל |
| ראָולד צוים | געבויט-אין פּלאַטע |
| אָרעם טיפּ | Free אַרם |
| לייטינג | צווייענדיק געפירט לייץ |
| פּאָרטאַביליטי | געבויט-אין פירן שעפּן |
| GTIN (UPC) | 037431887269 |
9. וואָראַנטי און שטיצן
For detailed warranty information, please refer to the official SINGER warranty documentation included with your purchase.
For comprehensive instructions, advanced techniques, and further troubleshooting, please download the complete User Manual (PDF) from the official SINGER website or via the link provided during purchase.
דאַונלאָוד באַניצער מאַנואַל (PDF)
For customer support, visit the official SINGER webפּלאַץ אָדער קאָנטאַקט זייער קונה סערוויס אָפּטיילונג.