
1. הקדמה
This manual provides essential information for the installation, operation, and maintenance of your DEUSES replacement carburetor. This carburetor is designed for specific Robin 49CC brush cutter and trimmer models, including NB411, CG411, BG411, and EC04, serving as a direct replacement for part number 5416040000. Please read this manual thoroughly before attempting any installation or maintenance to ensure proper function and safety.
2. זיכערקייַט אינפֿאָרמאַציע
ווארענונג:
- Always wear appropriate personal protective equipment (PPE), such as gloves and eye protection, when working with fuel systems and engine components.
- Ensure the engine is turned off and cooled down before performing any installation, maintenance, or inspection.
- ארבעט אין א גוט-ווענטילירטע געגנט צו פארמיידן אריינאטעמען ברענשטאָף פארע.
- Keep open flames, sparks, and other ignition sources away from fuel and fuel system components.
- Handle fuel with extreme care. Fuel is highly flammable and can cause serious injury or death.
- אויב איר זענט נישט זיכער וועגן קיין שריט, קאָנסולטירט אַ קוואַליפֿיצירטן טעכניקער.
3. פּעקל אינהאַלט
באַשטעטיקן אַז אַלע זאכן זענען דאָרט און נישט געשעדיגט ווען איר עפֿנט דעם פּעקל.
- 1 x DEUSES Carburetor (Replacement for Robin NB411, CG411, BG411, EC04)

בילד 3.1: זייַט view of the DEUSES Carburetor, showing the main body and throttle linkage.
4. סעטאַפּ און ייַנמאָנטירונג
This carburetor is a direct replacement part. Installation typically involves removing the old carburetor and installing the new one. Refer to your specific brush cutter or trimmer's service manual for detailed instructions on removing and installing engine components.
פארלאנגט מכשירים (ניט אַרייַנגערעכנט):
- שרויפנ - ציער (Phillips און Flathead)
- Wrenches or sockets (appropriate sizes for your engine)
- צוואַנג
- ברענוואַרג ליניע קלamps or plugs
- ריין בעבעכעס
ינסטאַלירונג סטעפּס:
- צוגרייטן דעם מאָטאָר: זיכער מאַכן אַז דער מאָטאָר איז אויסגעלאָשן און קיל. אָפּשטעקן דעם צינדקער דראָט צו פאַרמייַדן אַקסידענטאַל אָנצינדונג.
- אויסלאָזן ברענשטאָף: If necessary, drain the fuel tank or clamp the fuel lines to prevent fuel leakage during removal.
- אַראָפּנעמען לופט פילטער אַסעמבלי: Carefully remove the air filter housing and air filter to access the carburetor.
- Disconnect Linkages and Lines:
- Disconnect the throttle cable from the carburetor.
- Disconnect the choke linkage (if applicable).
- Carefully detach all fuel lines (inlet and return) from the carburetor. Note their positions for reinstallation.
- אַראָפּנעמען אַלטן קאַרבוראַטאָר: Unscrew the mounting bolts or nuts that secure the carburetor to the engine intake manifold. Carefully remove the old carburetor, ensuring any gaskets are also removed.
- דורכקוקן און ריין: Inspect the intake manifold and surrounding areas for debris. Clean as necessary. Ensure new gaskets (if required and not included with the carburetor) are ready.
- אינסטאַלירן אַ נייעם קאַרבוראַטאָר:
- Place new gaskets (if applicable) onto the intake manifold.
- Position the new DEUSES carburetor onto the mounting studs/bolts.
- Secure the carburetor with the mounting bolts/nuts. Tighten evenly to prevent air leaks, but do not overtighten.
- Reconnect Linkages and Lines:
- Reconnect the fuel lines to their correct ports on the new carburetor. Ensure connections are secure.
- Reconnect the throttle cable and choke linkage. Verify smooth operation of both.
- Reinstall Air Filter Assembly: Reattach the air filter and its housing.
- צוריקבינדן צינדקער: ריקאַנעקט די אָנצינדן צאַפּן דראָט.
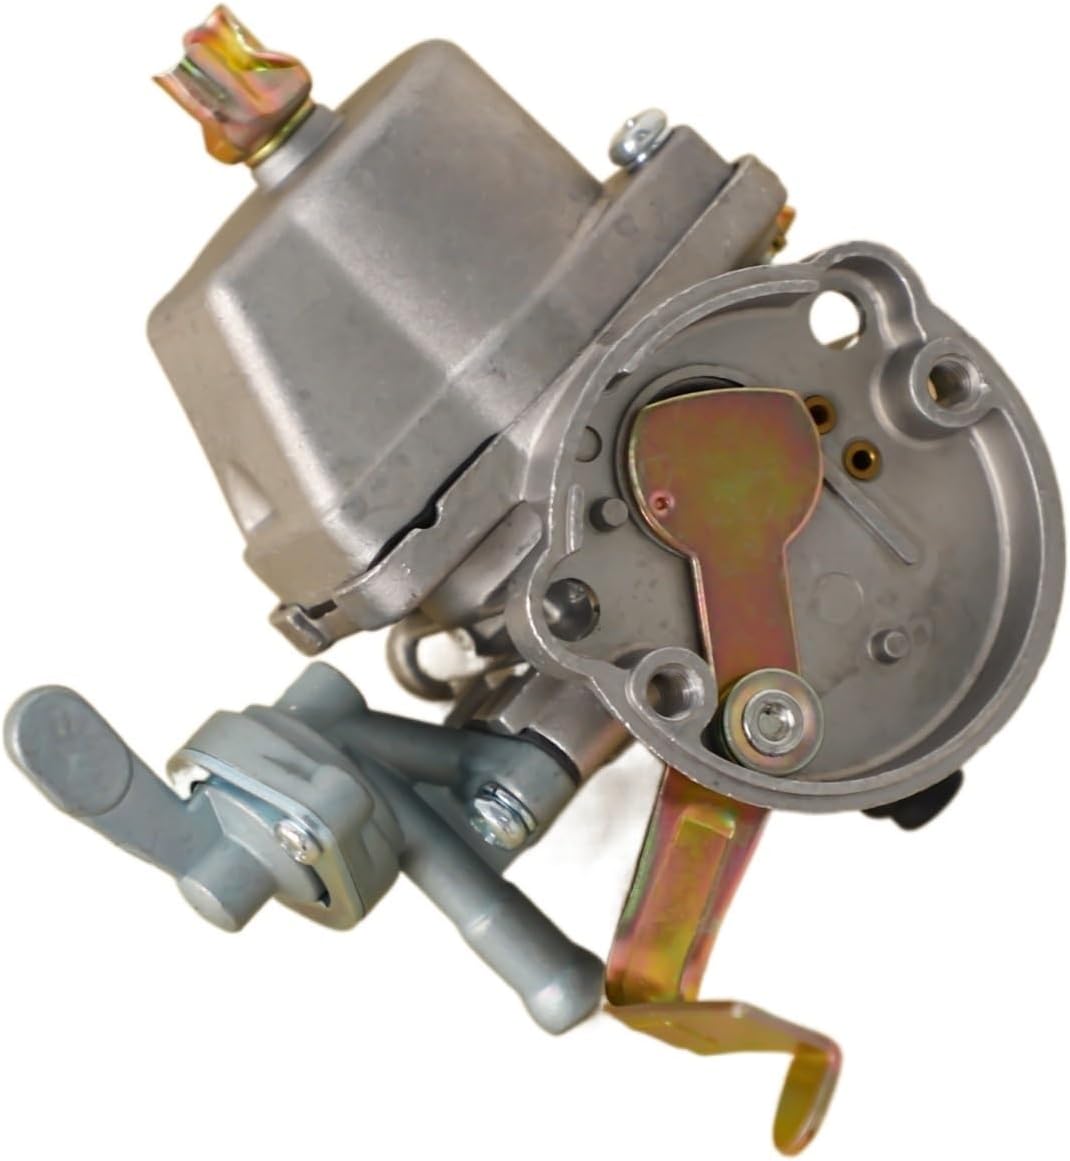
בילד 4.1: אַנגגאַלד view of the carburetor, highlighting the fuel inlet and adjustment screws (if present).

בילד 4.2: Top view of the carburetor, showing the choke lever and air intake.
5. Operating Instructions (Post-Installation)
After installing the new carburetor, perform the following checks before starting the engine:
- ברענשטאָף קאָנטראָל: Ensure the fuel tank contains the correct fuel/oil mixture as specified by your engine manufacturer. Check for any fuel leaks around the carburetor and fuel lines.
- Throttle and Choke: Verify that the throttle and choke levers move freely and return to their proper positions.
- ערשט אָנהייב:
- Set the choke to the "START" or "CLOSED" position.
- Prime the carburetor if your engine has a primer bulb, until fuel is visible.
- Pull the starter cord according to your engine's starting procedure.
- Once the engine fires or attempts to start, move the choke to the "RUN" or "OPEN" position.
- Continue pulling the starter cord until the engine runs smoothly.
- ליידיק אַדזשאַסטמאַנט: Allow the engine to warm up for a few minutes. If the idle speed is too high or too low, locate the idle adjustment screw on the carburetor (refer to your engine's manual for exact location) and adjust it until the engine idles smoothly without stalling.
- פאָרשטעלונג קאָנטראָל: Test the engine under light load to ensure proper acceleration and power delivery.
6. וישאַלט
Regular maintenance of your carburetor and associated fuel system components will ensure optimal engine performance and longevity.
- לופט פילטער: Regularly inspect and clean or replace the air filter. A clogged air filter can restrict airflow to the carburetor, leading to poor engine performance.
- ברענוואַרג פילטער: Check and replace the in-tank fuel filter periodically. A dirty fuel filter can restrict fuel flow and cause carburetor issues.
- ברענשטאָף ליניעס: Inspect fuel lines for cracks, leaks, or hardening. Replace damaged fuel lines immediately.
- Carburetor Cleaning: If the engine experiences performance issues due to fuel contamination, the carburetor may need cleaning. This typically involves disassembling the carburetor, cleaning jets and passages with carburetor cleaner, and replacing gaskets. This procedure should only be performed by individuals with mechanical experience.
- ברענוואַרג קוואַליטעט: Always use fresh, clean fuel mixed with the correct ratio of 2-stroke oil (if applicable to your engine). Stale or contaminated fuel is a common cause of carburetor problems.
7. טראָובלעשאָאָטינג
אויב איר טרעפט פּראָבלעמען נאָך דעם אינסטאַלירן דעם נייעם קאַרבוראַטאָר, באַטראַכט די פאלגענדע געוויינטלעכע פּראָבלעמען און לייזונגען:
| פּראָבלעם | מעגלעך סיבה | לייזונג |
|---|---|---|
| מאָטאָר וועט נישט אָנהייבן | No fuel reaching carburetor; clogged fuel filter; incorrect choke setting; spark plug issue. | Check fuel lines and filter for blockages. Ensure choke is set correctly. Verify spark plug is clean and firing. |
| מאָטאָר הייבט זיך אָן אָבער שטאַרבט | Idle speed too low; air leak around carburetor; fuel delivery issue. | Adjust idle screw. Check carburetor mounting bolts for tightness. Inspect fuel lines. |
| Engine runs rough or lacks power | Clogged air filter; dirty carburetor jets; incorrect fuel mixture; exhaust blockage. | Clean or replace air filter. Clean carburetor jets (professional service recommended). Ensure correct fuel/oil mix. Check exhaust for blockages. |
| ברענשטאָף ליקס | Loose fuel line connections; damaged fuel lines; faulty carburetor gasket. | ציען אָן ברענשטאָף ליניע clamps. Replace damaged fuel lines. Inspect and replace carburetor gaskets if necessary. |
If troubleshooting steps do not resolve the issue, it is recommended to consult a qualified small engine mechanic.
8. ספּעסאַפאַקיישאַנז
- פּראָדוקט טיפּ: Replacement Carburetor
- סאָרט: DEUSES
- מאָדעל קאַמפּאַטאַבילאַטי: Robin NB411, CG411, BG411, EC04
- מאָטאָר דיספּלייסמאַנט: 49CC
- ערזעצט טייל נומער: 5416040000
- מאַטעריאַל: מעטאַל
- קאָליר: זילבער
- נומער וואָג: 1 גראַמז
- איינהייט ציילן: 1.0 גראף
9. וואָראַנטי און שטיצן
For information regarding warranty coverage and customer support, please refer to the seller or manufacturer's official documentation provided at the time of purchase. Keep your proof of purchase for any warranty claims.