
SeeYing HP-H0056
SeeYing בלועטוט טורנטייבל באַניצער מאַנואַל
מאָדעל: HP-H0056
1. וויכטיק סאַפעטי אינסטרוקציעס
Please read these instructions carefully before using the product and retain them for future reference. Adhere to all warnings and follow all instructions.
- דו זאלסט נישט נוצן דעם אַפּאַראַט לעבן וואַסער.
- ריין בלויז מיט אַ טרוקן שטאָף.
- בלאָקירט נישט קיין ווענטילאַציע עפענונגען. אינסטאַלירט לויט די אינסטרוקציעס פונעם פאַבריקאַנט.
- דו זאלסט נישט ינסטאַלירן לעבן קיין היץ קוואלן אַזאַ ווי ראַדיאַטאָרס, היץ רעדזשיסטערז, סטאָוווז אָדער אנדערע אַפּאַראַט (אַרייַנגערעכנט ampליפיערס) וואָס פּראָדוצירן היץ.
- באַשיצן די מאַכט שנור פון גיין אויף אָדער פּינטשט, ספּעציעל אין די פּלאַגז, קאַנוויניאַנס רעסאַפּיז און די פונט ווו זיי אַרויסגיין פון די אַפּאַראַט.
- נאָר נוצן אַטאַטשמאַנץ / אַקסעסעריז ספּעסיפיעד דורך דער פאַבריקאַנט.
- אָפּשטויסן דעם אַפּאַראַט בעשאַס בליץ סטאָרמז אָדער ווען אַניוזד פֿאַר לאַנג פּיריאַדז.
2. פּראָדוקט איבערview
The SeeYing Bluetooth Turntable is designed for high-fidelity vinyl playback with modern connectivity options. It features a belt-drive system, adjustable counterweight, and a high-quality magnetic cartridge for precise tracking.
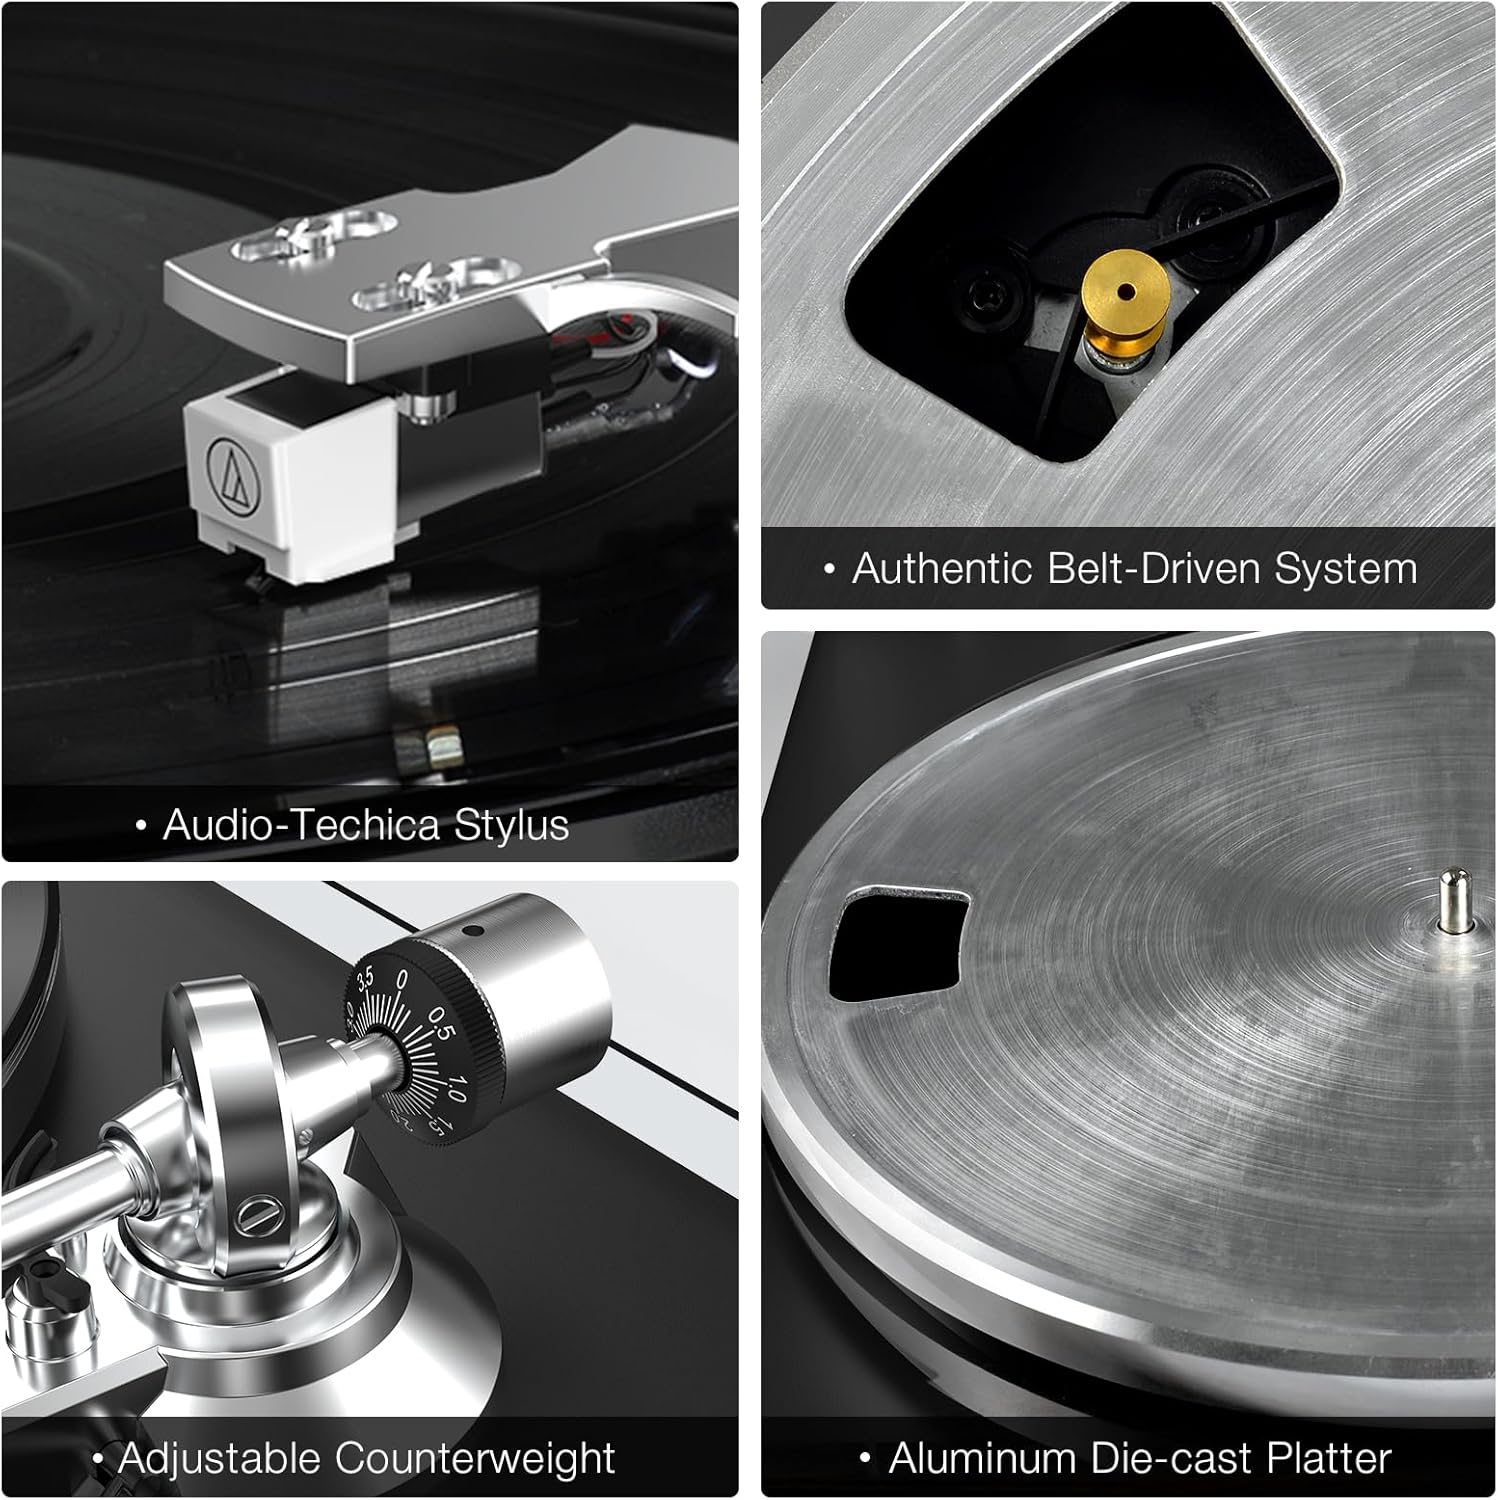
שליסל קאַמפּאָונאַנץ: This image displays the Audio-Technica stylus, the authentic belt-driven system, the adjustable counterweight, and the aluminum die-cast platter, highlighting the precision engineering of the turntable.

דערציען פּאַנעל קאַנעקשאַנז: This diagram illustrates the various input and output ports on the rear of the turntable, including the ground connector, phono/line-out jacks, phono/line-out switch, USB port for PC link, 12V DC adapter jacks, and wireless output connectivity indicator.
3. סעטאַפּ גייד
Follow these steps to set up your SeeYing Turntable for the first time.
- אויספּאַקן: נעמט פֿאָרזיכטיק אַרויס אַלע קאָמפּאָנענטן פֿון דער פּאַקאַדזשינג. מאַכט זיכער אַז אַלע טיילן וואָס זענען אויסגערעכנט אין דער פּאַקינג־ליסטע זענען פֿאַראַן.
- Platter and Belt Installation:
Place the aluminum platter onto the spindle. Locate the drive belt and carefully stretch it around the motor pulley and the inner rim of the platter. Ensure the belt is not twisted.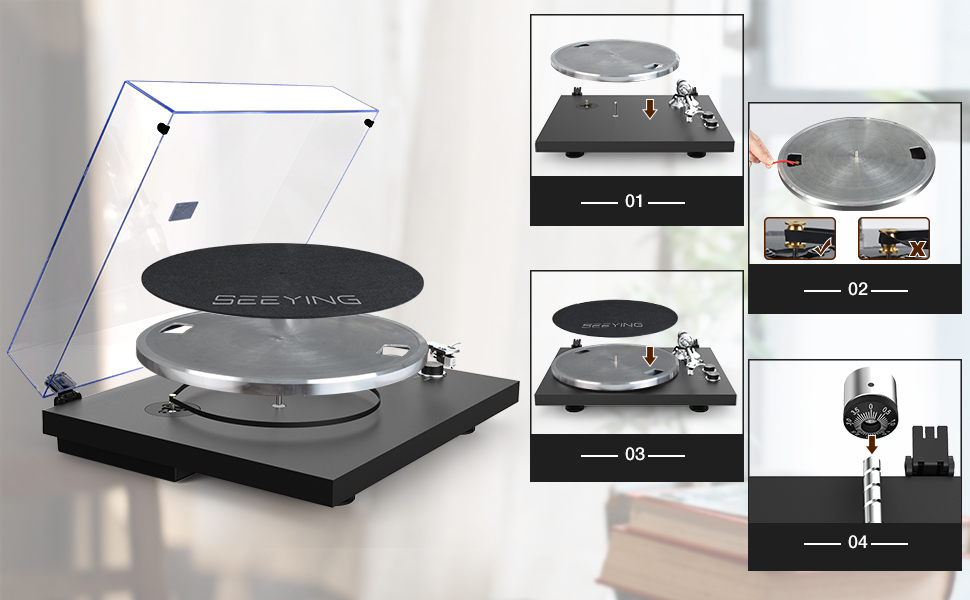
סעטאַפּ סטעפּס: This image provides a visual guide for the initial setup, including placing the platter, installing the belt, and adjusting the counterweight.
- Counterweight Adjustment: Slide the counterweight onto the rear of the tonearm. Rotate the counterweight until the tonearm is balanced and floats freely. Then, adjust the tracking force according to your cartridge's specifications (typically 1.5-2.5 grams for the included cartridge).
- שטויב דעקל אינסטאַלאַציע: Attach the dust cover hinges to the designated slots on the turntable base.
- מאַכט קשר: Connect the provided power adapter to the 'DC IN 12V' port on the rear of the turntable and plug it into a wall outlet.
4. אַפּערייטינג ינסטרוקטיאָנס
Learn how to play records and utilize the turntable's features.
4.1 שפּילן אַ פּלאַטע
- שטעלן אַ רעקאָרד אויף די טאַץ.
- Select the appropriate speed (33 or 45 RPM) using the speed button. For 7-inch records, use the 45 RPM setting. For 12-inch records, use the 33 RPM setting.

קאָנטראָל קנעפּלעך: This image highlights the 33 & 45 speed selection button and the Start & Stop button for easy operation.
- הייבט אויף דעם טאָנאַרם מיטן קיוינג לעווער.
- באַוועגט דעם טאָנאַרם איבער דער געוואונטשענער אָנהייב רינע פון דער פּלאַטע.
- Gently lower the tonearm using the cueing lever. The record will begin to play.
- To stop playback, lift the tonearm using the cueing lever and return it to the tonearm rest.
4.2 בלועטאָאָטה פּערינג
The turntable can wirelessly connect to Bluetooth speakers or headphones.
- Ensure your Bluetooth speaker/headphones are in pairing mode.
- Turn on the turntable. It will automatically search for and attempt to pair with nearby Bluetooth devices.
- Once connected, the Bluetooth indicator light on the turntable will illuminate steadily. Audio will now be streamed wirelessly.

ווירעלעסס קאַנעקטיוויטי: This image demonstrates the turntable's ability to connect wirelessly to Bluetooth speakers, providing a convenient audio experience.
4.3 RCA אויסגאַנג קאַנעקשאַן
For wired connections to external amplifiers or powered speakers, use the RCA output.
- Connect the RCA cables (red for right, white for left) from the turntable's RCA output jacks to the corresponding input jacks on your ampליפיער אָדער פּאַוערד ספּיקערז.
- Set the PHONO/LINE switch on the rear of the turntable to the appropriate setting (PHONO if connecting to a phono input on an amplifier, LINE if connecting to a line-level input or powered speakers).

RCA רעזולטאַט: This image illustrates the use of RCA output to connect the turntable to external speakers for enhanced sound quality.
4.4 USB to PC Recording
גער דיין וויינאַל רעקאָרדס צו דיגיטאַל אַודיאָ fileס אויף דיין קאָמפּיוטער.
- Connect the turntable to your computer using a USB cable (not always included, check 'Included Components').
- Install appropriate audio recording software on your computer (e.g., Audacity).
- Follow the software's instructions to record the audio playback from the turntable.
5. וישאַלט
Proper maintenance ensures the longevity and performance of your turntable.
5.1 רייניקן דעם דריי־טיש
- Wipe the dust cover and cabinet with a soft, dry cloth.
- For the stylus, use a soft brush and brush gently from back to front.
- ויסמיידן ניצן האַרב קעמיקאַלז אָדער אַברייסיוו קלינערז.
5.2 Stylus Replacement
The stylus (needle) should be replaced after approximately 300-500 hours of playback to maintain sound quality and prevent record wear.
- Carefully grasp the stylus housing and pull it downwards and forwards to remove it from the cartridge.
- Insert the new stylus by pushing it upwards and backwards into the cartridge until it clicks into place.
- Ensure the new stylus is securely seated.

Detachable Stylus: This image shows the detachable high-end AT3600L stylus, emphasizing its precision tracking and ease of replacement.
6. טראָובלעשאָאָטינג
If you encounter issues with your turntable, refer to the following common problems and solutions.
| פּראָבלעם | מעגלעך סיבה | לייזונג |
|---|---|---|
| קיין מאַכט | Power adapter not connected; Power outlet not active | Ensure power adapter is securely connected; Try a different power outlet. |
| ניט געזונט אָדער נידעריק באַנד | אומרעכטע איינגאַבע אויסוואַל אויף amplifier; RCA cables loose; PHONO/LINE switch incorrect; Bluetooth not paired | Select correct input on amplifier; Check RCA cable connections; Set PHONO/LINE switch correctly; Re-pair Bluetooth device. |
| Sound distorted or skipping | Stylus dirty or worn; Tracking force incorrect; Record dirty or damaged | Clean or replace stylus; Adjust counterweight/tracking force; Clean record or try a different one. |
| טעלער דרייט זיך נישט | Drive belt dislodged or broken; Motor issue | Check and re-seat drive belt; Contact customer support if motor issue suspected. |
7. ספּעסאַפאַקיישאַנז
| שטריך | דעטאַל |
|---|---|
| סאָרט | SeeYing |
| מאָדעל נאָמען | SeeYing (HP-H0056) |
| קאַנעקטיוויטי טעכנאָלאָגיע | בלועטאָאָטה |
| מאַקסימום ראָוטיישאַנאַל גיכקייַט | 45 Revolutions Per Minute (supports 33 1/3 RPM) |
| אַרייַנגערעכנט קאַמפּאָונאַנץ | USB Conversion, RCA Cable |
| ספּעציעלע פֿעיִקייטן | ינטעגראַטעד פּרעamplifier, Adjustable Speed |
| מאַטעריאַל | אַלומינום |
| קאָליר | שוואַרץ |
| קאַמפּאַטאַבאַל דעוויסעס | Bluetooth speakers, Bluetooth headphones, Computers, Active speakers with RCA input, USB-compatible devices (e.g., smartphone, tablet) |
| פּראָדוקט גרייס (אומגעפער) | 48.9 X 42.29 X 19.8 סענטימעטער |
| פּראָדוקט וואָג (בעערעך) | 6.14 קילאָגראַמס |
8. וואָראַנטי און שטיצן
SeeYing is committed to product quality and customer satisfaction. While specific warranty terms are not detailed here, the manufacturer provides excellent 1-to-1 after-sales support for all customers.
For any inquiries or support needs, please contact SeeYing customer service through your purchase platform or the official SeeYing webפּלאַץ.
Ask a question about this manual
Ask about setup, troubleshooting, compatibility, parts, safety, or missing instructions. Manuals+ will review the question and use this page’s manual context to help answer it.