
1. הקדמה
Thank you for choosing the Crivit Auriol Radio-Controlled Projection Alarm Clock. This device combines a precise radio-controlled clock with a clear LCD display, dual alarms, and a convenient projection feature. This manual will guide you through the setup, operation, and maintenance of your new alarm clock.

פראָנט view of the alarm clock displaying time, date, and temperature.
2. זיכערקייַט אינסטרוקציעס
- לייענען אַלע ינסטראַקשאַנז קערפאַלי איידער נוצן און האַלטן זיי פֿאַר צוקונפֿט דערמאָנען.
- שטעלט נישט אויס דעם אפאראט צו עקסטרעמע טעמפעראטורן, דירעקטע זונשייַן, אדער הויכע הומידיטי.
- ויסמיידן דראַפּינג אָדער אונטערטעניק די מיטל צו שטאַרק ימפּאַקץ.
- פּרוּווט נישט צו צענעמען אָדער פאַרריכטן דעם אַפּאַראַט אַליין. קאָנטאַקט קוואַליפֿיצירטע סערוויס פּערסאָנעל.
- האַלט באַטעריעס אַוועק פון קינדער. וואַרפט אַוועק גענוצטע באַטעריעס לויט די לאָקאַלע רעגולאַציעס.
- Use only the provided AC adapter or one with identical specifications.
3. פּעקל אינהאַלט
ביטע טשעק די פּאַקעט פֿאַר די פאלגענדע זאכן:
- Crivit Auriol Radio-Controlled Projection Alarm Clock (Model 373928)
- אַק מאַכט אַדאַפּטער
- Batteries (pre-installed or separate)
- באַניצער מאַנואַל (דעם דאָקומענט)

Included AC power adapter.
4. פּראָדוקט פֿעיִקייטן
- Radio-Controlled Time: Automatic time synchronization for precise timekeeping.
- פּרויעקציע פֿונקציע: Projects time, alarm times, or ambient temperature onto a wall or ceiling.
- Pivoting Projection Arm: Adjustable projection angle with easy focus adjustment.
- LCD ווייַז: Clear screen showing time, day, month, week number/day of the week, and indoor temperature.
- צוויי אַלאַרמס: Two independent alarm settings with snooze function.
- ריר סענסאָר: Activates short-term projection and screen backlight.
- מאַכט אָפּציעס: Operates via AC adapter or batteries.
- USB-A טשאַרדזשינג פּאָרט: Convenient 5V, 800mA output for charging external devices.
- אַדזשאַסטאַבאַל ברייטנאַס: Customizable display brightness.
5. קאָמפּאָנענט לעגיטימאַציע
פראָנט View:
פראָנט view with LCD display.
- LCD ווייַז: Shows time, date, temperature, alarm status, and radio control signal.
- ריר סענסאר שטח: Located above the display, for temporary backlight and projection.
- Projection Indicator: Icon indicating projection is active.
- שרעק ינדיקאַטאָרס: Icons for Alarm 1 and Alarm 2.
- ראָוטיישאַן קנעפּל: Adjusts projection orientation.
זייַט View (Projection Arm):
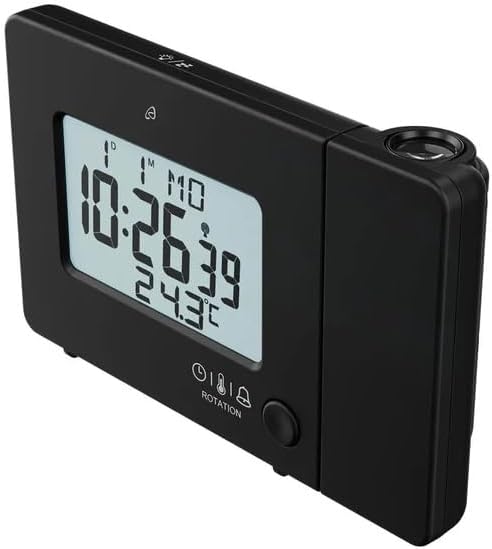
זייַט view with projection arm extended.
- פּרויעקציע אָרעם: Pivots to direct the projection.
- פאָקוס ראָד: אַדזשאַסטירט די קלאַרקייט פון די פּראַיעקטירטע בילד.
- פּרויעקציע לענס: Emits the time/temperature display.
דערציען View:

דערציען view with control buttons and ports.
- -/WEEK Button: Decreases values, sets week display.
- +/ZONE Button: Increases values, sets time zone.
- °C/°F קנעפּל: Toggles temperature unit.
- LANG Button: Selects display language for day of the week.
- 12/24 קנעפּל: Toggles 12/24 hour format.
- מאָדע קנעפּל: Cycles through settings modes (Time, Alarm 1, Alarm 2).
- SET קנעפּל: Enters setting mode for current display.
- RESET קנעפּל: Resets the device to factory defaults (use a pointed object).
- באַטערי אָפּטייל: For backup batteries.
- DC אין פּאָרט: פֿאַר פֿאַרבינדן דעם AC מאַכט אַדאַפּטער.
- USB-A רעזולטאַט פּאָרט: פֿאַר טשאַרדזשינג עקסטערנע דעוויסעס.
6. סעטאַפּ
6.1. פּאַוערינג אויף
The alarm clock can be powered by either the included AC adapter or batteries for backup.
- ייַנמאָנטירונג פון באַטאַרייע: Open the battery compartment on the rear of the unit. Insert the included batteries, observing the correct polarity (+/-). Batteries primarily serve as backup in case of power outage.
- אַק אַדאַפּטער קאַנעקשאַן: Connect the small plug of the AC adapter into the DC IN port on the back of the alarm clock. Plug the AC adapter into a standard wall outlet. The display will light up.
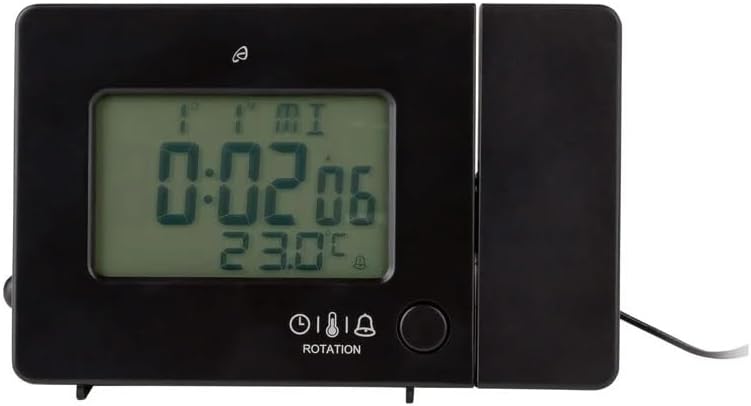
Alarm clock connected to power.
6.2. Initial Setup and Radio Control Synchronization
Upon first power-up or after a reset, the clock will automatically attempt to synchronize with the radio-controlled time signal (DCF77). This process can take several minutes to an hour, depending on your location and signal strength. During synchronization, a radio tower icon will flash on the display.
- Place the clock near a window for better signal reception.
- Avoid placing it near electronic devices that may cause interference.
- Once synchronized, the radio tower icon will appear solid on the display.
If the radio signal is not received, you may need to set the time manually (see Section 7.1).
6.3. Basic Settings (if not automatically set or for adjustment)
דרוק די שטעלן button to enter setting mode. Use the -/WEEK און +/ZONE buttons to adjust values, and שטעלן צו באַשטעטיקן און מאַך צו די ווייַטער באַשטעטיקן.
- צייט זאָנע: Adjust if you are not in the standard time zone for the radio signal.
- 12/24 שעה פֿאָרמאַט: דרוק די 12/24 button to toggle between 12-hour (with AM/PM) and 24-hour formats.
- טעמפּעראַטור אַפּאַראַט: דרוק די ° C / ° F קנעפּל צו באַשטימען צווישן סעלסיוס און פאַהרענהעיט.
- ווייַז שפּראַך: דרוק די LANG button to select the language for the day of the week display (5 languages available).
7. אַפּערייטינג ינסטרוקטיאָנס
7.1. באַשטעטיקן צייט מאַניואַלי
If the radio-controlled time signal is weak or unavailable, you can set the time manually:
- דריקן און האַלטן די שטעלן קנעפּל ביז די שעה ציפערן בליצן.
- ניצן די -/WEEK און +/ZONE קנעפּלעך צו סטרויערן די שעה.
- דרוק שטעלן to confirm and move to minutes, then year, month, and day.
- דרוק שטעלן again to exit manual time setting.
7.2. שטעלן אַלאַרמס (אַלאַרם 1 און אַלאַרם 2)
די זייגער פֿאַרמאָגט צוויי אומאָפּהענגיקע אַלאַרמס.
- דרוק די מאָדע button once to display Alarm 1 time, or twice for Alarm 2 time. The corresponding alarm icon (e.g., A1) will flash.
- While the alarm time is displayed, press and hold the שטעלן קנעפּל ביז די שעה ציפערן בליצן.
- ניצן די -/WEEK און +/ZONE קנעפּלעך צו סטרויערן די שעה.
- דרוק שטעלן to confirm and move to minutes. Adjust minutes using -/WEEK און +/ZONE.
- דרוק שטעלן נאכאמאל צו באשטעטיגן און ארויסגיין פון דעם אלארם סעטטינג.
- צו אַקטיווירן/דעאַקטיווירן אַן אַלאַרם, דריק די מאָדע button to display the desired alarm, then press the +/ZONE button. The alarm icon (bell) will appear/disappear on the display.
7.3. שלאָף פונקציע
When an alarm sounds, touch the ריר סענסאָר שטח אָדער דריקן די SNOOZE / LIGHT button (if available, otherwise use the touch sensor) to activate the snooze function. The alarm will pause for approximately 5 minutes and then sound again. To stop the alarm completely, press any other button.
7.4. פּראָיעקציע פֿונקציע
The alarm clock can project the time, alarm times, or ambient temperature onto a wall or ceiling.
- אַקטיווירן פּראָיעקציע: The projection is continuously active when powered by the AC adapter. If running on batteries, touch the ריר סענסאָר שטח for short-term projection.
- סטרויערן פּרויעקציע ווינקל: Pivot the projection arm to direct the image to your desired location.
- סטרויערן פאָקוס: ניצן די פאָקוס וויל on the projection arm to sharpen the projected image.
- Change Projected Content: דרוק די מאָדע button repeatedly to cycle through projecting Time, Alarm 1, Alarm 2, or Temperature.
- דרייען פּרויעקציע: דרוק די ראָוטיישאַן button to rotate the projected image by 90-degree increments (4 orientations available).

Time projected onto a surface.
7.5. ווייַז באַקלייט
When powered by the AC adapter, the display backlight is continuously on. When running on batteries, touch the ריר סענסאָר שטח to activate the backlight for a few seconds.
7.6. USB Charging Output
The USB-A port on the back of the unit provides a 5V, 800mA output for charging small electronic devices like smartphones or tablets. Connect your device's USB charging cable to this port.
8. וישאַלט
- רייניקונג: ווישט אָפּ דאָס אַפּאַראַט מיט אַ ווייכן, טרוקענעם שטאָף. ניצט נישט קיין שרײַבנדיקע רייניגערס אָדער סאָלווענטן.
- באַטערי פאַרבייַט: If using batteries for backup, replace them annually or when the display becomes dim during power outagזיכער מאַכן די ריכטיקע פּאָלאַריטעט.
- סטאָרידזש: אויב איר לייגט אַוועק דאָס אַפּאַראַט פֿאַר אַ לענגערע צײַט, נעמט אַרויס די באַטעריעס כּדי צו פֿאַרמײַדן ליקאַדזש.
9. טראָובלעשאָאָטינג
| פּראָבלעם | מעגלעך סיבה | לייזונג |
|---|---|---|
| דער עקראַן איז ליידיק אָדער טונקל. | No power, dead batteries, or AC adapter not connected. | Ensure AC adapter is securely connected. Replace batteries if using for backup. |
| ראַדיאָ-קאָנטראָלירטע צייט סינקראָניזירט זיך נישט. | Weak signal, interference, or incorrect time zone. | Move the clock to a window or open area. Avoid electronic devices. Manually set time if necessary. Check time zone setting. |
| די פּראָיעקציע איז פֿאַרשוואָמען. | פאָקוס נישט אַדזשאַסטיד. | סטרויערן די פאָקוס וויל on the projection arm. |
| דער אַלאַרם קלינגט נישט. | אַלאַרם נישט אַקטיוויזירט אָדער פאַלש געשטעלט. | Ensure the alarm icon is visible on the display. Recheck alarm time settings. |
| USB טשאַרדזשינג אַרבעט נישט. | Device not properly connected, or device requires more power than 800mA. | Ensure the USB cable is securely connected. Check if your device's charging requirements exceed 5V/800mA. |
10. ספּעסאַפאַקיישאַנז

פּראָדוקט דימענסיעס.
- מאָדעל נומער: 373928
- דימענשאַנז (L x W x H): 15 x 3.81 x 9.5 cm (approx. 15l x 9.5H centimeters)
- מאַטעריאַל: פּלאַסטיק
- ווייַז טיפּ: דיגיטאַל לקד
- מאַכט מקור: AC Adapter (included) or Batteries (included)
- USB רעזולטאַט: 5 וו, 800 מאַ
- ספּעציעלע פֿעיִקייטן: Adjustable brightness, Snooze, Projection, Radio-controlled time
- באַוועגונג טיפּ: קוואַרץ
- מאַונטינג טיפּ: טאַבלעטאָפּ
- דרינענדיק/דרויסנדיק נוצן: דרינענדיק
11. וואָראַנטי און שטיצן
This Crivit Auriol Projection Alarm Clock comes with a standard manufacturer's warranty. Please refer to the warranty card included in your package or contact your retailer for specific warranty terms and conditions.
For technical support or inquiries, please contact the customer service department of your retailer or the Crivit support line as indicated on the product packaging or official webפּלאַץ.