
AVARRO 0E-HDMIMX4
AVARRO 0E-HDMIMX4 HDMI סוויטשער באַניצער מאַנואַל
Model: 0E-HDMIMX4
1. הקדמה
The AVARRO 0E-HDMIMX4 is a high-performance 4x4 HDMI matrix switcher designed to route any of four HDMI input sources to any of four HDMI output displays. It supports 4K Ultra HD resolutions, HDCP 2.2, and advanced features like Smart EDID Management and a built-in 4K-1080P downscaler. This manual provides detailed instructions for installation, operation, and troubleshooting to ensure optimal performance of your device.
2. זיכערקייַט אינפֿאָרמאַציע
- לייענען אַלע ינסטראַקשאַנז קערפאַלי איידער אַפּערייטינג די מיטל.
- Do not expose this unit to rain, moisture, or excessive humidity.
- Do not place any objects filled with liquids on the unit.
- דו זאלסט נישט פאַרשפּאַרן ווענטאַליישאַן אָופּאַנינגז.
- ניצן בלויז די צוגעשטעלט מאַכט אַדאַפּטער.
- פרובירט נישט צו סערוויסן דעם אַפּאַראַט אליין. לאָזט איבער אַלע סערוויסינג צו קוואַליפֿיצירטע פּערסאָנעל.
- Ensure proper grounding for all connected equipment.
3. פּעקל אינהאַלט
Verify that all items are present before installation:
- AVARRO 0E-HDMIMX4 HDMI Switcher Unit
- IR רימאָוט קאָנטראָל
- דק 12 וו מאַכט אַדאַפּטער
- באַניצער מאַנואַל (דעם דאָקומענט)
- Mounting Brackets (if applicable, not explicitly mentioned but common for such devices)
4. פּראָדוקט איבערview
4.1 פראָנט פּאַנעל

בילד: פראָנט view of the AVARRO 0E-HDMIMX4 HDMI Switcher, showing the IR receiver and output selector buttons.
- IR ופנעמער: Receives signals from the IR remote control.
- Output Selectors (1-4): Buttons to select the input source for each corresponding HDMI output. Each output has its own set of source selection buttons (1, 2, 3, 4).
- LED ינדיקאַטאָרס: Indicate the currently selected input for each output.
4.2 דערציען פּאַנעל
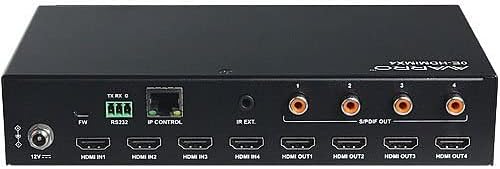
בילד: הינטערשטע view of the AVARRO 0E-HDMIMX4 HDMI Switcher, displaying all input/output ports and control interfaces.
- DC 12V אין: מאַכט אַרייַנשרייַב פּאָרט.
- FW (Micro USB): Micro-USB port for firmware upgrades.
- רס 232: Serial port for control via RS232 commands.
- IP CONTROL (RJ45): Ethernet port for network control and Web UI אַקסעס.
- IR עקסט: Port for connecting an external IR receiver.
- HDMI IN (1-4): HDMI input ports for connecting source devices (e.g., Blu-ray player, game console).
- HDMI OUT (1-4): HDMI output ports for connecting display devices (e.g., TV, projector).
- S/PDIF OUT (1-4): Digital audio output ports for each HDMI output, supporting PCM 2.0/5.1, Dolby Digital, and DTS up to 5.1 Channel.
5. סעטאַפּ און קאַנעקשאַן
- Power Off All Devices: Before making any connections, ensure all source devices, displays, and the switcher are powered off.
- פאַרבינדן HDMI קוואלן: Connect your HDMI source devices (e.g., media players, gaming consoles) to the HDMI IN 1-4 ports on the switcher using high-quality HDMI cables.
- פֿאַרבינדן HDMI דיספּלייז: Connect your HDMI display devices (e.g., TVs, projectors) to the HDMI OUT 1-4 ports on the switcher using high-quality HDMI cables.
- Connect Audio Outputs (Optional): If desired, connect external audio systems to the S/PDIF OUT ports for digital audio extraction.
- פֿאַרבינדן נעץ (אָפּציאָנאַל): For IP control and Web UI access, connect an Ethernet cable from your network router/switch to the IP CONTROL (RJ45) port.
- פאַרבינדן מאַכט: Connect the provided DC 12V power adapter to the DC 12V IN port on the switcher, then plug the adapter into a power outlet.
- מאַכט אויף דיווייסאַז: Power on the switcher, then your display devices, and finally your source devices.
באַמערקונג: For optimal performance with 4K content, use certified High-Speed HDMI cables.
6. אַפּערייטינג ינסטרוקטיאָנס
6.1 Front Panel Control
To switch an input source for a specific output:
- Locate the "SELECTOR" buttons for the desired OUTPUT (1-4).
- Press the corresponding "SOURCE" button (1, 2, 3, or 4) below the "SELECTOR" button to route the desired input to that output. The LED indicator will illuminate to show the active input.
6.2 יר רימאָוט קאָנטראָל
The included IR remote control allows for convenient switching from a distance. Point the remote towards the IR receiver on the front panel of the switcher.
- איינגאַבע קנעפּלעך (1-4): סעלעקץ די אַרייַנשרייַב מקור.
- Output Buttons (A-D or 1-4): Selects the output to control.
- מאַטריץ סוויטשינג: Typically, you would press an Output button, then an Input button to route that input to the selected output. Refer to the remote's specific layout for exact button functions.
6.3 Web UI קאָנטראָל
די Web UI provides a graphical interface for advanced control and configuration.
- Ensure the switcher is connected to your network via the IP CONTROL port.
- Obtain the IP address of the switcher (refer to network settings or device documentation for default IP or discovery method).
- עפענען א web בלעטערער אויף אַ קאָמפּיוטער קאָננעקטעד צו דער זעלביקער נעץ.
- Enter the switcher's IP address into the browser's address bar.
- Log in using the default credentials (if prompted, refer to device documentation for default username/password).
- ניצן די Web UI to manage input/output routing, EDID settings, and other advanced features.
6.4 רס232 קאָנטראָל
The RS232 port allows for integration with control systems using serial commands. Refer to the detailed RS232 command set documentation (usually available from the manufacturer's website) for specific protocols and commands.
7. Smart EDID Management
The 0E-HDMIMX4 features Smart EDID Management to ensure compatibility between source devices and displays. EDID (Extended Display Identification Data) communicates display capabilities to the source. The switcher can automatically manage EDID or allow manual configuration via the Web UI to optimize video and audio formats for connected devices.
8. Firmware אַפּגריידינג
Firmware updates can improve performance, add new features, or resolve issues. The 0E-HDMIMX4 supports firmware upgrading via both the Micro-USB port and the Web וי.
- מיקראָ-וסב: Connect a computer to the FW (Micro USB) port and use the manufacturer's provided upgrade tool.
- Web וי: אַקסעס די Web UI and navigate to the firmware upgrade section.
Always download the latest firmware and instructions from the official AVARRO website before attempting an upgrade.
9. ספּעסאַפאַקיישאַנז
| שטריך | דעטאַל |
|---|---|
| מאָדעל | 0E-HDMIMX4 |
| ינפּוץ | 4 x HDMI ין |
| אַוטפּוץ | 4 x HDMI OUT, 4 x S/PDIF OUT (Digital) |
| קאָנטראָל פּאָרץ | 1 x RS232, 1 x IP CONTROL (RJ45), 1 x FW (Micro USB) |
| HDMI העסקעם | 4K Ultra HD, HDCP 2.2 compliant |
| ווידעא האַכלאָטע שטיצן | VESA: 800x600 to 1920x1200; SMPTE: 720x576P to 4096x2160 |
| HDR שטיצן | HDR 10, HLG, DOLBY VISION up to 4K60 444 |
| דאַונסקאַלער | Built-in 4K-1080P downscaler |
| מאַקסימום דאַטע קורס | 18 גבפּס |
| מאַקסימום פּיקסעל זייגער | 600 מהז |
| אַודיאָ פֿאָרמאַטירונגען (HDMI) | PCM 2.0/5.1/7.1, Dolby TrueHD, Dolby Atmos, DTS HD Master Audio, DTS:X |
| Audio Formats (S/PDIF) | PCM 2.0/5.1, Dolby Digital, DTS up to 5.1 Channel |
| ESD פּראַטעקשאַן | ±8kV (לופט-גאַפּ אָפּזאָגן) / ±4kV (קאָנטאַקט אָפּזאָגן) |
| סערדזש פּראַטעקשאַן | Voltage: ±1 Kv |
| מאַכט צושטעלן | דק 12וו 2אַ |
| מאַכט קאַנסאַמשאַן (מאַקס) | 10.8 וו |
| אַפּאַראַט גרייס (L x B x H) | 8.46 "רענטגענ 4.73" רענטגענ 1.65 "(21.49 סענטימעטער רענטגענ 12.01 סענטימעטער רענטגענ 4.19 סענטימעטער) |
| פּראָדוקט וואָג | 1.19 לבס (0.54 קג) |
10. טראָובלעשאָאָטינג
אויב איר טרעפט פּראָבלעמען, ביטע זעט די פאלגענדע געוויינטלעכע פּראָבלעמען און לייזונגען:
- קיין ווידעא/אודיאָ אויסגאַנג:
- זיכער מאַכן אַז אַלע HDMI קייבאַלז זענען זיכער פארבונדן.
- Verify the power adapter is correctly connected and the unit is powered on.
- Check that the correct input source is selected for the desired output.
- Test with different HDMI cables.
- Bypass the switcher to confirm source and display functionality.
- Check EDID settings, especially with mixed resolution displays.
- Intermittent Signal/Flickering:
- Use high-quality, certified HDMI cables, especially for longer runs or 4K content.
- Ensure cables are not excessively bent or damaged.
- Check for potential electromagnetic interference from other devices.
- רימאָוט קאָנטראָל נישט ארבעטן:
- Ensure there are no obstructions between the remote and the switcher's IR receiver.
- פאַרבייַטן די ווייַט קאָנטראָל באַטעריז.
- Verify the remote is pointed directly at the IR receiver.
- Web UI/IP Control Issues:
- Confirm the Ethernet cable is properly connected.
- Verify the switcher's IP address and ensure your computer is on the same network subnet.
- Check firewall settings on your computer or network.
11. וישאַלט
- רייניקונג: ניצט אַ ווייכע, טרוקענע שטאָף צו רייניקן די אויסערלעכע זייט פון דעם אַפּאַראַט. ניצט נישט קיין פליסיקע רייניקונגס-מיטלען אדער אַעראָזאָלן.
- ווענטילאַטיאָן: זיכער מאַכן אַז די ווענטילאַציע עפענונגען זענען ריין און נישט פֿאַרשטאָפּט צו פאַרמייַדן איבערהיצונג.
- סטאָרידזש: If storing the unit for an extended period, disconnect power and store in a cool, dry place.
12. וואָראַנטי און שטיצן
AVARRO products are designed for reliability and performance. For specific warranty information, please refer to the warranty card included with your product or visit the official AVARRO website. For technical support, product registration, or to download the latest drivers and firmware, please visit www.avarrus.com or contact AVARRO customer service.
Ask a question about this manual
Ask about setup, troubleshooting, compatibility, parts, safety, or missing instructions. Manuals+ will review the question and use this page’s manual context to help answer it.