
1. הקדמה
This manual provides instructions for the installation, operation, and maintenance of your NETGEAR GS305P 5-Port PoE Gigabit Ethernet Unmanaged Switch. This device is designed to expand your network connectivity with both standard Gigabit Ethernet and Power over Ethernet (PoE+) capabilities, ideal for small office or home network environments.
2. פּעקל אינהאַלט
באַשטעטיקן אַז דיין פּעקל כּולל די פאלגענדע זאכן:
- NETGEAR GS305P 5-Port PoE Gigabit Ethernet Unmanaged Switch (GS305Pv3)
- מאַכט אַדאַפּטער
- וואַללמאָונט קיט
- שנעל ייַנמאָנטירונג פירער

Image: The NETGEAR GS305P switch, power adapter, and power cord as typically found in the package.
3. פּראָדוקט איבערview
The NETGEAR GS305P is an unmanaged switch featuring 5 Gigabit Ethernet ports, with 4 of these ports supporting PoE+ (Power over Ethernet Plus). It provides a total power budget of 63W for connected PoE devices. The switch is designed for plug-and-play operation, requiring no software installation or configuration.
ווידעא: אן איבערview of the NETGEAR 5-Port PoE Switch, demonstrating its features and ease of use.
פראָנט פּאַנעל

Image: Front panel of the GS305P switch, highlighting the 5 Gigabit Ethernet ports and LED indicators for power, PoE Max, link/activity, and PoE fault.
- Power LED: ינדיקייץ מאַכט סטאַטוס.
- PoE Max LED: Illuminates when PoE power consumption is near maximum capacity.
- Link/Activity LEDs (Ports 1-5): Green for 1000Mbps link, Yellow for 10/100Mbps link. Blinks to indicate activity.
- PoE Status LEDs (Ports 1-4): Green for PoE powered, Yellow for PoE fault.
- עטהערנעט פּאָרץ (1-5): RJ-45 ports for network connections. Ports 1-4 support PoE+.
4. סעטאַפּ און ייַנמאָנטירונג
The NETGEAR GS305P switch is designed for simple plug-and-play installation. No software configuration is required.
4.1 פֿאַרבינדן דעם סוויטש
- Connect the power adapter to the switch's power input and then plug the power adapter into an electrical outlet. The Power LED on the switch will illuminate.
- Connect your router or modem to any of the 5 Gigabit Ethernet ports on the switch using an Ethernet cable.
- Connect your network devices (computers, printers, network storage) to the remaining Gigabit Ethernet ports. For PoE-powered devices (e.g., IP cameras, wireless access points), connect them to ports 1-4.

Image: A diagram illustrating the plug-and-play nature of the unmanaged switch, connecting various devices like WiFi Access Points, IP Cameras, Computers, and NAS.
4.2 מאַונטינג אָפּציעס
The GS305P switch can be placed on a desktop or mounted on a wall. A wallmount kit is included for secure installation.
- דעסקטאַפּ פּלייסמאַנט: Ensure the switch is placed on a flat, stable surface with adequate ventilation.
- וואנט בארג: Use the provided wallmount kit to secure the switch to a wall. Refer to the quick installation guide for detailed steps on wall mounting.
5. אפערירן דעם סוויטש
Once connected, the switch operates automatically. The LEDs provide visual feedback on the network status.
- מאַכט אויף: The Power LED will be green when the switch is receiving power.
- Network Activity: The Link/Activity LEDs will light up when a device is connected and blink to indicate data transmission.
- PoE מאַכט: For PoE-powered devices, the PoE Status LED will be green when power is being supplied. If a PoE fault occurs, the LED will turn yellow.
- שטיל אָפּעראַציע: The fanless design ensures quiet operation, making it suitable for noise-sensitive environments.
6. וישאַלט
To ensure optimal performance and longevity of your switch, follow these maintenance guidelines:
- רייניקונג: ניצט אַ ווייכע, טרוקענע שטאָף צו רייניקן די אויסערלעכע זייט פון דעם סוויטש. ניצט נישט קיין פליסיקע אדער אַעראָזאָל רייניגער.
- ווענטילאַטיאָן: פאַרזיכערן אַז די ווענטאַליישאַן אָופּאַנינגז זענען נישט אפגעשטעלט צו פאַרמייַדן אָוווערכיטינג.
- סוויווע: Operate the switch within its specified temperature and humidity ranges. Avoid direct sunlight or extreme temperatures.
- קאַבלע פאַרוואַלטונג: Keep network cables organized to prevent strain on ports and improve airflow.
7. טראָובלעשאָאָטינג
If you encounter issues with your NETGEAR GS305P switch, refer to the following common troubleshooting steps:
- קיין מאַכט: Ensure the power adapter is securely connected to the switch and a working electrical outlet. Check the Power LED.
- קיין לינק/אַקטיוויטעט: Verify that Ethernet cables are properly connected to both the switch and the connected device. Try a different cable or port. Check the Link/Activity LED.
- PoE דעווייס גייט נישט אן: Ensure the device is PoE-compatible and connected to one of the PoE+ ports (1-4). Check the PoE Status LED for the port; a yellow light indicates a fault. Verify the total power budget (63W) is not exceeded by all connected PoE devices.
- לאַנגזאַמע נעץ גיכקייט: Ensure all connected devices and cables support Gigabit Ethernet for optimal performance. Check for excessive network traffic.
8. ספּעסאַפאַקיישאַנז
Key technical specifications for the NETGEAR GS305P switch:
| שטריך | באַשרייַבונג |
|---|---|
| מאָדעל | GS305P (GS305Pv3) |
| נומער פון פּאָרץ | 5 גיגאַביט עטהערנעט פּאָרץ |
| PoE + פּאָרץ | 4 (פּאָרטן 1-4) |
| גאַנץ פּאָע מאַכט בודזשעט | 63 וו |
| דאַטאַ אַריבערפירן קורס | 1000 מעגאַביט פּער סעקונדע (גיגאַביט) |
| באַשטימען טיפּ | אַנמאַנידזשד |
| קאַסע מאַטעריאַל | מעטאַל |
| דימענסיעס (L X W X H) | 9.5" x 6.7" x 3.4" (approximate, from product data) |
| Voltage | 240 Volts (Power adapter input) |
| אַפּערייטינג סוויווע | Designed for indoor use in U.S. & CA. |
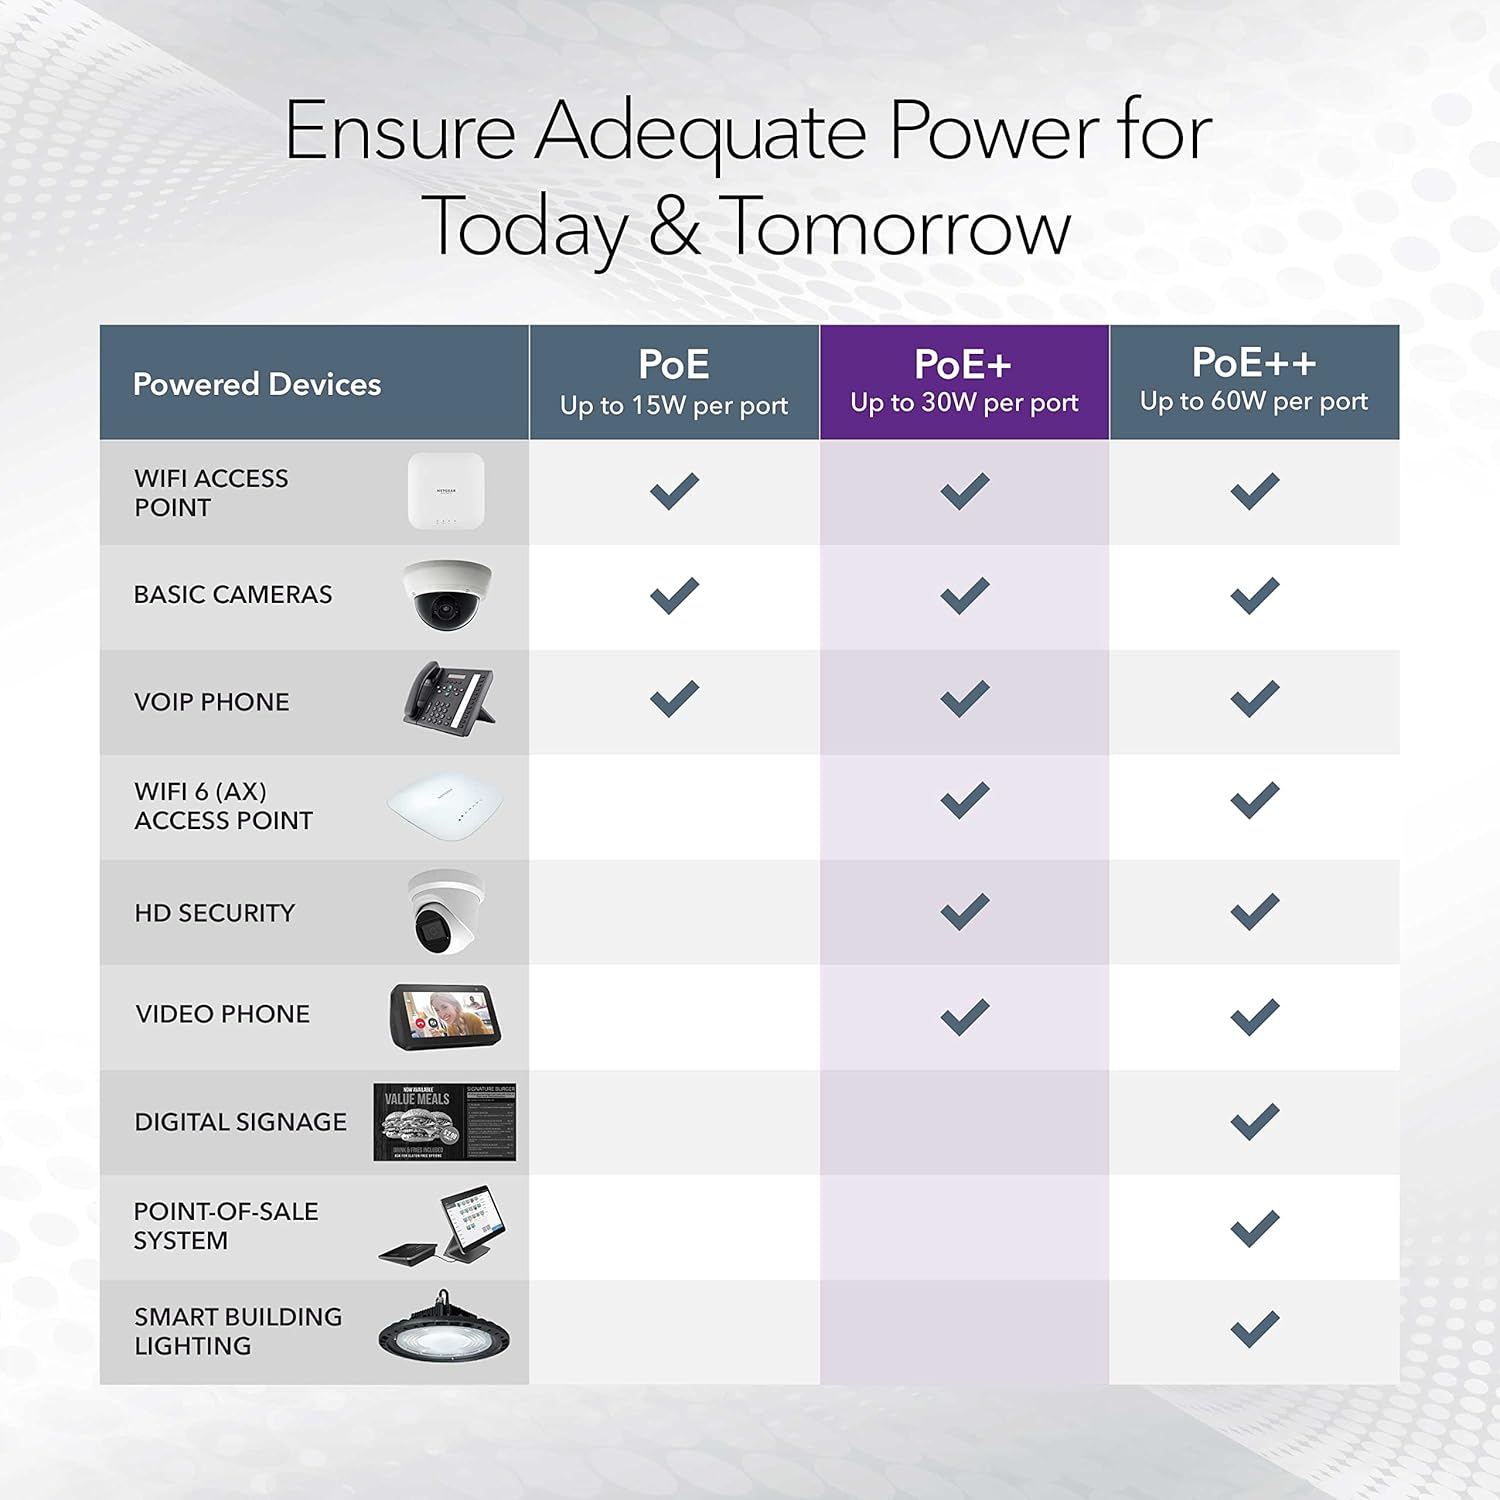
Image: A table illustrating the power capabilities of PoE, PoE+, and PoE++ for different powered devices.
9. וואָראַנטי און שטיצן
9.1 וואָראַנטי אינפֿאָרמאַציע
The NETGEAR GS305P switch comes with an industry-leading 3-יאָר לימיטעד ייַזנוואַרג וואָראַנטי. Please retain your proof of purchase for warranty claims. For full warranty terms and conditions, refer to the official NETGEAR webוועבזייטל אדער די דאקומענטאציע וואס איז אריינגערעכנט מיט אייער פראדוקט.
9.2 טעכניש שטיצן
For technical assistance, product registration, or to access additional resources, visit the official NETGEAR support website. You can find FAQs, firmware updates, and community forums there.
NETGEAR שטיצן Webפּלאַץ: www.netgear.com/support