
1. הקדמה
This manual provides detailed instructions for the setup, operation, and maintenance of your Adler AD 1196B Digital Alarm Clock. Please read this manual thoroughly before using the device to ensure proper function and longevity.
2. פּראָדוקט איבערview
2.1 שליסל פֿעיִקייטן
- Digital time display with 12/24 hour format.
- באַקלייט אַרויסווייַזן פֿאַר גרינג viewing, automatically turns off after 4 seconds.
- Three independent alarm time settings.
- Three alarm activation settings: 5 days (weekday), 6 days (weekday + Saturday), 7 days (every day).
- Displays current time, date, indoor temperature, and humidity.
- Battery-powered for portability and backup during power outages.
2.2 פּעקל אינהאַלט
- Adler AD 1196B Digital Alarm Clock Unit
- באַניצער מאַנואַל
Note: 2x AA batteries are required and not included in the package.

פיגורע 1: פראָנט view of the Adler AD 1196B Digital Alarm Clock, displaying 12:00, 26°C, 56% humidity, and the current date.
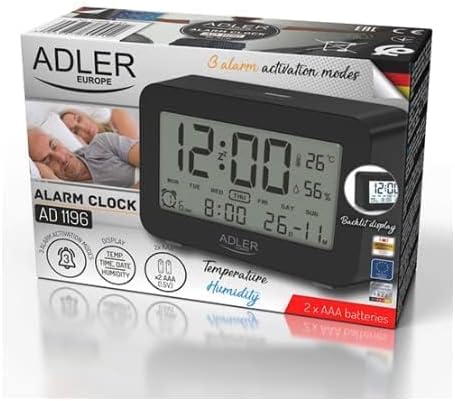
Figure 2: The Adler AD 1196B Digital Alarm Clock shown in its retail packaging, highlighting key features.
3. סעטאַפּ
3.1 באַטאַרייע ייַנמאָנטירונג
- געפינט דעם דעקל פון דעם באַטעריע אָפּטייל אויף דער צוריקזייט פון דעם וועקער זייגער.
- שלעפּט אָדער הייבט אויף דעם דעקל צו עפֿענען דעם אָפּטייל.
- אַרײַנשטעלן צוויי (2) AA באַטעריעס, און זיכער מאַכן אַז די ריכטיקע פּאָלאַריטעט (+ און -) איז אָנגעוויזן אין דעם אָפּטייל.
- פאַרבייַטן די באַטאַרייע אָפּטייל דעקן סיקיורלי.
The clock will power on automatically once batteries are inserted. The display will show default settings or begin flashing.
3.2 ערשט מאַכט אויף
Upon successful battery installation, the display will illuminate. You may need to press a button (e.g., "MODE" or "SET") to activate the display if it remains blank after battery insertion. The backlight will activate briefly and then turn off.
4. אַפּערייטינג ינסטרוקטיאָנס
Familiarize yourself with the control buttons, typically located on the back or top of the device. Common buttons include: MODE, SET, UP/+, DOWN/-, ALARM.
4.1 באַשטעטיקן די צייט
- דריקן און האַלטן די שטעלן קנעפּל (אָדער מאָדע button, depending on model) until the hour digits begin to flash.
- ניצן די UP/+ or אַראָפּ /- קנעפּלעך צו סטרויערן די שעה.
- דרוק שטעלן (אָדער מאָדע) again to move to the minute setting.
- ניצן די UP/+ or אַראָפּ /- קנעפּלעך צו סטרויערן די מינוט.
- פאָרזעצן דרינגלעך שטעלן (אָדער מאָדע) to cycle through 12/24 hour format, and then to exit time setting mode.
4.2 באַשטעטיקן דעם טאָג
- פֿון נאָרמאַלער צײַט־אַרויסווייַזונג, דריק די מאָדע button repeatedly until the date display starts flashing or you enter date setting mode.
- The year digits may flash first. Use UP/+ or אַראָפּ /- צו סטרויערן די יאָר.
- דרוק מאָדע to move to the month setting, then adjust with UP/+ or אַראָפּ /-.
- דרוק מאָדע to move to the day setting, then adjust with UP/+ or אַראָפּ /-.
- דרוק מאָדע again to confirm and exit date setting.
4.3 Setting Alarms (Alarm 1, Alarm 2, Alarm 3)
The AD 1196B features three independent alarms. The process is similar for each.
- דרוק די שרעק קנעפּל אַמאָל צו view Alarm 1. Press again for Alarm 2, and a third time for Alarm 3.
- בשעת viewing the desired alarm (e.g., AL1), press and hold the שטעלן קנעפּל ביז די אַלאַרם שעה ציפערן בליצן.
- ניצן UP/+ or אַראָפּ /- צו שטעלן די שרעק שעה.
- דרוק שטעלן to move to the alarm minute setting.
- ניצן UP/+ or אַראָפּ /- צו שטעלן די אַלאַרם מינוטן.
- דרוק שטעלן again to confirm the alarm time.
- צו אַקטיווירן/דעאַקטיווירן אַן אַלאַרם, דריק די שרעק button repeatedly until the alarm icon (e.g., bell symbol) appears or disappears next to the corresponding alarm number (AL1, AL2, AL3).
4.4 Alarm Activation Modes (5, 6, 7 Days)
After setting an alarm time, you can choose its activation frequency:
- While in alarm setting mode (after setting minutes for an alarm), press שטעלן one more time. The display will show a day indicator (e.g., "5 DAY", "6 DAY", "7 DAY").
- ניצן UP/+ or אַראָפּ /- to cycle through the options:
- 5 טאָג: דער אלארם קלינגט מאָנטיק ביז פרייטיק.
- 6 טאָג: Alarm sounds Monday to Saturday.
- 7 טאָג: דער אַלאַרם קלינגט יעדן טאָג פון דער וואָך.
- דרוק שטעלן to confirm your selection and exit alarm setting for that specific alarm.
4.5 באַקלייט פונקציע
The display features a backlight for improved visibility in low light conditions. The backlight automatically activates when a button is pressed and turns off after approximately 4 seconds to conserve battery power.
4.6 טעמפּעראַטור און הומידיטי אַרויסווייַזונג
The alarm clock continuously displays the current indoor temperature (in Celsius) and relative humidity percentage. No specific action is required to view these readings; they are shown on the main display.
5. וישאַלט
5.1 רייניקונג
To clean the alarm clock, gently wipe the surface with a soft, dry cloth. Do not use abrasive cleaners, solvents, or chemical sprays, as these may damage the display or casing.
5.2 באַטערי פאַרבייַט
When the display becomes dim or the clock functions erratically, it is time to replace the batteries. Follow the battery installation steps in Section 3.1. Always replace both batteries with new AA batteries of the same type. Dispose of old batteries responsibly according to local regulations.
6. טראָובלעשאָאָטינג
| פּראָבלעם | מעגלעך סיבה | לייזונג |
|---|---|---|
| דער עקראַן איז ליידיק אָדער טונקל. | באַטעריעס זענען נידעריק אָדער נישט ריכטיק אינסטאַלירט. | פאַרבייטן די באַטעריעס מיט נייַע AA באַטעריעס, און זאָרגט אַז די פּאָלאַריטעט איז ריכטיק. |
| דער אַלאַרם קלינגט נישט. | דער אַלאַרם איז נישט אַקטיוויזירט אָדער פאַלש געשטעלט. | Ensure the alarm icon is visible on the display. Verify the alarm time and activation mode (5, 6, or 7 days) are set correctly. |
| צייט/דאטום איז נישט ריכטיג. | Time/Date was not set or reset after battery change. | Follow instructions in Section 4.1 and 4.2 to set the correct time and date. |
| טעמפּעראַטור/פֿײַכטקייט מעסטונגען זעען אויס נישט ריכטיק. | די זייגער ווערט געשטעלט לעבן א היץ-קוואל, א ווענטיל, אדער אין דירעקטער זון. | אריבערפירן די זייגער צו א סטאַבילע סביבה ווייט פון עקסטרעמע טעמפּעראַטור אָדער הומידיטי פלוקטואַציעס. לאָזט צייט פֿאַר די לייענונגען צו סטאַביליזירן זיך. |
7. ספּעסאַפאַקיישאַנז
- מאָדעל: AD 1196B
- מאַכט מקור: 2 קס אַאַ באַטעריז (ניט אַרייַנגערעכנט)
- ווייַז טיפּ: דיגיטאַלע LCD מיט באַקלייט
- פאַנגקשאַנז: Time, Date, Day of Week, Temperature (°C), Humidity (%), 3 Alarms with 3 Activation Modes
- הינטערגרונט ליכט געדויער: בעערעך 4 סעקונדעס
- מאַטעריאַל: פּלאַסטיק
- דימענשאַנז (ב x ד x ה): 11 סענטימעטער X 3.81 סענטימעטער X 5 סענטימעטער
- וואָג: 1.6 קג
8. וואָראַנטי און שטיצן
For warranty information or technical support, please refer to the warranty card included with your product or contact the manufacturer directly. Keep your purchase receipt as proof of purchase.
Manufacturer: Adler