
1. הקדמה
This manual provides detailed instructions for the installation, operation, and maintenance of the Supermicro X13SEI-F Server Motherboard. This motherboard is designed for high-performance server applications, supporting Intel Xeon processors with an LGA4677 socket and DDR5 memory.
Please read this manual thoroughly before attempting to install or operate the motherboard to ensure proper setup and to prevent damage to the components.
2. זיכערקייַט אינפֿאָרמאַציע
Observe the following safety precautions to prevent injury and damage to the equipment:
- Always disconnect the power cord from the power supply before installing or removing any components.
- Wear an anti-static wrist strap when handling the motherboard and other components to prevent electrostatic discharge (ESD).
- Ensure the installation environment is dry and free from static electricity.
- שטעלט נישט אויס די מאַדערבאָרד צו פייכטקייט אָדער עקסטרעמע טעמפּעראַטורן.
- האַלט אָן דאָס מוטערבאָרד ביי די ברעגן כּדי נישט צו אָנרירן סענסיטיווע קאָמפּאָנענטן.
- Refer to the power supply unit's manual for specific safety guidelines related to power connections.
3. פּעקל אינהאַלט
Verify that all items are present and in good condition. If any items are damaged or missing, contact your vendor.
- Supermicro X13SEI-F Server Motherboard
- איך / אָ שילד
- SATA קייבלס (די קוואַנטיטעט קען זיין אַנדערש)
- Quick Reference Guide / User Manual (this document)
- Driver CD/DVD or USB drive (or download instructions)
4. פּראָדוקט איבערview
The Supermicro X13SEI-F is a high-performance server motherboard featuring the LGA4677 socket, designed to support Intel Xeon Scalable processors. It offers robust memory capabilities with 8 DDR5 DIMM slots, supporting up to 4800MHz memory speed. The board also includes multiple PCIe slots for expansion.
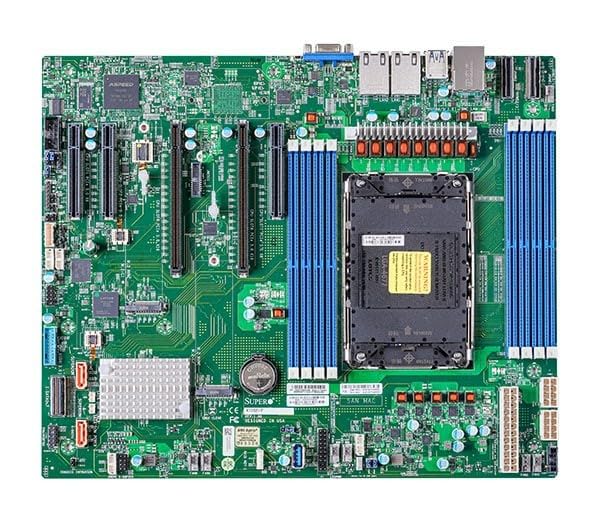
Figure 1: Supermicro X13SEI-F Server Motherboard. This image displays the overall layout of the motherboard, including the CPU socket, DIMM slots, and various connectors.
4.1 שליסל פֿעיִקייטן
- קפּו סאָקקעט: LGA4677 for Intel Xeon Scalable Processors
- טשיפּסעט: Intel C621
- זכּרון: 8x DDR5 DIMM slots, up to 4800MHz
- יקספּאַנשאַן סלאָץ: Multiple PCIe slots (specific configuration depends on model variant)
- סטאָרידזש: Support for various storage interfaces (SATA, NVMe - specific details in specifications)
- נעטוואָרקינג: Integrated LAN controllers
5. סעטאַפּ און ייַנמאָנטירונג
Before beginning installation, ensure your system case is compatible with the motherboard's form factor and that you have all necessary components.
5.1 קפּו אינסטאַלאַציע (LGA4677)
- געפינט די LGA4677 סאָקעט אויף די מאָטהערבאָאַרד.
- Carefully open the CPU socket retention mechanism according to the instructions provided with your CPU or motherboard.
- Align the CPU with the socket, ensuring the triangular mark on the CPU matches the mark on the socket. Do not force the CPU into the socket.
- לאָזט אָפּ די סי-פּי-יו לײַכט אין דער סאָקעט.
- Close the CPU socket retention mechanism until it locks securely.
- אינסטאלירט דעם סי-פי-יו קולער לויט די אינסטרוקציעס פונעם פאבריקאנט.
5.2 ראַם אינסטאַלאַציע (DDR5)
- Locate the 8 DDR5 DIMM slots on the motherboard.
- עפֿנט די ריטענשאַן קליפּס ביי ביידע ענדס פון די DIMM סלאָט.
- גלייכט אויס דעם קערב אויפן DDR5 זכּרון מאָדול מיטן שליסל אין דעם DIMM סלאָט.
- Insert the memory module firmly into the slot until the retention clips snap into place. Ensure both clips are closed.
- For optimal performance, refer to the motherboard's manual for recommended memory population order.
5.3 PCIe קאַרטל אינסטאַלאַציע
- Identify the appropriate PCIe slot for your expansion card (e.g., GPU, RAID card).
- Remove the corresponding expansion slot cover from your chassis.
- Align the PCIe card with the slot and press down firmly until it is fully seated.
- Secure the card with a screw or retention clip to the chassis.
5.4 סטאָרידזש מיטל ינסטאַלירונג
- SATA דרייווס: Connect SATA data cables from the motherboard's SATA ports to your SATA hard drives or SSDs. Connect power cables from the PSU to the drives.
- NVMe M.2 Drives: Locate the M.2 slots. Insert the M.2 drive at an angle, then push it down and secure it with the provided screw or retention mechanism.
5.5 מאַכט קאַנעקשאַנז
- פֿאַרבינדט דעם 24-פּין ATX מאַכט קאַנעקטאָר פֿון אייער מאַכט צושטעל צו דער הויפּט מאַכט סאָקעט אויף דער מוטערבאָרד.
- Connect the 8-pin (or 4+4 pin) EPS 12V CPU power connector(s) to the corresponding sockets near the CPU.
- זיכער מאַכן אַז אַלע מאַכט קאַנעקשאַנז זענען זיכער.
5.6 פראָנט פּאַנעל קאַנעקשאַנז
Connect the front panel cables (Power LED, HDD LED, Power Switch, Reset Switch, USB, Audio) from your chassis to the corresponding headers on the motherboard. Refer to the motherboard's silkscreen labels or the detailed manual for exact pin configurations.
6. אַפּערייטינג ינסטרוקטיאָנס
6.1 ערשטער שטיוול
- After completing all hardware installations, connect the monitor, keyboard, and mouse.
- Connect the power cord to the power supply and turn on the power switch on the PSU.
- דריק דעם פּאַוער קנעפּל אויף אייער שאַסי.
- The system should power on, and you should see the BIOS/UEFI POST screen.
6.2 בייאָס/UEFI סעטאַפּ
כדי אריינצוגיין אין די BIOS/UEFI סעטאַפּ יוטיליטי, דריק די DEL or F2 key repeatedly during the POST process. Within the BIOS/UEFI, you can configure:
- שטיוול סדר
- סיסטעם צייט און דאַטע
- CPU and memory settings
- Storage configurations (RAID, AHCI)
- פאָכער גיכקייַט קאָנטראָל
- זיכערהייַט סעטטינגס
Save changes before exiting the BIOS/UEFI.
6.3 אַפּערייטינג סיסטעם ינסטאַלירונג
Insert your operating system installation media (USB drive or DVD) and set it as the primary boot device in the BIOS/UEFI. Follow the on-screen instructions to install your preferred operating system. After installation, install all necessary drivers from the Supermicro website or the provided driver media.
7. וישאַלט
7.1 רייניקונג
- Regularly clean dust from the motherboard and system components using compressed air.
- זיכער מאַכן אַז די סיסטעם איז אויסגעלאָשן און נישט אַרייַנגעטראָגן פון די פלעק איידער רייניקונג.
- פֿאַרמײַדן צו ניצן פֿליסיגע רייניקונגס־מיטלען גלייך אויף קאָמפּאָנענטן.
7.2 פירמוואַרע דערהייַנטיקונגען
טשעקט פּעריִאָדיש די סופּערמיקראָ website for updated BIOS/UEFI firmware. Firmware updates can improve system stability, performance, and compatibility. Follow the specific instructions provided by Supermicro for updating the firmware to avoid system damage.
8. טראָובלעשאָאָטינג
די סעקציע גיט לייזונגען צו געוויינטלעכע פראבלעמען וואָס איר קענט באַגעגענען.
8.1 קיין מאַכט / קיין POST (אויף-אויף זעלבסט-טעסט)
- קוק די מאַכט קאַנעקשאַנז: Ensure the 24-pin ATX and 8-pin EPS 12V power connectors are securely seated.
- באַשטעטיקן PSU: Test the power supply unit (PSU) with another system or a PSU tester.
- איבערזעצן קאמפאנענטן: Reseat the CPU, RAM modules, and any expansion cards.
- קלאָר CMOS: Refer to the motherboard manual for instructions on how to clear the CMOS (Complementary Metal-Oxide-Semiconductor) settings, which can resolve boot issues.
- מינימום קאַנפיגיעריישאַן: Try booting with only the CPU, one RAM stick, and the necessary power connections.
8.2 קיין אַרויסווייַזונג רעזולטאַט
- מאָניטאָר קאַנעקשאַן: Ensure the monitor is properly connected to the graphics output (either integrated or discrete GPU) and is powered on.
- גראַפיקס קאָרט: If using a discrete graphics card, ensure it is fully seated in its PCIe slot and has all necessary power connectors from the PSU.
- ינאַגרייטיד גראַפיקס: If your CPU supports integrated graphics, try connecting the monitor to the motherboard's video output to rule out a discrete GPU issue.
8.3 Operating System Not Booting
- שטיוול אָרדער: Check the BIOS/UEFI settings to ensure the correct boot device (e.g., SSD, HDD) is selected as the primary boot option.
- Drive Connections: Verify that your storage drives are properly connected (data and power).
- אָפּערירן סיסטעם אינסטאַלאַציע: If the OS is newly installed, ensure the installation process completed successfully and all drivers are installed.
9. ספּעסאַפאַקיישאַנז
| שטריך | דעטאַל |
|---|---|
| סאָרט | סופּערמיקראָ |
| מאָדעל נאָמען | MBD-X13SEI-F-B |
| קפּו סאָקקעט | LGA 4677 |
| קאָמפּאַטיבלע פּראַסעסאָרן | Intel Xeon Scalable |
| טשיפּסעט טיפּ | Intel C621 |
| ראַם זכּרון טעכנאָלאָגיע | דדר5 |
| זכּרון ספּיד | 4800 מהז |
| ראַם סלאָץ | 8x DDR5 DIMM slots |
| פּראָדוקט דימענשאַנז (LxWxH) | 16 X 12 X 5 אינטשעס |
| פּונקט וואָג | 3.19 פונט |
| ערשטער בנימצא טאָג | 20 יאנואר 2023 |
Note: Specifications are subject to change without notice. For the most current information, please refer to the official Supermicro product page.
10. וואָראַנטי און טעכניש שטיצן
10.1 וואָראַנטי אינפֿאָרמאַציע
Supermicro products are covered by a limited warranty. For detailed warranty terms and conditions, including duration and coverage, please visit the official Supermicro website or consult the warranty card included with your product. Keep your proof of purchase for warranty claims.
10.2 טעכניש שטיצן
For technical assistance, driver downloads, BIOS updates, and further product information, please visit the official Supermicro support webפּלאַץ:
https://www.supermicro.com/support
Before contacting support, please have your motherboard model number (MBD-X13SEI-F-B) and serial number ready.