
1. וויכטיק סאַפעטי אינפֿאָרמאַציע
לייענט און פארשטייט שטענדיק אלע זיכערהייט ווארענונגען, אינסטרוקציעס, אילוסטראציעס און ספעציפיקאציעס וואס ווערן צוגעשטעלט מיט דעם עלעקטרישן געצייג. נישט נאכפאלגן אלע אינסטרוקציעס וואס ווערן אויסגערעכנט אונטן קען רעזולטירן אין עלעקטרישן שאק, פייער און/אדער ערנסטע שאדן.
- אַרבעט שטח זיכערקייַט: האַלט אייער אַרבעטס־געגנט ריין און גוט באַלויכטן. פֿאַרפּאַקטע אָדער טונקעלע געביטן לאַדן איין צו אומגליקן. ניצט נישט עלעקטרישע מכשירים אין עקספּלאָזיווע אַטמאָספֿערעס, ווי למשל אין דער אנוועזנהייט פֿון ברענענדיקע פֿליסיקייטן, גאַזן אָדער שטויב. עלעקטרישע מכשירים שאַפֿן פֿונקען וואָס קענען אָנצינדן דעם שטויב אָדער די דאַמפּן.
- עלעקטריקאַל זיכערקייַט: עלעקטרישע געצייג שטעקער מוזן פּאַסן צום אַוטלעט. קיינמאָל נישט מאָדיפֿיצירן דעם שטעקער אויף קיין וועג. נישט מיסברויכן דעם שנור. קיינמאָל נישט נוצן דעם שנור צו טראָגן, ציען אָדער אַרויסציען דעם עלעקטרישן געצייג. האַלטן דעם שנור אַוועק פון היץ, בוימל, שאַרפֿע עקן אָדער באַוועגלעכע טיילן.
- פערזענליכע זיכערקייט: Stay alert, watch what you are doing, and use common sense when operating a power tool. Do not use a power tool while you are tired or under the influence of drugs, alcohol, or medication. Always wear eye protection. Use safety glasses, goggles, or a face shield.
- מכשירים נוצן און זאָרגן: צווינגט נישט דעם עלעקטרישן געצייג. ניצט דעם ריכטיקן עלעקטרישן געצייג פאר אייער אנווענדונג. דער ריכטיקער עלעקטרישער געצייג וועט טאן די ארבעט בעסער און זיכערער מיט דער שנעלקייט פאר וועלכער עס איז געמאכט געווארן. שטעקט ארויס דעם שטעקער פון דער שטראָם-מקור און/אדער נעמט ארויס די באַטעריע, אויב עס איז אפגענוצט, פון דעם עלעקטרישן געצייג איידער איר מאכט קיין אַדזשאַסטמאַנץ, טוישט אַקסעסאָריעס, אדער לייגט אַוועק עלעקטרישע געצייג.
- באַטערי פּאַק נוצן און זאָרגן: ריטשאַרדזש בלויז מיט די טשאַרדזשער ספּעסיפיעד דורך דער פאַבריקאַנט. א טשאַרדזשער וואָס איז פּאַסיק פֿאַר איין טיפּ פון באַטאַרייע פּאַק קען מאַכן אַ ריזיקירן פון פייַער ווען געוויינט מיט אן אנדער באַטאַרייע פּאַק. ניצן מאַכט מכשירים בלויז מיט ספּאַסיפיקלי דעזיגנייטיד באַטאַרייע פּאַקס.
2. פּעקל אינהאַלט
פּאַקט פֿאָרזיכטיק אויס אַלע זאַכן און מאַכט זיכער אַז איר האָט באַקומען די פֿאָלגנדיקע:
- BATAVIA Cordless Drill (BT-CTD001)
- 20V MAX 2.0Ah Lithium-Ion Battery
- 2.4A באַטערי טשאַרדזשער
- ינסטראַקשאַנז מאַנואַל

Image: The BATAVIA Cordless Drill, including the main unit, a 20V MAX 2.0Ah Lithium-Ion battery, and a 2.4A battery charger.
3. פּראָדוקט איבערview
Familiarize yourself with the components of your BATAVIA Cordless Drill:
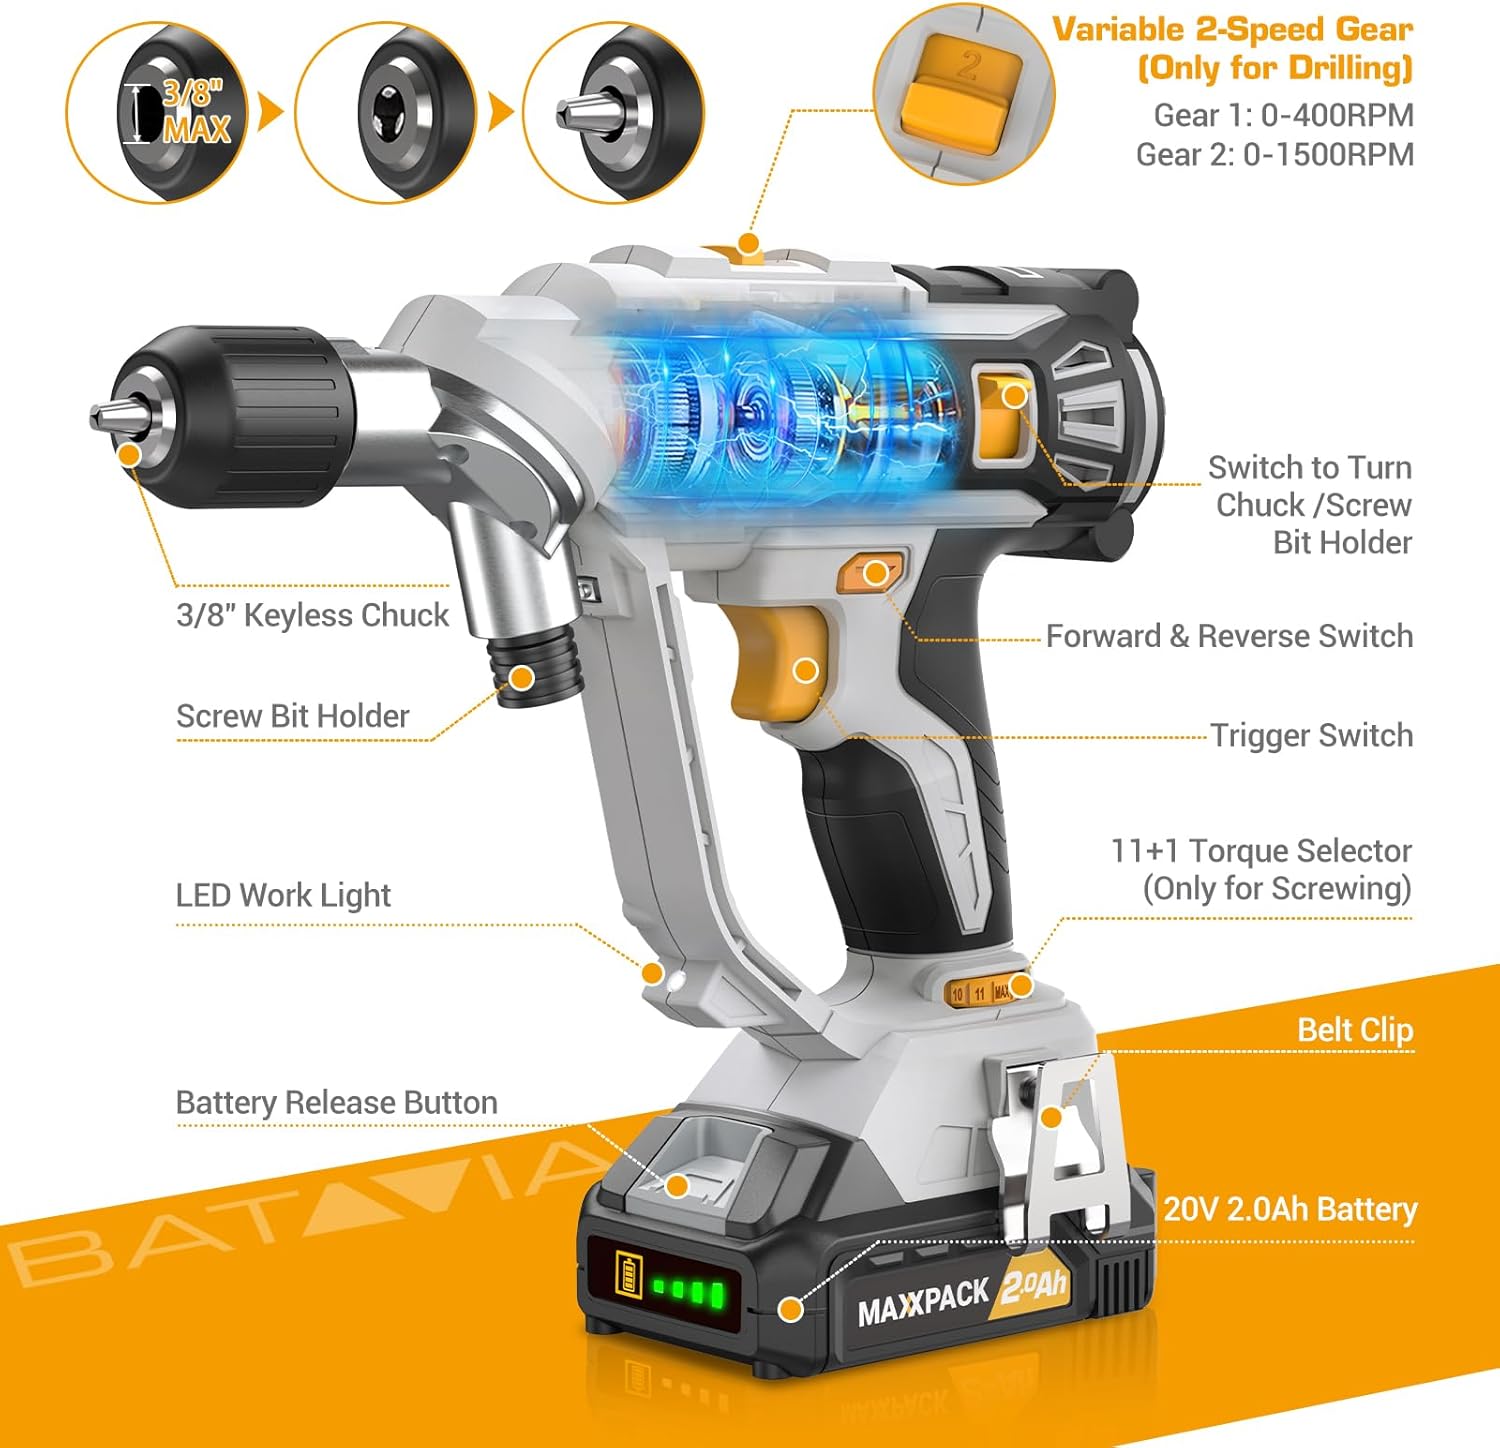
Image: A detailed diagram highlighting key components of the BATAVIA Cordless Drill, including the 3/8" Keyless Chuck, Screw Bit Holder, LED Work Light, Battery Release Button, 20V 2.0Ah Battery, Belt Clip, 11+1 Torque Selector, Trigger Switch, Forward & Reverse Switch, and Variable 2-Speed Gear switch.
- Dual Rotating Chucks: Features both a 3/8" keyless chuck for drilling and a 1/4" hex chuck for driving, allowing quick transitions between tasks.
- 11+1 טאָרק סעטטינגס: Provides precise control for various applications and materials.
- 2 וועריאַבלע ספּידז: Offers two speed ranges (0-400 RPM and 0-1500 RPM) for optimal performance in different drilling and driving scenarios.
- Automatic LED Work Light: באַלויכטן דעם אַרבעטס־געגנט פֿאַר פֿאַרבעסערטע זעאונג אין נידעריק־ליכטיקע באַדינגונגען.
- גאַרטל קליפּ: Conveniently attaches the drill to your belt for easy access.
4. סעטאַפּ
4.1 טשאַרדזשינג די באַטאַרייע
- Ensure the battery is securely inserted into the 2.4A battery charger.
- Plug the charger into a standard 120V AC electrical outlet.
- The indicator lights on the charger will show the charging status. A full charge typically takes less time due to the 2.4A charger.
- Once fully charged, disconnect the charger from the outlet and remove the battery.
4.2 אינסטאלירן/אראפנעמען די באַטעריע
- To install: Align the battery with the base of the drill handle and slide it in until it clicks securely into place.
- To remove: Press the battery release button located on the front of the battery pack and slide the battery out.
4.3 Using the Dual Rotating Chucks
This drill features a unique dual rotating chuck system for quick changes between drilling and driving tasks.

Image: The BATAVIA Cordless Drill demonstrating its dual rotating chuck feature, allowing users to switch between a drill bit and a screwdriver bit by rotating the chuck assembly.
- For Drilling (3/8" Keyless Chuck): Rotate the front section of the drill head to expose the 3/8" keyless chuck. Insert the drill bit and tighten the chuck by hand until the bit is secure.
- For Driving (1/4" Hex Chuck): Rotate the front section of the drill head to expose the 1/4" hex chuck. Insert the screwdriver bit directly into the hex opening until it locks into place.
5. אַפּערייטינג ינסטרוקטיאָנס
5.1 Setting Torque (11+1 Settings)
The torque selector ring allows you to adjust the amount of rotational force the drill applies. This is crucial for preventing overtightening screws or damaging materials.

Image: The BATAVIA Cordless Drill highlighting its 11+1 torque settings, with recommendations for low settings for small screws/soft materials and high settings for large screws/hard materials.
- Rotate the torque selector ring to choose a setting from 1 to 11. Lower numbers are for smaller screws or softer materials, while higher numbers are for larger screws or harder materials.
- The 'Drill' symbol (often indicated as 'MAX' or a drill icon) bypasses the clutch for maximum torque, suitable for drilling applications.
5.2 Selecting Speed (2 Variable Speeds)
The drill features a 2-speed gearbox to match the speed to the application.

Image: The BATAVIA Cordless Drill showing its adjustable variable 2-speed gear selector. Gear 1 (0-400 RPM) is recommended for large diameter drilling, and Gear 2 (0-1500 RPM) for small diameter drilling.
- Gear 1 (0-400 RPM): Use for high-torque applications, such as driving large screws or drilling large holes in tough materials.
- Gear 2 (0-1500 RPM): Use for high-speed applications, such as drilling small holes or driving small screws quickly.
- The trigger switch provides variable speed control within the selected gear range. Pressing the trigger further increases the speed.
5.3 פאָרווערטס/צוריקקער סוויטש
The forward/reverse switch is located above the trigger. It controls the direction of rotation.
- דריק דעם קנעפּל צו די לינקס פֿאַר פאָרווערטס ראָטאַציע (פֿאַר בויערן און אַרײַנדריבן שרויפן).
- דריק דעם קנעפּל צו רעכטס פֿאַר פאַרקערט ראָטאַציע (צו אַרויסנעמען שרויפן אָדער אַרויסציען באָר ביטס).
- When the switch is in the center position, the trigger is locked, preventing accidental starting.
5.4 Automatic LED Work Light
די איינגעבויטע LED ליכט צינדט זיך אויטאָמאַטיש אָן ווען מען דריקט דעם טריגער, און דאָס גיט גוטע זעאונג אין שוואַך באַלויכטענע אַרבעטס־געביטן.
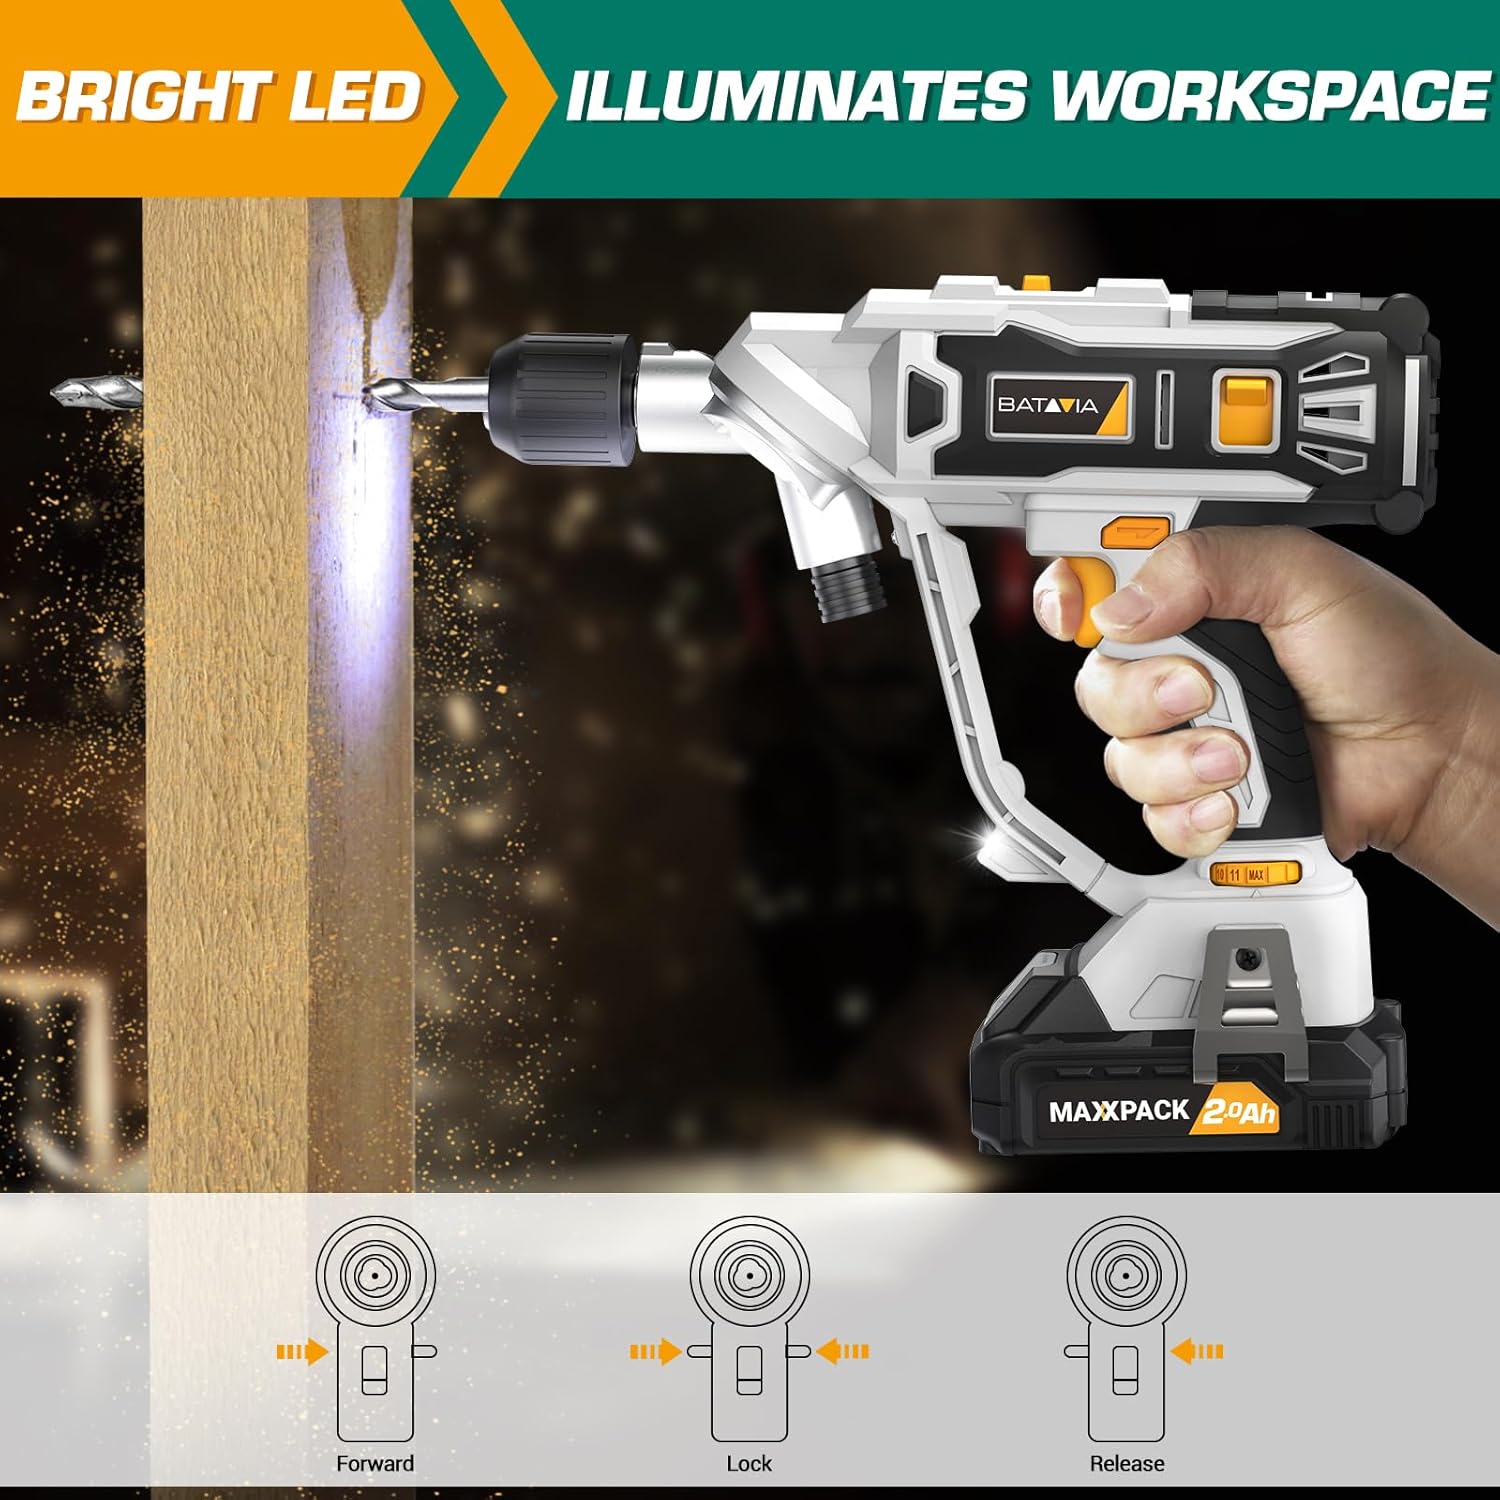
Image: The BATAVIA Cordless Drill in use, with its bright LED light illuminating the work surface, demonstrating its utility in dark or confined spaces.
6. וישאַלט
רעגולערע אויפהאלטונג גאראנטירט די לאנגעוויטי און אפטימאלע פאָרשטעלונג פון אייער דריל.
- רייניקונג: נאך יעדן באניץ, ווישט אפ די דריל מיט א ריינעם,amp שטאָף. ניצט נישט קיין שטרענגע כעמיקאַלן אדער שרײַבנדיקע רייניקונגסמיטלען. האַלט די ווענטילאַציע עפענונגען ריין פון שטויב און שמוץ.
- סטאָרידזש: Store the drill, battery, and charger in a cool, dry place, away from direct sunlight and extreme temperatures. Ensure the battery is removed from the drill before storage.
- באַטערי זאָרגן: Do not store batteries in a discharged state. Recharge them periodically if not in use for extended periods.
7. טראָובלעשאָאָטינג
If you encounter issues with your BATAVIA Cordless Drill, refer to the following common problems and solutions:
| פּראָבלעם | מעגלעך סיבה | לייזונג |
|---|---|---|
| די דריל הייבט זיך נישט אן. | Battery not charged or not properly inserted. Forward/Reverse switch in locked (center) position. | Ensure battery is fully charged and securely inserted. Move Forward/Reverse switch to forward or reverse position. |
| די באַטאַרייע איז נישט טשאַרדזשינג. | טשאַרדזשער נישט איינגעשטעקט. דעפעקטיווע באַטאַרייע אָדער טשאַרדזשער. | Check power outlet and charger connection. If problem persists, contact customer support. |
| Drill lacks power or stops during use. | Battery low on charge. Overload protection activated. | Recharge battery. Reduce pressure on the drill or use a lower speed setting for tough materials. |
| טשאַק האַלט נישט די ביט זיכער. | Bit not inserted deep enough. Chuck not tightened properly. | Ensure bit shank is fully inserted into the chuck. Tighten the keyless chuck firmly by hand. |
8. ספּעסאַפאַקיישאַנז
| שטריך | באַשרייַבונג |
|---|---|
| מאָדעל נומער | BT-CTD001 |
| סאָרט | באַטאַוויאַ |
| מאַכט מקור | באַטאַרייע פּאַוערד |
| באַטערי טיפּ | 20V MAX 2.0Ah Lithium-Ion |
| טשאַרדזשער Ampעראַגע | 2.4 Amps |
| מאַקסימום ראָוטיישאַנאַל גיכקייַט | 1500 רפּם |
| נומער פון ספּידז | 2 (0-400 RPM & 0-1500 RPM) |
| טאָרק סעטטינגס | 11+1 |
| מאַקסימום טשאַק גרייס | 3/8 Inches (Keyless Chuck) |
| מאַטעריאַל | PA6-GF30 |
| פּראָדוקט דימענשאַנז (L x W x H) | 8.07" x 3.34" x 14.5" |
| פּונקט וואָג | 5.28 פונט |
| ספּעציעלע פֿעיִקייטן | Adjustable Torque, Built-In LED Working Light, Compact, Cordless, Variable Speed |
| סערטיפיקאַטיאָנס | ETL Certified |
9. וואָראַנטי און שטיצן
BATAVIA products are designed and manufactured to the highest quality standards. This product is ETL certified, ensuring product quality and safety.
For any questions, technical assistance, or warranty claims, please contact BATAVIA customer service:
- טעלעפֿאָן: (+1) 866-272-5789
- Operating Hours (EDT): 10am - 7pm
- Operating Hours (PDT): 7am - 4pm
Please have your model number (BT-CTD001) and purchase information ready when contacting support.