
1. הקדמה
This manual provides detailed instructions for the installation, operation, and maintenance of your Thinkbee Wireless Light Switch Kit. Please read this manual thoroughly before installation and use to ensure proper function and safety.
2. זיכערקייַט אינפֿאָרמאַציע און וואָרנינגז
- ווארענונג: Always turn off power at the circuit breaker before installing or servicing the receiver. Failure to do so may result in serious injury or death.
- The receiver requires both live and neutral wires for power. Do not install in a single-pole switch box that lacks a neutral wire.
- It is not recommended to install the switch on a metal surface or the receiver in a metal cover. Metal can block the wireless signal and reduce the remote control distance.
- Ensure all wiring connections are secure and comply with local electrical codes. If you are unsure about wiring, consult a qualified electrician.
- Do not exceed the maximum load capacity of 1000W or 10A for the receiver.
- This product is IP66 waterproof, suitable for damp locations, but avoid submerging it in water.
3. פּעקל אינהאַלט
באַשטעטיקן אַז אַלע זאכן זענען פאַראַן אין דיין פּעקל:
- 1x Wireless Switch (Transmitter)
- 1x Mini Receiver
- 2x סטיקערז
- 2x Wiring Connectors
- 1x באַניצער מאַנואַל (דאָס דאָקומענט)

Image 3.1: Components of the Thinkbee Wireless Light Switch Kit, including the switch and receiver.
4. פּראָדוקט ספּעסאַפאַקיישאַנז
| קאָמפּאָנענט | באַשרייַבונג |
|---|---|
| Transmitter (Wireless Switch) | |
| וואָטערפּרוף רייטינג | IP66 |
| דימענשאַנז | 8.6 X 8.6 X 1.1 סענטימעטער |
| ארבעטן טעמפּעראַטור | -30°C ~ +75°C |
| באַטאַרייע מאָדעל | 3V CR2032 (אַרייַנגערעכנט) |
| ופנעמער | |
| Voltage | אַק 80-275וו |
| Composite Load | 1000 וו |
| מאַקסימום מאַסע | 10 א |
| דימענשאַנז | 3.9 X 2.3 X 2.2 סענטימעטער |
| ווייַט קאָנטראָל מאָדע | ראַדיאָ פרעקווענסי |
| Common Attributes | |
| סענסיטיוויטי | -116 דב |
| ראַדיאָ פרעקווענסי | 433.932 מהז |
| מאַטעריאַל | Fire protection ABS (refractory PC Chimei) |
| ווייַט קאָנטראָל דיסטאַנסע | Outdoor 600M (1969ft), Indoor 40M (130ft) (through-wall) |
| סערטיפיקאַטיאָנס | סע, פקק, ראָהס |

Image 4.1: Detailed dimensions and specifications for the wireless switch and receiver.
5. ינסטאַלירונג אינסטרוקציעס
5.1. Receiver Wiring
- קער אַוועק מאַכט: Before starting any electrical work, ensure the power supply to the circuit is turned off at the main circuit breaker.
- אידענטיפיצירן דראָטן: The receiver has input and output wires.
- Input Live Line (Red)
- Input Neutral Line (Blue)
- Output Live Line (Brown)
- Output Neutral Line (Blue)
- פֿאַרבינדן אַרייַנגאַנג: Connect the Input Live Line (Red) and Input Neutral Line (Blue) of the receiver to the corresponding live and neutral wires from your power source.
- פֿאַרבינדן אַוטפּוט: Connect the Output Live Line (Brown) and Output Neutral Line (Blue) of the receiver to the corresponding live and neutral wires of the light fixture or appliance you wish to control.
- זיכער קאַנעקשאַנז: Use the provided wiring connectors or appropriate wire nuts to ensure all connections are secure and insulated.
- מאָנטירן ריסיווער: The mini receiver is designed to fit into control boxes such as canopy, distribution box, or electrical box. Ensure it is placed in a location where the signal will not be obstructed by metal.
- ומקערן מאַכט: Once all connections are secure and the receiver is safely housed, restore power at the circuit breaker.
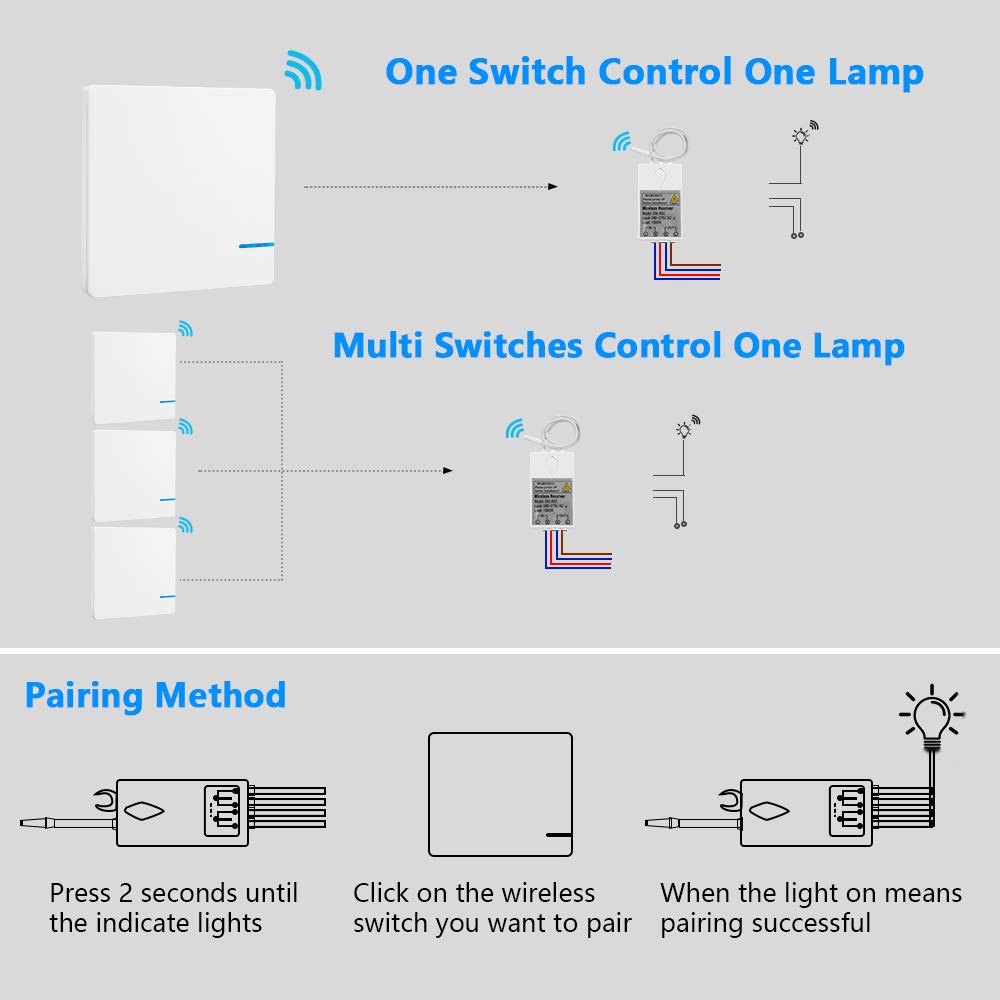
Image 5.1: Wiring diagram for connecting the receiver to a power source and a light.

Image 5.2: Visual comparison of traditional wired switch setup versus the simplified wireless switch installation.
5.2. Wireless Switch Mounting
The wireless switch does not require wiring and can be mounted in various locations:
- קלעפּיק מאַונטינג: Use the provided self-adhesive stickers to attach the switch to any flat, clean surface. Ensure the surface is dry and free of dust or grease for optimal adhesion.
- שרויף מאַונטינג: The switch can also be mounted using screws (not included) through designated holes if a more permanent fixture is desired.

בילד 5.3: עקס.ample of the wireless switch mounted on a wall.
6. אַפּערייטינג ינסטרוקטיאָנס
6.1. Pairing the Wireless Switch with the Receiver
Follow these steps to pair your wireless switch with the receiver:
- Activate Pairing Mode on Receiver: Press and hold the pairing key on the receiver for approximately 2 seconds until the indicator light on the receiver begins to flash. This indicates the receiver is in pairing mode.
- אַקטאַווייט סוויטש: Within 10 seconds of the receiver entering pairing mode, click the wireless switch you wish to pair.
- באַשטעטיקונג: The light connected to the receiver will turn on, indicating successful pairing.
- Multiple Switches: One receiver can be paired with up to 8 wireless switches. Repeat the pairing process for each additional switch.

Image 6.1: Step-by-step guide for pairing the wireless switch with the receiver.
6.2. יקערדיק אָפּעראַציע
Once paired, simply press the wireless switch to toggle the connected light or appliance ON/OFF.

Image 6.2: Demonstrating the simple operation of the wireless switch.
7. וישאַלט
7.1. רייניקונג
Wipe the surfaces of the wireless switch and receiver with a soft, dry cloth. Do not use abrasive cleaners or solvents.
7.2. Battery Replacement (Wireless Switch)
The wireless switch is powered by a 3V CR2032 lithium battery. The battery has a lifespan of approximately 10 years. When replacement is needed:
- Carefully pry open the switch casing to access the battery compartment.
- אַראָפּנעמען די אַלט CR2032 באַטאַרייע.
- אַרײַנשטעלן אַ נײַע 3V CR2032 באַטעריע, און זיכער מאַכן אַז די פּאָלאַריטעט איז ריכטיק.
- Snap the switch casinג צוריק זיכער צוזאַמען.
8. טראָובלעשאָאָטינג
| פּראָבלעם | מעגלעך סיבה | לייזונג |
|---|---|---|
| די ליכט טוט זיך נישט אן/אויסלעשן. | קיין מאַכט צום ריסיווער. Receiver not paired with switch. Wireless signal interference. פאַולטי וויירינג. | Check circuit breaker and receiver power connections. Re-pair the switch and receiver (refer to Section 6.1). Ensure receiver is not in a metal enclosure; move switch closer to receiver. Verify all wiring connections are correct and secure. |
| Reduced remote control distance. | Obstruction by metal surfaces. Excessive distance. | Relocate the receiver or switch away from metal. Ensure the distance is within the specified indoor (40m) or outdoor (600m) range. |
| Switch indicator light does not illuminate when pressed. | Low or dead battery in wireless switch. | טוישט אויס די CR2032 באַטעריע (זעט סעקציע 7.2). |
9. וואָראַנטי און שטיצן
Thinkbee provides a no-hassle 36-month warranty for this product. For technical support, troubleshooting assistance, or warranty claims, please contact Thinkbee customer service. You can typically find contact information on the product packaging or the official Thinkbee webפּלאַץ.
קונה סערוויס: פֿאַראַן 24 שעה.