
1. הקדמה
Thank you for choosing the USX MOUNT TV Wall Mount. This manual provides essential information for the safe and correct installation, operation, and maintenance of your new TV wall mount. Please read these instructions thoroughly before installation and retain them for future reference.
2. זיכערקייַט אינפֿאָרמאַציע
ווארענונג: Failure to read and follow these instructions may result in serious personal injury, property damage, or voiding of your warranty. If you have any questions, please contact customer service.
- זיכער מאַכן אַז די מאָנטירונג ייבערפלאַך קען זיכער שטיצן די קאַמביינד וואָג פון די מאָונט און די טעלעוויזיע.
- דו זאלסט נישט יקסיד די מאַקסימום מאַסע קאַפּאַציטעט פון 35 קג (77 לבס).
- This product is designed for installation on wood studs or solid concrete walls only. Do not install on drywall alone.
- Always use a stud finder to locate wood studs accurately.
- Use appropriate safety gear during installation, including eye protection.
- צוויי מענטשן ווערן רעקאמענדירט פארן אינסטאלירן צו גאראנטירן זיכערהייט.
3. פּעקל אינהאַלט
Verify that all components are present and undamaged before beginning installation. If any parts are missing or defective, contact customer service.
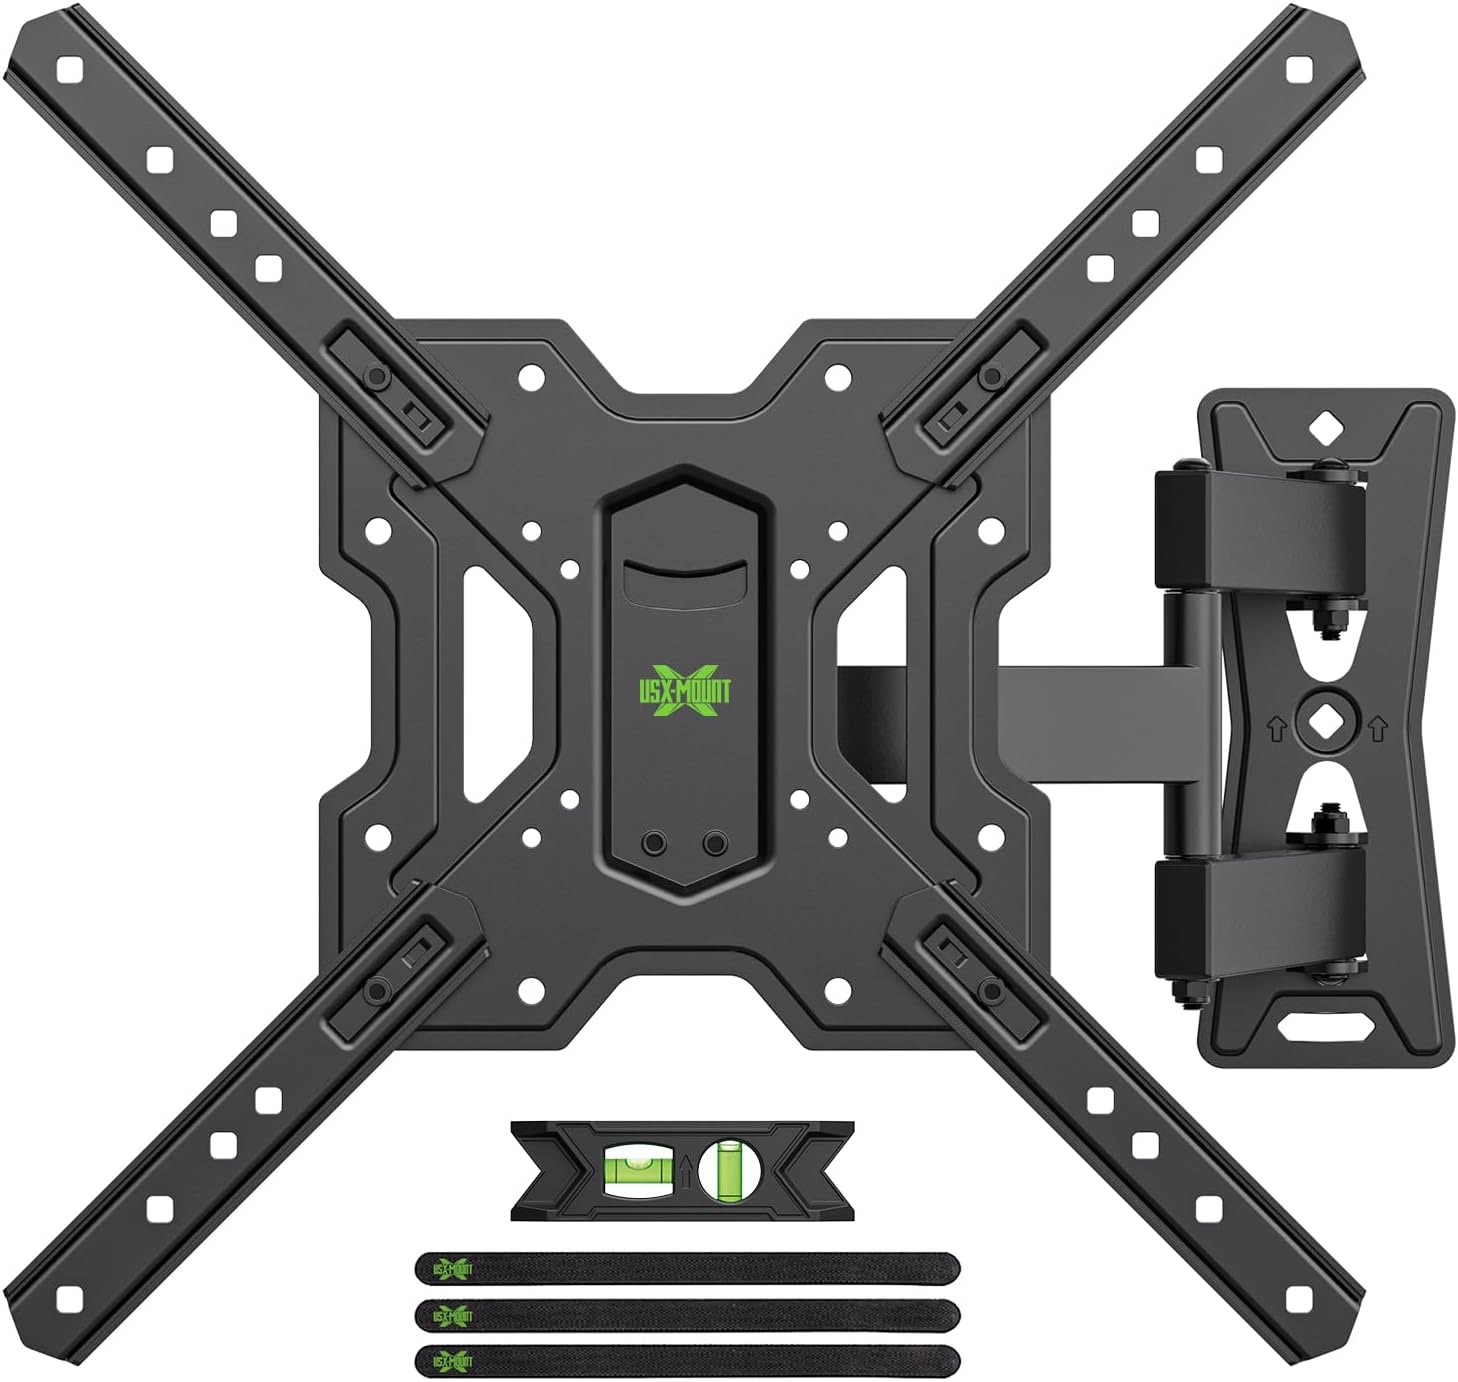
פיגורע 3.1: איבערview of the USX MOUNT TV Wall Mount and all included accessories, such as the main mount assembly, VESA extension arms, bubble level, and cable ties.
אַרייַנגערעכנט ייַזנוואַרג:
- וואַנט פּלאַטע פֿאַרזאַמלונג
- TV Plate (VESA Adapter)
- Various screws, washers, and spacers for TV attachment
- Lag bolts and concrete anchors for wall attachment
- בלאָז לעוועל
- קאַבלע טייז
- העקס דורכפֿאַל
4. ספּעסאַפאַקיישאַנז
| שטריך | באַשרייַבונג |
|---|---|
| קאָמפּאַטיבלע טעלעוויזיע סיזעס | 26-55 אינטשעס |
| מאַקסימום מאַסע קאַפּאַציטעט | 35 קג (77 לבס) |
| VESA קאַמפּאַטאַבילאַטי | 75x75mm, 100x100mm, 100x200mm, 200x100mm, 200x200mm, 150x150mm, 200x300mm, 200x400mm, 300x200mm, 300x300mm, 400x200mm, 400x300mm, 400x400mm |
| טילט ווינקל | +5° צו -15° |
| סוויוואַל ווינקל | ±90° (אפהענגיק פון טעלעוויזיע גרייס) |
| מדרגה אַדזשאַסטמאַנט | ±4° |
| דיסטאַנסע צו וואנט | 70 מם (מין) צו 480 מם (מאַקס) |
| מאַטעריאַל | שטאָל |
| קאָליר | שוואַרץ |

פיגורע 4.1: VESA compatibility chart and maximum load capacity for the mount. Always check your TV's VESA pattern before installation.

פיגורע 4.2: Visual representation of various VESA mounting patterns supported by the mount, indicating horizontal and vertical screw hole distances.
5. ינסטאַלירונג אינסטרוקציעס
Step 1: Attach TV Plate to TV
- לייגט פֿאָרזיכטיק אייער טעלעוויזאָר מיטן פּנים אַראָפּ אויף אַ ווייכער, ריינער ייבערפֿלאַך כּדי צו פֿאַרמייַדן שאָדן צום עקראַן.
- ידענטיפיצירן די VESA מאַונטינג האָלעס אויף די צוריק פון דיין טעלעוויזיע.
- Select the appropriate screws, washers, and spacers from the provided hardware kit that fit your TV's mounting holes.
- Attach the TV plate (VESA adapter) to the back of your TV using the selected hardware. Ensure it is securely fastened but do not overtighten.
שריט 2: צוטשעפּען וואנט טעלער צו וואנט
וויכטיק: Determine your wall type before proceeding. This mount is suitable for wood stud walls and solid concrete walls.

פיגורע 5.1: Illustration of compatible wall types for installation: wood stud and solid concrete. Ensure your wall matches one of these types.
פֿאַר האָלץ שטאַפּל ווענט:
- Use a stud finder to locate the edges and center of the wood stud. Mark the center of the stud.
- Position the wall plate at your desired height and use the integrated bubble level to ensure it is perfectly horizontal. Mark the pilot hole locations.
- Drill pilot holes into the center of the stud at the marked locations. The drill bit size should be 5/32" (4 mm) and the depth approximately 2.36" (60 mm).
- Attach the wall plate to the wall using the provided lag bolts. Tighten securely with a wrench.
For Solid Concrete Walls:
- Position the wall plate at your desired height and use the integrated bubble level to ensure it is perfectly horizontal. Mark the pilot hole locations.
- Drill pilot holes into the concrete at the marked locations. The drill bit size should be 3/8" (10 mm) and the depth approximately 2.36" (60 mm).
- Insert the concrete anchors into the drilled holes. Tap them gently with a hammer until they are flush with the wall surface.
- Attach the wall plate to the wall using the provided lag bolts. Tighten securely with a wrench.
Step 3: Hang and Secure TV to Wall Plate
- With assistance, carefully lift the TV (with the TV plate attached) and hook it onto the wall plate.
- Ensure the TV is properly seated and centered on the wall plate.
- באַפעסטיקט דעם טעלעוויזאָר צו דער וואַנט פּלאַטע מיט די זיכערהייט שרויפן אָדער שלאָס מעכאַניזמען וואָס זענען צוגעשטעלט. דאָס פאַרהיט אַקצידענטאַלע אַרויסוואַרף.
ווידעא 5.1: A short demonstration of the installation process, including attaching the TV plate, mounting the wall plate, and hanging the TV. This video also briefly shows the leveling and tilting adjustments.
6. אפערירן אינסטרוקציעס (אַדזשאַסטמאַנץ)
Your USX MOUNT TV Wall Mount offers various adjustments for optimal viewing.
טילט אַדזשאַסטמאַנט:
The mount allows for a tilt range of +5° to -15°. To adjust the tilt:
- Locate the tilt adjustment knobs on the TV plate.
- Loosen the knobs to allow the TV to tilt freely.
- Adjust the TV to your desired vertical angle.
- Tighten the knobs to secure the TV in place.
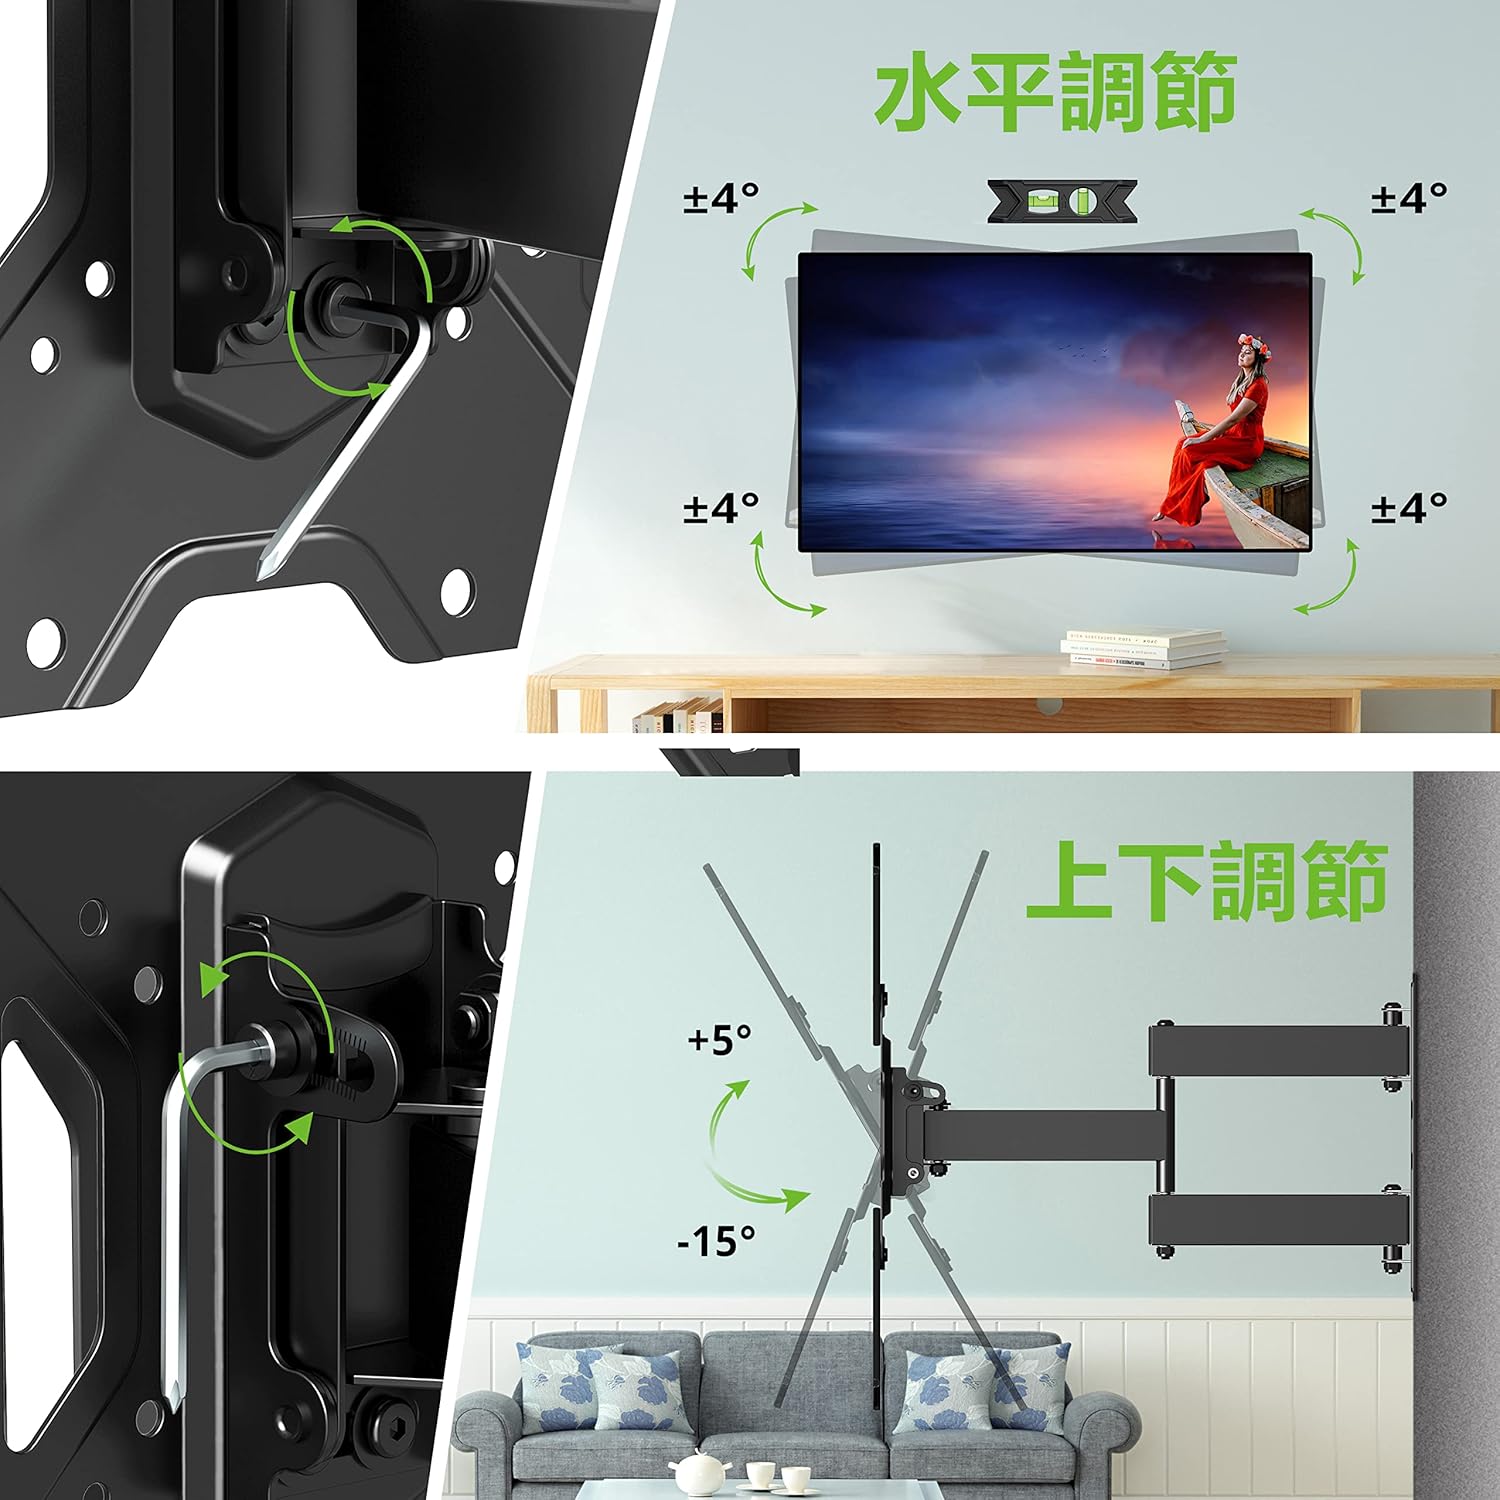
פיגורע 6.1: Visual guide for adjusting the horizontal level and vertical tilt of the TV. The top panel shows ±4° leveling, and the bottom panel shows +5° to -15° tilt.

פיגורע 6.2: This image illustrates the adjustable distance from the wall (70mm to 426mm) and the tilt angles (+5° backward, -15° forward) of the TV mount.
סוויוואַל אַדזשאַסטמאַנט:
The mount allows for a swivel of up to ±90° (left/right), depending on the size of your TV. To adjust the swivel:
- Gently push or pull the TV to the desired left or right angle.
- The friction joints will hold the TV in position.

פיגורע 6.3: This diagram demonstrates the ±90° swivel capability of the TV mount, allowing for flexible viewing angles from various positions in a room.
מדרגה אַדזשאַסטמאַנט:
The mount allows for a level adjustment of ±4° after installation. To adjust the level:
- Use the provided hex key to loosen the leveling screws on the TV plate.
- Adjust the TV until it is perfectly level using the bubble level.
- Tighten the leveling screws to secure the TV in the desired horizontal position.
7. וישאַלט
- קאָנטראָלירט פּעריִאָדיש אַלע שרויפן און באָלטן צו זיכער מאַכן אַז זיי בלייבן פעסט. פֿעסטשטײַערט ווידער אויב נייטיק.
- רייניקט דעם מאָונט מיט אַ ווייכן, טרוקענעם שטאָף. פֿאַרמייַדט אַברייסיוו רייניגער אָדער סאָלווענטן.
- Ensure cables are managed neatly using the provided cable ties to prevent strain or damage.
8. טראָובלעשאָאָטינג
If you encounter any issues during or after installation, please refer to the following common solutions:
- טעלעוויזיע נישט גלייך: Use the level adjustment feature as described in Section 6.
- באַרג פילט זיך פריי: Recheck all wall and TV attachment points and tighten any loose fasteners. Ensure the wall type is appropriate for installation.
- Difficulty adjusting tilt/swivel: Ensure all adjustment knobs/screws are sufficiently loosened before attempting to move the TV.
If the problem persists, contact USX MOUNT customer support.
9. וואָראַנטי און שטיצן
USX MOUNT provides a 10-year quality guarantee from the date of purchase. This warranty covers manufacturing defects and ensures the product's structural integrity under normal use.
For any questions, missing parts, or support needs, please contact USX MOUNT customer service. Our team is dedicated to providing assistance and ensuring your satisfaction.
קאָנטאַקט אינפֿאָרמאַציע: Please refer to the contact details provided with your purchase or visit the official USX MOUNT webפּלאַץ.