
Interlight QUASAR
Interlight Quasar Wall Sconce - Instruction Manual
Model: Quasar | Color Temperature: 2700K | Voltage: Bivolt
הקדמה
This manual provides essential information for the safe and correct installation, operation, and maintenance of your Interlight Quasar Wall Sconce. Please read these instructions thoroughly before installation and retain them for future reference.
זיכערקייַט אינסטרוקציעס
- עלעקטריקאַל זיכערקייַט: Always disconnect power at the circuit breaker or fuse box before beginning installation or performing any maintenance. Failure to do so may result in electric shock or serious injury.
- פאַכמאַן ינסטאַלירונג: די אינסטאַלאַציע זאָל דורכגעפירט ווערן דורך אַ קוואַליפֿיצירטן עלעקטריקער אין לויט מיט אַלע לאָקאַלע און נאַציאָנאַלע עלעקטרישע קאָודן.
- Voltage קאַמפּאַטאַבילאַטי: This fixture is Bivolt (110-240V). Ensure your electrical supply matches this range.
- האַנדלינג: Handle the product with care to avoid damage. Do not install if the product appears damaged.
- סוויווע: This product is designed for specific environments. Ensure it is suitable for your intended indoor or outdoor application.
פּעקל אינהאַלט
באַשטעטיקן אַז אַלע קאָמפּאָנענטן זענען פאַראַן איידער איר גייט ווייטער מיט דער אינסטאַלאַציע:
- Interlight Quasar Wall Sconce (1 unit)
- מאָנטירונג קלאַמער (1 אַפּאַראַט)
- Mounting Screws and Wall Anchors (quantity may vary)
- ינסטרוקטיאָן מאַנואַל (דעם דאָקומענט)

בילד: פראָנט view of the Interlight Quasar Wall Sconce, showcasing its black finish and geometric design.
ספּעסאַפאַקיישאַנז
| סאָרט | Interlight |
| מאָדעל | קוואַזאַר |
| קאָליר טעמפּעראַטור | 2700K (וואַרעם ווייַס) |
| Voltage | Bivolt (110-240V) |
| פּראָדוקט דימענשאַנז (L x W x H) | 𠃠.1 x 0.95 x 0.1 cm; 370 g (Note: These dimensions appear unusually small for a wall sconce and may be a data entry error. Please refer to package dimensions for a more typical size indication.) |
| פּעקל דימענשאַנז | 10.8 X 10.7 X 10.4 סענטימעטער |
| EAN/GTIN | 7894088042365 |
| ASIN | B09QCZSRFC |
| באַטעריז פארלאנגט | ניין |
סעטאַפּ און ינסטאַלירונג
וויכטיק: Ensure power is disconnected at the main circuit breaker before starting installation.
- צוגרייטן די ינסטאַלירונג שטח: Choose a suitable location on a wall. Ensure there is existing electrical wiring available.
- מאַונטינג בראַקאַץ ינסטאַלירונג:
- Carefully remove the mounting bracket from the back of the sconce.
- Position the mounting bracket against the wall at the desired installation point. Mark the drilling locations.
- באָרט פּילאָט לעכער אין די אָנגעצייכנטע לאָקאַציעס. אַרײַנשטעלן וואַנט אַנקערס אויב נייטיק.
- באַפעסטיקט די מאָנטירונג קלאַמער צו דער וואַנט מיט די צוגעשטעלטע שרויפן. מאַכט זיכער אַז עס איז פעסט באַפעסטיקט.
- עלעקטריקאַל קשר:
- Connect the electrical wires from the wall to the corresponding wires on the sconce. Typically, this involves connecting live to live, neutral to neutral, and ground to ground. Refer to local electrical codes for proper wiring color conventions.
- Use appropriate wire connectors (not included) to secure all connections.
- ענשור אַז אַלע קאַנעקשאַנז זענען ענג און ינסאַלייטיד.
- צוטשעפּען די סקאַנז:
- Carefully align the sconce with the installed mounting bracket.
- Secure the sconce to the mounting bracket using the screws provided, ensuring it is flush against the wall and stable.
- אינסטאַלירן ליכט מקור: The product image suggests a G9 bulb.
- Insert the G9 bulb (not included, or pre-installed if specified by manufacturer) into the socket. Do not overtighten.

בילד: זייט view of the Interlight Quasar Wall Sconce, revealing the internal light source (G9 bulb type).
- ומקערן מאַכט: אזוי שנעל ווי די אינסטאַלאַציע איז פֿאַרטיק און אַלע פֿאַרבינדונגען זענען זיכער, שטעלט צוריק די מאַכט בײַם קרייַז ברעאַקער.
Examples of installed sconces:
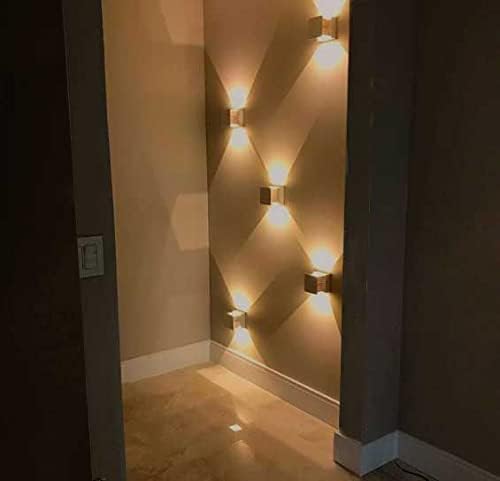
Image: Multiple Interlight Quasar sconces installed on an interior wall, demonstrating the upward and downward light projection.

Image: Interlight Quasar sconces mounted on an exterior building wall, providing ambient outdoor lighting.
אַפּערייטינג ינסטראַקשאַנז
The Interlight Quasar Wall Sconce operates via a standard wall switch connected to its electrical circuit. There are no additional controls on the fixture itself.
- צו אָנהייבן: Flip the connected wall switch to the "ON" position.
- צו קער אַוועק: Flip the connected wall switch to the "OFF" position.
וישאַלט
Regular maintenance ensures the longevity and optimal performance of your wall sconce.
- רייניקונג:
- איידער איר רייניגט, זיכערט זיך אז די עלעקטרע צום פיקסטשער איז אויסגעלאשן ביים קרייז ברעיקער.
- Wipe the exterior surface with a soft, dry, or slightly damp שטאָף.
- ניצט נישט קיין שרײַבענדיקע רייניגער, סאָלווענטן אדער פּאָלירן, ווײַל זיי קענען שאַטן די ענדיקונג.
- גלאָביר אויסטויש (אויב אָנווענדלעך):
- Ensure power is off and the bulb has cooled completely before attempting replacement.
- Carefully remove the old G9 bulb by pulling it straight out.
- Insert a new G9 bulb of the correct wattage and type (e.g., LED G9 2700K) by pushing it gently into the socket.
- דו זאלסט נישט יקסיד די מאַקסימום וואַסערtage specified for the fixture (refer to fixture label if available).
טראָובלעשאָאָטינג
If you encounter issues with your Interlight Quasar Wall Sconce, refer to the following common problems and solutions:
| פּראָבלעם | מעגלעך סיבה | לייזונג |
|---|---|---|
| ליכט טוט נישט קער אויף. |
|
|
| ליכט פליכטן. |
|
|
| די פֿיקסטשור איז הייס צום אָנרירן. |
|
|
If problems persist, consult a qualified electrician or contact Interlight customer support.
וואָראַנטי און שטיצן
Interlight products are manufactured to high-quality standards. For information regarding warranty coverage, please refer to the warranty card included with your purchase or visit the official Interlight webפּלאַץ.
For technical support, replacement parts, or any other inquiries, please contact Interlight customer service through their official channels.
Webפּלאַץ: www.interlight.com.br (עקסampדער לינק, דער פאקטישער לינק קען זיין אנדערש)
Ask a question about this manual
Ask about setup, troubleshooting, compatibility, parts, safety, or missing instructions. Manuals+ will review the question and use this page’s manual context to help answer it.