
1. פּראָדוקט איבערview
The HECASA Brush Guard Grille is designed to provide front-end protection for your truck while enhancing its aesthetic appeal. Constructed from durable steel with a powder-coated finish, this brush guard is engineered for a direct bolt-on, no-drill installation.
1.1 קאַמפּאַטאַבילאַטי
- 1994-2001 Dodge RAM 1500 (Excludes Sport models)
- 1994-2002 Dodge RAM 2500
- 1994-2002 Dodge RAM 3500
NOTE: This brush guard will NOT fit vehicles equipped with Sport bumpers.

בילד 1.1: פראָנט view of the HECASA Brush Guard Grille.
2. זיכערקייַט פּריקאָשאַנז
Always prioritize safety during installation and operation. Failure to follow these guidelines may result in injury or damage to the product or vehicle.
- טראָגט פּאַסיקע פּערזענלעכע שוץ-עקוויפּמענט, אַרייַנגערעכנט זיכערהייט ברילן און הענטשקעס.
- זיכער מאַכן אַז די פאָרמיטל איז פּאַרקירט אויף אַ גלייכער ייבערפלאַך מיט די פּאַרקינג ברעיק איינגעשטעלט.
- Turn off the vehicle engine and disconnect the battery if working near electrical components.
- Do not overtighten fasteners, as this can strip threads or damage components. Refer to torque specifications if available.
- האַלטן קינדער און בייסטאַנדערז אַוועק פון די אַרבעט געגנט.
- If you are unsure about any step of the installation process, seek professional assistance.
3. פּעקל אינהאַלט
Verify that all components listed below are present and undamaged before beginning installation. If any parts are missing or damaged, contact customer support.
- 1 x HECASA Brush Guard Grille Assembly
- מאָנטירונג קלאַמערן (לינקס און רעכטס)
- Hardware Kit (Bolts, Nuts, Washers, Spacers)
- Assembly Instructions (Note: Detailed installation instructions for vehicle integration may not be included, refer to this manual)

Image 3.1: All components included in the HECASA Brush Guard Grille package.
4. ינסטאַללאַטיאָן גייד
4.1 מכשירים פארלאנגט
- כאָלעל מוטער שליסל
- עפֿן-סוף רענטש שטעלן
- דריימאָמענט שליסל (רעקאָמענדירט)
- מעאַסורינג טייפּ
- Marker or Pen
4.2 שריט-ביי-שריט אינסטאַלאַציע
This brush guard is designed for a no-drill, direct bolt-on installation. The process typically involves attaching mounting brackets to existing frame holes and then securing the brush guard to these brackets.
- צוגרייטן די פאָרמיטל: Park the vehicle on a flat, stable surface. Engage the parking brake. For easier access, you may need to remove the front license plate or any existing air dams, depending on your specific vehicle model.
- אידענטיפיצירן בארג-פונקטן: Locate the factory mounting points on the vehicle's frame, typically near the front bumper. These are usually pre-drilled holes.
- ינסטאַלירן מאַונטינג בראַקאַץ: Attach the provided mounting brackets to the identified frame points using the appropriate bolts, washers, and nuts from the hardware kit. Do not fully tighten the hardware at this stage; allow for some adjustment. Ensure the brackets are correctly oriented (left and right).
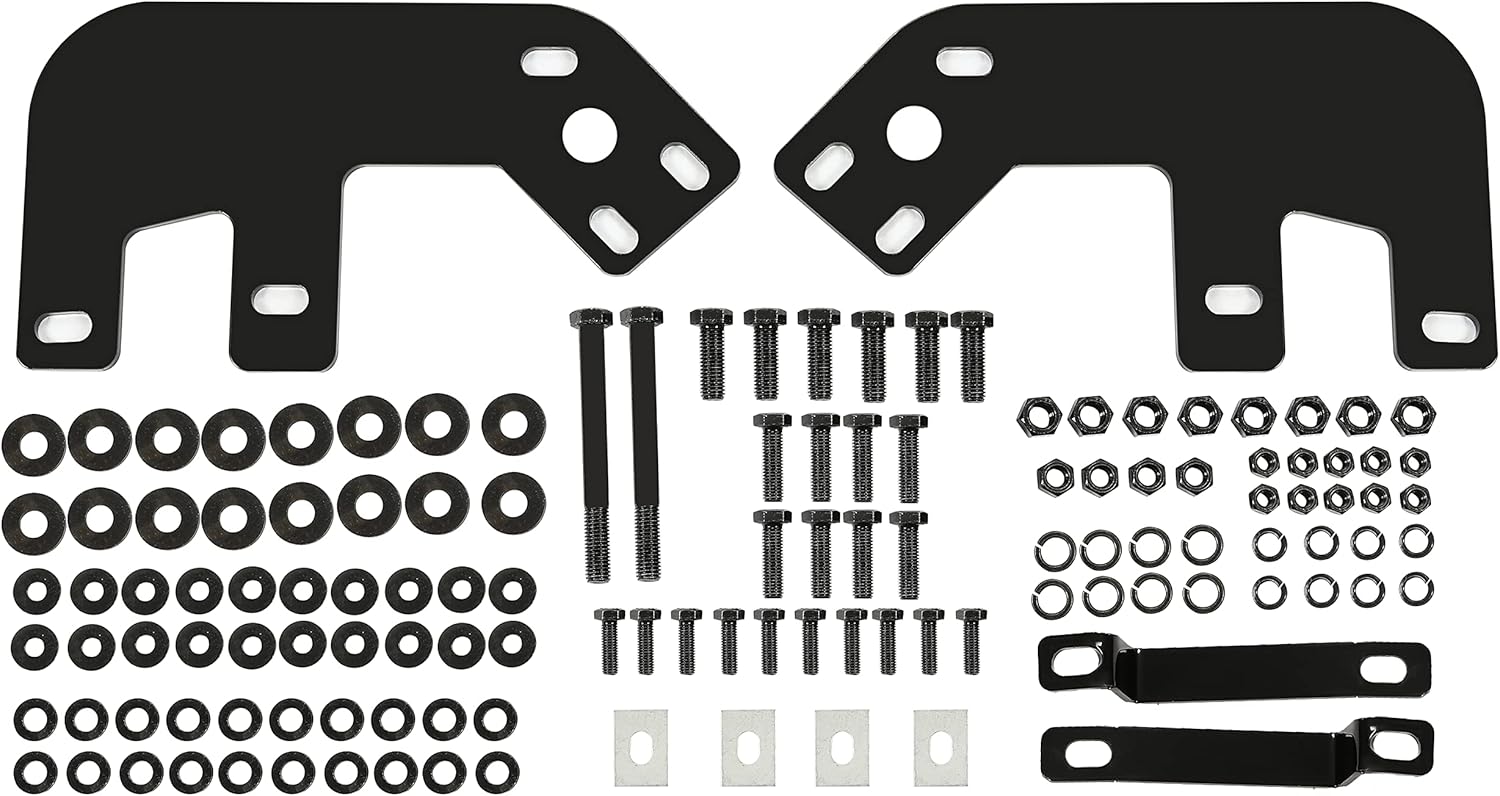
Image 4.1: Mounting hardware components.
- Attach Brush Guard to Brackets: With assistance, carefully lift the brush guard assembly and align its mounting points with the installed brackets. Secure the brush guard to the brackets using the remaining hardware. Again, do not fully tighten the bolts yet.
- צופּאַסן און אויסגלייַכן: Adjust the position of the brush guard to ensure it is centered and level with the vehicle's front end. Check for proper clearance around headlights and other components.
- פֿעסטשטעלן אַלע האַרדווער: Once the brush guard is properly aligned, systematically tighten all bolts and nuts, starting from the frame mounts and moving to the brush guard connections. Ensure all fasteners are secure. Refer to vehicle-specific torque specifications if available.

בילד 4.2: עקס.ample of a bolted connection point.
- לעצט דורכקוק: Double-check all connections to ensure they are tight and secure. Verify that the brush guard does not interfere with any vehicle functions (e.g., hood opening, lights).
באַמערקונג: Due to variations in vehicle models and the general nature of these instructions, professional installation is highly recommended to ensure proper fitment and safety.
5. אָפּעראַציע
Once installed, the HECASA Brush Guard operates passively by providing a protective barrier for the front of your vehicle. No specific operational steps are required.
- The brush guard is designed to absorb minor impacts and protect the grille, headlights, and bumper from brush, debris, and small obstacles.
- Be aware of the increased front-end length of your vehicle when parking or maneuvering in tight spaces.
6. וישאַלט
Regular maintenance will help preserve the appearance and integrity of your brush guard.
- רייניקונג: Wash the brush guard regularly with mild automotive soap and water to remove dirt, mud, and road grime. Avoid abrasive cleaners or harsh chemicals that could damage the powder-coated finish.
- דורכקוק: Periodically inspect all mounting hardware for tightness. Vibrations from driving can cause bolts to loosen over time. Retighten any loose fasteners.
- שעדיקן טשעק: Check for any signs of rust, chips in the powder coating, or structural damage. Address minor chips with touch-up paint to prevent rust. Significant damage may require replacement.
7. טראָובלעשאָאָטינג
די סעקציע באהאנדלט אלגעמיינע פראבלעמען וואס קענען אויפשטיין בעת אדער נאך דער אינסטאלאציע.
- Issue: Brush guard rattles or feels loose.
לייזונג: Re-check all mounting bolts and nuts. Ensure they are tightened securely. Over time, vibrations can loosen fasteners. - Issue: Difficulty aligning the brush guard.
לייזונג: Ensure all mounting hardware is only hand-tightened initially, allowing for maximum adjustment. Adjust the brush guard's position until it is centered and level, then gradually tighten all fasteners. Professional assistance may be required for complex alignments. - Issue: Parts appear to be missing or do not fit.
לייזונג: קערפאַלי שייַעךview the package contents list (Section 3) and compare with received items. If parts are genuinely missing or incorrect, contact HECASA customer support with your purchase details. Note that some minor modifications or adjustments might be necessary for optimal fitment due to manufacturing tolerances or vehicle variations. - Issue: Brush guard interferes with vehicle components.
לייזונג: Loosen mounting hardware and re-adjust the brush guard's position to ensure adequate clearance. If interference persists, verify that the brush guard is compatible with your specific vehicle model and trim level (e.g., non-Sport bumper).
8. פּראָדוקט ספּעסאַפאַקיישאַנז
| שטריך | באַשרייַבונג |
|---|---|
| סאָרט | HECASA |
| מאָדעל נומער | CB-1241 |
| מאַטעריאַל | אַללוי סטיל |
| קאָליר | שוואַרץ |
| ייבערפלאַך ענדיקן | פּודער קאָוטאַד |
| ייַנמאָנטירונג טיפּ | Bolt-On (No-Drill) |
| פאָרמיטל סערוויס טיפּ | טראָק |
| אַוטאָמאָטיווע פּאַסיק טיפּ | פאָרמיטל ספּעציפיש פּאַסיק |
9. וואָראַנטי אינפֿאָרמאַציע
HECASA does not provide a specific manufacturer's warranty description for this product. For information regarding returns or replacements, please refer to the retailer's return policy where the product was purchased. Typically, a 30-day return window is offered for eligible items.
10. קונה שטיצן
If you have any questions, require assistance with installation, or need to report missing/damaged parts, please contact the seller or HECASA customer support through the platform where you made your purchase. Provide your order number and a detailed description of your inquiry for prompt assistance.
For more information about HECASA products, you may visit the official HECASA store page on Amazon: HECASA Store