
1. הקדמה
The Antec NX260 is a mid-tower ATX gaming PC case designed to accommodate high-performance components. It features a fine mesh front panel for optimal airflow, a tempered glass side panel to showcase your build, and includes three 120mm ARGB fans for effective cooling and customizable lighting. This manual provides essential information for setting up, operating, and maintaining your NX260 case.

2. פּעקל אינהאַלט
ביטע באַשטעטיקן אַז אַלע זאכן זענען פאַראַן אין דעם פּעקל:
- Antec NX260 ATX Mid-Tower PC Case
- 3 x 120mm ARGB Fans (pre-installed in the front)
- Accessory Box (containing screws, standoffs, and cable ties)
- באַניצער מאַנואַל (דעם דאָקומענט)
3. טעכניש ספּעסאַפאַקיישאַנז
| שטריך | באַשרייַבונג |
|---|---|
| מאָדעל נאָמען | נקסקסנומקס |
| טיפּ פון קאַסטן | מיטן טורעם |
| דימענשאַנז (די רענטגענ וו x ה) | 50.6 X 28.4 X 44.5 סענטימעטער (19.9 X 11.2 X 17.5 אינטשעס) |
| וואָג | 4.3 קג (9.48 לבס) |
| מאַטעריאַל | שטאָל, געהאַרצטע גלאָז |
| מאָטהערבאָאַרד סופּפּאָרט | אַטקס, מיקראָ אַטקס |
| יקספּאַנשאַן סלאָץ | 7 |
| פאָר בייס | 2 x 3.5" HDD / 2.5" SSD (convertible), 2 x 2.5" SSD |
| פראָנט איך / אָ פּאָרץ | Power, LED Control Button, 1 x USB 3.0, 2 x USB 2.0, HD-AUDIO |
| אַרייַנגערעכנט פאַנס | 3 x 120mm ARGB fans (Front) |
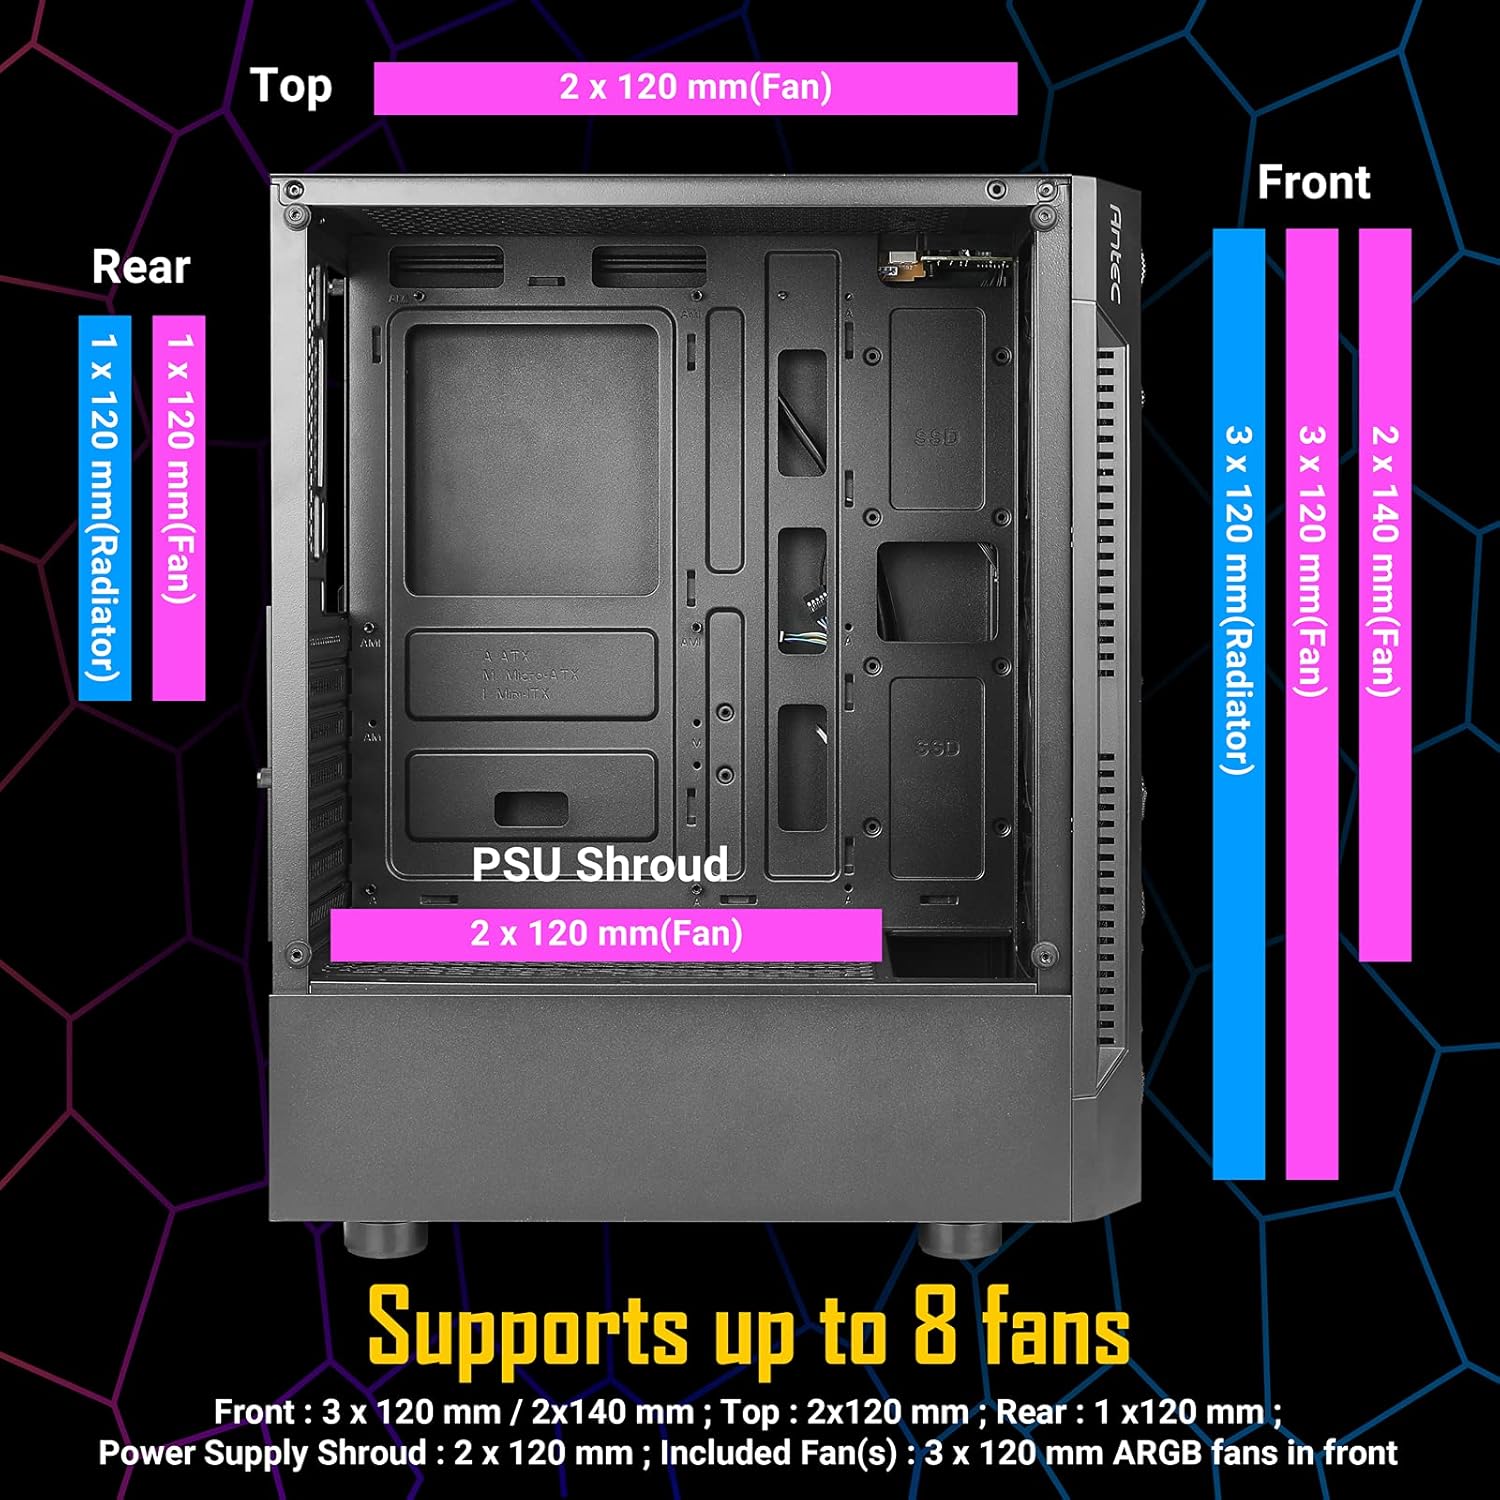
| פאָכער שטיצע (מאַקס) | Front: 3 x 120mm / 2 x 140mm; Top: 2 x 120mm; Rear: 1 x 120mm; PSU Shroud: 2 x 120mm |
| ראַדיאַטאָר שטיצן | Front: Up to 360mm; Rear: 120mm |
| מאַקסימום גפּו לענג | 310 מם |
| מאַקסימום קפּו קולער הייך | 160 מם |
| מאַקסימום פּסו לענג | 185mm (with HDD), 310mm (without HDD) |


4. סעטאַפּ און ייַנמאָנטירונג
4.1. פאַר-ינסטאַלירונג טשעקליסט
- Ensure you have all necessary components (motherboard, CPU, GPU, PSU, storage, RAM).
- Gather essential tools: Phillips head screwdriver, cable ties (some included).
- Work on a clean, static-free surface.
4.2. Component Installation Guide
- אַראָפּנעמען זייַט פּאַנאַלז: Carefully unscrew the tempered glass side panel and the solid steel side panel. Place them aside on a soft, flat surface to prevent scratches.
- ינסטאַלירן מאָטהערבאָאַרד: Align your ATX or Micro ATX motherboard with the standoffs inside the case. Secure it with the provided screws.
- אינסטאַלירן סי-פּי-יו קולער: If using an air cooler, install it according to its manufacturer's instructions, ensuring it does not exceed the 160mm height limit. For liquid cooling, install the radiator (up to 360mm in front, 120mm in rear) and then the CPU block.
- אינסטאַלירן גראַפיקס קאַרטל (GPU): Insert your graphics card into the appropriate PCIe slot on your motherboard. Ensure it is securely seated and fastened with the expansion slot screws. The case supports GPUs up to 310mm in length.
- אינסטאַלירן סטאָרידזש דרייווס:
- For 3.5" HDDs or 2.5" SSDs: Use the convertible drive bays located in the PSU shroud area.
- For 2.5" SSDs: Mount them on the dedicated SSD trays behind the motherboard tray.
- אינסטאַלירן מאַכט צושטעלן אַפּאַראַט (PSU): Mount your PSU in the bottom rear compartment of the case. Ensure the fan faces downwards (if the case has bottom ventilation) or upwards. Secure it with screws. The case supports PSUs up to 185mm in length with HDDs installed, or 310mm without HDDs.
- פֿאַרבינדן די פראָנט פּאַנעל קייבאַלז: Connect the front panel I/O cables (Power, Reset, USB 3.0, USB 2.0, HD-AUDIO, LED) to their corresponding headers on your motherboard. Refer to your motherboard manual for correct pin assignments.
- קאַבלע פאַרוואַלטונג: Utilize the space behind the motherboard tray and the cable routing cutouts to neatly organize your cables. Use the included cable ties to secure them, improving airflow and aesthetics.
- Reinstall Side Panels: Once all components are installed and cables are managed, carefully reattach both side panels.

5. אַפּערייטינג ינסטרוקטיאָנס
5.1. פּאַוערינג אויף דיין סיסטעם
After completing the installation and connecting all external peripherals (monitor, keyboard, mouse, power cable), press the power button located on the front I/O panel to start your computer.
5.2. ARGB פען קאנטראל
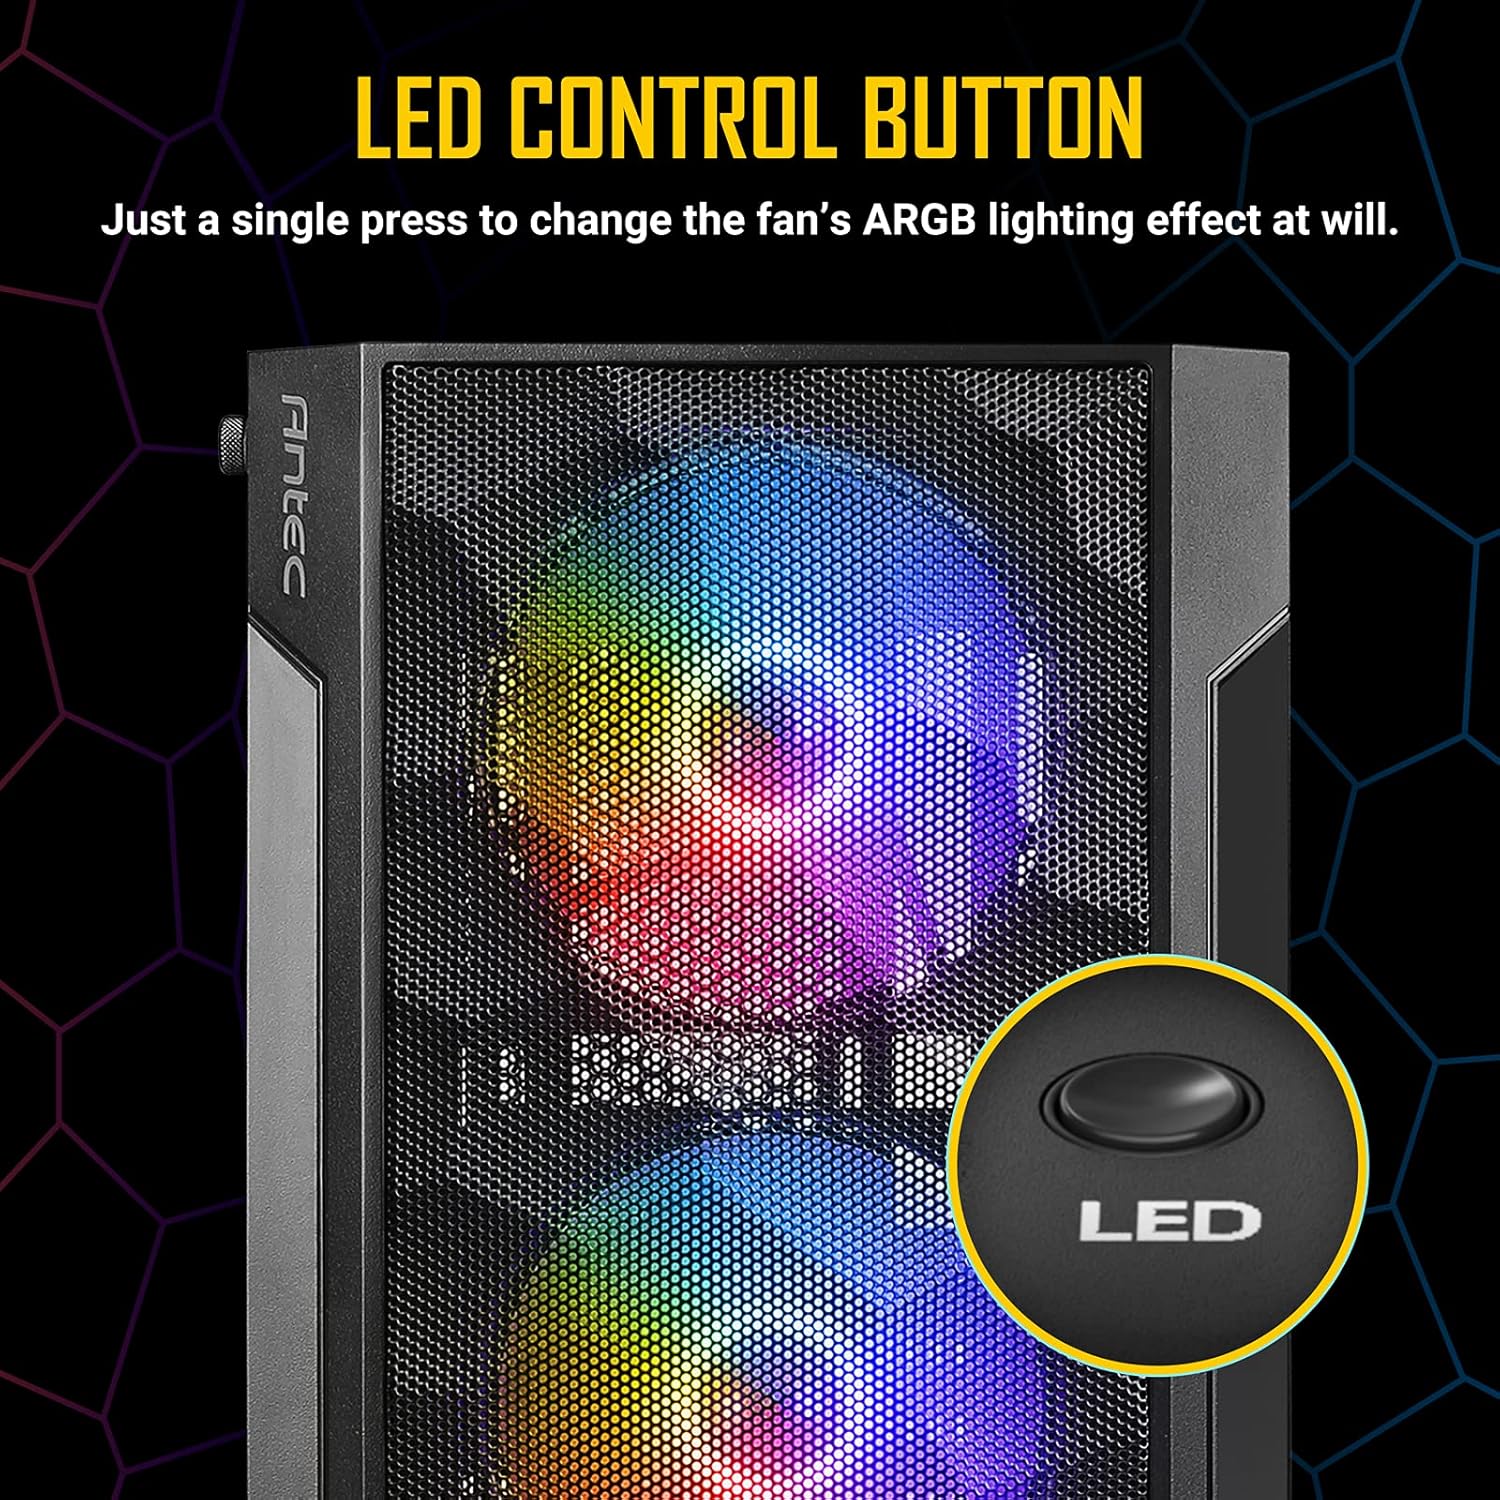
The Antec NX260 includes three pre-installed 120mm ARGB fans in the front. These fans are controlled via a dedicated LED button on the front I/O panel.
- טוישן לייטינג עפעקט: Press the LED button briefly to cycle through various pre-set ARGB lighting modes and colors.
- קער אַוועק לייץ: Press and hold the LED button for a few seconds to turn off the ARGB lighting. Repeat the action to turn them back on.
באַמערקונג: The included ARGB fans use a proprietary connection and are controlled directly by the case's integrated controller. They may not be compatible with motherboard ARGB software synchronization without an additional adapter (not included).
6. וישאַלט
רעגולערע אויפהאלטונג העלפט זיכער מאכן די בעסטע פאָרשטעלונג און לאַנגלעבעדיקייט פון אייער פּיסי קעסטל.
- שטויב רייניקונג: Periodically clean the mesh front panel and any dust filters (if present) to maintain good airflow. Use compressed air or a soft brush to remove accumulated dust.
- טעמפּערד גלאז פּאַנעל: Clean the tempered glass side panel with a soft, lint-free cloth and a non-abrasive glass cleaner. Avoid harsh chemicals that could damage the glass or coating.
- ינלענדיש רייניקונג: With the system powered off and unplugged, use compressed air to clear dust from internal components and fan blades.
7. טראָובלעשאָאָטינג
If you encounter issues with your Antec NX260 case, consider the following:
- פאַנס דרייען זיך נישט/צינדן זיך אָן:
- Check if the fan power cables are securely connected to the case's fan controller or motherboard headers.
- Ensure the SATA power connector for the fan controller is connected to your PSU.
- Verify that the LED button is not in the 'off' state (press it briefly or hold to cycle modes).
- פראָנט USB פּאָרטן אַרבעטן נישט:
- Ensure the USB 3.0 and USB 2.0 headers from the front panel are correctly connected to your motherboard. Refer to your motherboard manual for correct pin orientation.
- Front Audio Jacks Not Working:
- Verify that the HD-AUDIO cable from the front panel is correctly connected to the audio header on your motherboard.
- Check your operating system's audio settings and drivers.
- מאַכט קנעפּל ריספּאַנד נישט:
- Ensure the power switch cable from the front panel is correctly connected to the power header on your motherboard.
8. וואָראַנטי און שטיצן
8.1. וואָראַנטי אינפֿאָרמאַציע
The Antec NX260 PC case comes with a manufacturer's warranty. For specific details regarding warranty duration and coverage in your region, please refer to the warranty card included with your product or visit the official Antec website. Spare parts availability in the EU is guaranteed for 2 years from the date of purchase.
8.2. טעכניש שטיצן
For technical assistance, troubleshooting beyond this manual, or inquiries about replacement parts, please contact Antec customer support through their official website. Have your product model (NX260) and proof of purchase ready when contacting support.