
1. הקדמה
This manual provides comprehensive instructions for the installation, operation, and maintenance of your PANOEAGLE DS-7608NI-I2/8P 8-Channel 4K Network Video Recorder (NVR). Please read this manual thoroughly before using the product to ensure proper setup and functionality. Retain this manual for future reference.
The PANOEAGLE DS-7608NI-I2/8P is an embedded Plug and Play 4K NVR designed for robust 24/7 surveillance recording. It supports up to 8 cameras simultaneously, offering high-resolution recording up to 12MP and utilizing H.264+/H.264/H.265 video compression for efficient storage. Its Power over Ethernet (PoE) capability simplifies camera installation by providing both power and data through a single cable.
2. פּראָדוקט איבערview
מאַכט זיך באַקאַנט מיט די קאָמפּאָנענטן און אינטערפייסיז פון אייער NVR.
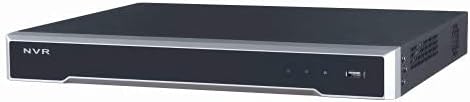
פיגורע 2.1: פראָנט פּאַנעל View
This image displays the front panel of the NVR, featuring the 'NVR' branding, status indicators, and a USB port for peripheral connections.

פיגורע 2.2: דערציען פּאַנעל View
This image shows the rear panel of the NVR, highlighting the power input, cooling fan, 8 PoE ports, network port, USB ports, audio input/output, VGA, and HDMI video outputs, and alarm/control terminals.

פיגור 2.3: געווינקלטע הינטערשטע View
An angled perspective of the NVR's rear panel, providing a clearer view of the various connectivity options and ventilation.
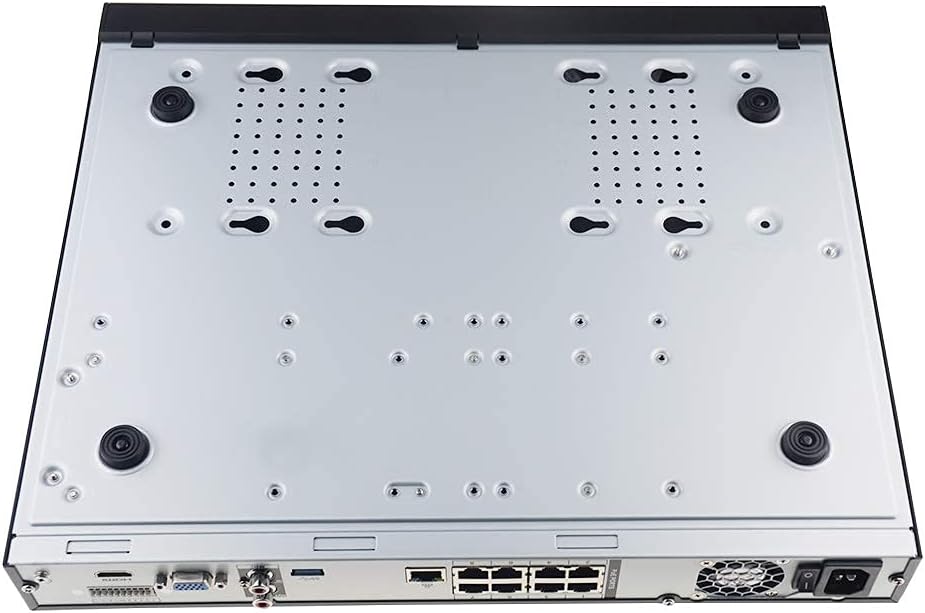
Figure 2.4: Bottom Panel View
This image displays the bottom of the NVR, showing mounting points and ventilation holes, along with rubber feet for stable placement.
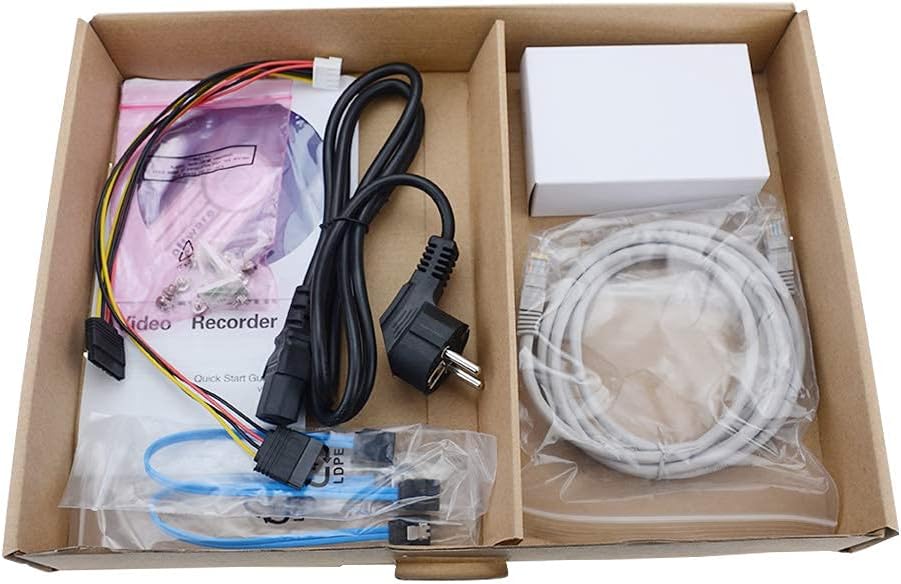
פיגורע 2.5: פּעקל אינהאַלט
A view of the accessories included with the NVR, typically comprising a power cable, network cable, USB mouse, SATA cables for hard drive installation, and a quick start guide.
3. שליסל פֿעיִקייטן
- 8-קאַנאַל רעקאָרדינג: Supports simultaneous recording from up to 8 IP cameras.
- 4K האַכלאָטע שטיצן: Capable of recording and displaying video resolutions up to 12MP.
- PoE Easy Setup: Integrated Power over Ethernet (PoE) ports for direct connection and power supply to IP cameras via a single Ethernet cable.
- אַוואַנסירטע ווידעא קאַמפּרעשאַן: Utilizes H.264+/H.264/H.265 codecs for efficient storage and bandwidth usage.
- 24/7 רעקאָרדינג: Designed for continuous, reliable surveillance monitoring.
- HDMI רעזולטאַט: High-definition video output for connecting to monitors or TVs.
- SATA שטיצן: Features 2 SATA interfaces for internal hard drive installation (HDDs not included).
4. סעטאַפּ גייד
4.1. האַרט דרייוו אינסטאַלאַציע (אפציאָנעל)
If your NVR did not come with a pre-installed hard drive, follow these steps:
- אויסלעשן די NVR און אפשטעלן אלע קייבלס.
- שרויפט אַראָפּ און נעמט אַראָפּ די אויבערשטע דעקל פֿון די NVR שאַסי.
- פֿאַרבינדט דעם SATA דאַטן קאַבל און מאַכט קאַבל פֿון די NVR צום האַרד דרייוו.
- באַפֿעסטיקן דעם האַרט דרייוו צום NVR שאַסי מיט די צוגעשטעלטע שרויפֿן.
- צוריקשטעלן די אויבערשטע דעקל און זיכערן עס מיט שרויפן.
4.2. ערשטע פֿאַרבינדונגען
- פֿאַרבינדן אַ מאָניטאָר: פֿאַרבינדט אַ מאָניטאָר צום NVR'ס HDMI אָדער VGA אַרויסגאַנג פּאָרט.
- פֿאַרבינדן אַ מויז: שטעקט אריין די USB מויז אין איינעם פון די NVR'ס USB פּאָרטן.
- פאַרבינדן צו די נעץ: פֿאַרבינדט דעם NVR'ס LAN פּאָרט צו אייער ראַוטער אָדער נעץ סוויטש מיט אַן עטהערנעט קאַבל.
- פֿאַרבינדן IP קאַמעראַס: Connect your PoE IP cameras to the NVR's PoE ports using Ethernet cables. The NVR will provide power and data to the cameras.
- מאַכט אויף: פֿאַרבינדט דעם מאַכט אַדאַפּטער צום NVR און דערנאָך שטעקט עס אַרײַן אין אַן עלעקטרישער אַוטלעט. דער NVR וועט זיך אויטאָמאַטיש אָנצינדן.
4.3. ערשט קאָנפיגוראַטיאָן
Upon first boot, the NVR will guide you through an initial setup wizard. This typically includes:
- Setting up an administrator password.
- Configuring network settings (DHCP is usually default).
- Initializing the hard drive (if newly installed).
- Searching for and adding connected IP cameras.
- באַשטעטיקן דאַטע און צייט.
גיי די פּראַמפּס אויף דעם עקראַן צו פאַרענדיקן די סעטאַפּ.
5. אַפּערייטינג ינסטרוקטיאָנס
5.1. לייוו View
After logging in, the NVR will typically display the live view of all connected cameras. You can switch between single-camera view, מולטי-קאַמעראַ גריד view, און קאַסטאַמייז דיספּליי לייאַוץ.
5.2. רעקאָרדינג
- קעסיידערדיק רעקאָרדינג: Records 24/7. Configure schedules in the NVR's menu.
- רעקאָרדינג פון באַוועגונג דעטעקטיאָן: Records only when motion is detected. Sensitivity and detection zones can be adjusted.
- סקעדזשולד רעקאָרדינג: שטעלן ספּעציפֿישע צייטן פֿאַר רעקאָרדינג.
Access recording settings via the NVR's main menu, usually under "Record" or "Storage" settings.
5.3. פּלייַבאַקק
צו שייַעךview רעקאָרדעד פוtage:
- פֿון די הויפּט מעניו, אויסקלײַבן "Playback".
- אויסקלײַבן די קאַמערא(ס) און דאַטע/צײַט ראַם וואָס איר ווילט איבערמאַכןview.
- Use the timeline to navigate through recorded events. Options for fast-forward, rewind, and pause are available.
5.4. ווייַט אַקסעס
The NVR supports remote viewדורך אַ מאָביל אַפּ אָדער web browser. Refer to the NVR's network settings for details on enabling P2P (peer-to-peer) or port forwarding for remote access. Download the official PANOEAGLE mobile application from your device's app store.
6. וישאַלט
- רעגולער רייניקונג: Keep the NVR free from dust. Use a soft, dry cloth for exterior cleaning. Ensure ventilation openings are clear.
- Firmware דערהייַנטיקונגען: Periodically check the PANOEAGLE official website for firmware updates. Updates can improve performance, add features, and enhance security. Follow update instructions carefully.
- האַרט דרייוו געזונט: Monitor the health of your hard drive(s) through the NVR's system information. Replace failing drives promptly to avoid data loss.
- שפּריכוואָרט זיכערהייט: Regularly change your administrator password and use strong, unique passwords.
7. טראָובלעשאָאָטינג
| פּראָבלעם | מעגלעך סיבה | לייזונג |
|---|---|---|
| קיין ווידעא ארויסגאנג אויף מאָניטאָר. | לויזער קאַבל פֿאַרבינדונג, אומרעכטע אינפוט מקור אויף מאָניטאָר, NVR נישט אנגעצונדן. | Check HDMI/VGA cable connections. Ensure monitor is set to correct input. Verify NVR power. |
| קאַמעראַס ווייַזן זיך נישט אין לייוו view. | Camera not powered, network issue, camera not added to NVR, incorrect IP address. | Check camera power and Ethernet cables. Ensure cameras are connected to PoE ports. Use NVR's camera management to search and add cameras. Verify camera IP addresses. |
| No recording or missing footage. | Hard drive not installed/initialized, recording schedule not configured, hard drive full, hard drive failure. | Install and initialize HDD. Configure recording schedules. Check HDD status and capacity. Replace faulty HDD. |
| קען נישט צוטריטן די NVR פון ווייטנס. | Network configuration issues, P2P disabled, incorrect app settings, firewall blocking. | Ensure NVR has internet access. Enable P2P service. Verify app settings and NVR's network configuration. Check router firewall settings. |
8. ספּעסאַפאַקיישאַנז
| שטריך | דעטאַל |
|---|---|
| מאָדעל | DS-7608NI-I2/8P |
| סאָרט | PANOEAGLE (Compatible with Hi-k USA systems) |
| נומער פון טשאַנאַלז | 8 |
| מאַקס האַכלאָטע | אַרויף צו 12 מפּ |
| ווידעא קאַמפּרעשאַן | ה.264+/ה.264/ה.265 |
| ווידעא רעזולטאַט | הדמי, ווגאַ |
| אַודיאָ אַרייַנשרייַב | RCA |
| SATA אינטערפייסיז | 2 (for HDD) |
| קאַנעקטיוויטי טעכנאָלאָגיע | HDMI, עטערנעט (PoE) |
| ערשטער דאַטע בנימצא | יולי 28, 2021 |
9. וואָראַנטי און שטיצן
For warranty information, please refer to the warranty card included with your product or visit the official PANOEAGLE webזייטל. טעכנישע שטיצע קען זיין בנימצא דורך די פאַבריקאַנט'ס webזייטל אדער דורך קאנטאקטירן זייער קאסטומער סערוויס דעפארטמענט.
Always ensure you are using official channels for support and firmware downloads to maintain product integrity and security.