
1. הקדמה
This manual provides detailed instructions for the installation, operation, and maintenance of your SECULINK 16-Channel 4K/8MP Network Video Recorder (NVR). This NVR is designed to provide a comprehensive security solution, supporting up to 16 channels of 4K (8MP) video recording from ONVIF-compliant IP cameras. It features advanced H.265+ compression, motion detection recording, and P2P remote access for convenient monitoring.
2. פּראָדוקט איבערview
שליסל פֿעיִקייטן
- אולטרא HD ווידעא: Full 4K (3840x2160P) video viewing and recording on all 16 channels, supporting 8MP/5MP/4MP/3MP/1080p ONVIF IP cameras.
- H.265+ Compression: Enhances bandwidth and storage efficiency, providing smaller file sizes, higher definition, and longer recording times. Supports simultaneous network transmission and playback.
- רעקאָרדינג פון באַוועגונג דעטעקטיאָן: Configurable to record only when motion is detected, optimizing storage space.
- גרינג סעטאַפּ: Requires a wired connection to your router for operation and manages all connected IP cameras on your network.
- קייפל סטאָרידזש אָפּציעס: Supports up to 6TB internal SATA HDD (sold separately) and cloud storage service (sold separately). Backup options include USB flash disk, USB DVR writer, and network.
- פּ2פּ ווײַט צוטריט: Cloud P2P function for remote viewing on smartphones, tablets, and PCs via the XMeye app.
פּעקל אינהאַלט
- 1x SECULINK 16-Channel Network Video Recorder (NVR1616PF-4K)
- 1x מאַכט אַדאַפּטער
- 1x וסב מאַוס
3. סעטאַפּ גייד
3.1 פיזישע פֿאַרבינדונגען
Before powering on the NVR, ensure all necessary connections are made.
- פֿאַרבינדן אַ מאָניטאָר: Use an HDMI or VGA cable to connect the NVR to a monitor or TV.
- פֿאַרבינדן אַ מויז: Plug the included USB mouse into one of the USB ports on the NVR.
- נעץ קאַנעקשאַן: Connect the NVR's LAN port to your router using an Ethernet cable. This NVR requires a wired network connection.
- מאַכט קשר: Connect the power adapter to the NVR's DC 12V input and then plug it into a power outlet.

Figure 3.1: NVR Rear Panel Connections
3.2 האַרט דרייוו אינסטאַלאַציע (האַרט דרייוו נישט אַרייַנגערעכנט)
The NVR supports a single SATA hard drive up to 6TB for local storage. Follow these steps to install an HDD:
- Unscrew the top cover of the NVR chassis.
- Connect the SATA data and power cables from the NVR to the corresponding ports on the hard drive.
- באַפֿעסטיקן דעם האַרט דרייוו צום NVR שאַסי מיט די צוגעשטעלטע שרויפֿן.
- צוריקשטעלן די אויבערשטע דעקל און זיכערן עס מיט שרויפן.
After installation, the NVR will typically detect the new HDD. You may need to format the HDD through the NVR's system settings before recording can begin.
3.3 נעטוואָרק קאָנפיגוראַטיאָן
The NVR connects to your network via an Ethernet cable. Ensure your router is functioning correctly. The NVR will typically obtain an IP address automatically via DHCP. For remote access, ensure your network allows outbound connections for the NVR's P2P service.
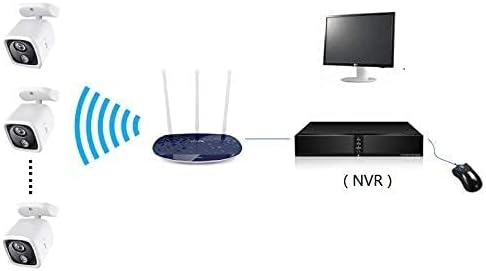
Figure 3.2: NVR Network Connection Diagram
3.4 קאַמעראַ ינטעגראַטיאָן
The NVR supports ONVIF-compliant IP cameras. To add cameras:
- Ensure your IP cameras are powered on and connected to the same network as the NVR.
- Access the NVR's main menu using the connected monitor and mouse.
- Navigate to the Camera Management or Channel Setup section.
- The NVR should automatically detect ONVIF cameras on the network. Select and add them, providing credentials if required.
4. אַפּערייטינג ינסטרוקטיאָנס
4.1 באַניצער צובינד נאַוויגאַציע
Use the connected USB mouse to navigate the NVR's graphical user interface (GUI). Right-click to access the main menu, and left-click to select options or open sub-menus.
4.2 רעקאָרדינג פאַרוואַלטונג
The NVR offers flexible recording options:
- קעסיידערדיק רעקאָרדינג: Records 24/7 without interruption.
- רעקאָרדינג פון באַוועגונג דעטעקטיאָן: Records only when motion is detected by the cameras, saving storage space. Configure motion detection zones and sensitivity in the NVR settings.
- סקעדזשולד רעקאָרדינג: Set specific times for recording to occur.
These modes can be configured per channel in the NVR's recording settings.

Figure 4.1: Recording Modes
4.3 Remote Access (P2P)
צו view your cameras remotely:
- אָפּלאָדירן די XMeye אַפּ אויף דיין סמאַרטפאָנע אָדער טאַבלעט.
- רעגיסטרירן אַ חשבון און קלאָץ אין.
- Add your NVR device by scanning the QR code displayed on the NVR's monitor (usually found in the P2P or Cloud settings) or by manually entering the device ID.
- אַמאָל צוגעגעבן, קענט איר view live feeds and playback recorded footagפון ערגעץ מיט אַן אינטערנעט פֿאַרבינדונג.

Figure 4.2: P2P Remote Access
4.4 ווידעא ווידערשפּיל און באַקאַפּ
צו שייַעךview רעקאָרדעד פוtage, access the Playback menu from the NVR's main interface. You can search by time, date, event, or channel. To back up footage, connect a USB flash drive to the NVR's USB port and use the backup function in the menu.
5. וישאַלט
5.1 האַרט דרייוו פאַרוואַלטונג
Regularly check the status of your hard drive through the NVR's system settings. Consider backing up critical footage periodically to an external device or cloud storage. If the HDD fails, replace it following the installation steps in Section 3.2.
5.2 סיסטעם דערהייַנטיקונגען
קאָנטראָלירט פּעריִאָדיש דעם פאַבריקאַנט'ס website for firmware updates. Keeping your NVR's firmware updated can improve performance, add new features, and enhance security. Follow the provided instructions carefully when performing firmware updates.
5.3 רייניקונג
Ensure the NVR unit is kept in a clean, dry, and well-ventilated area. Dust can accumulate and affect performance. Use a soft, dry cloth to clean the exterior of the NVR. Do not use liquid cleaners or aerosols.
6. טראָובלעשאָאָטינג
- קיין ווידעא ארויסגאַנג אויף מאָניטאָר:
- Check HDMI/VGA cable connections to both NVR and monitor.
- Ensure the monitor is set to the correct input source.
- Verify the NVR is powered on (power indicator light should be active). - קיין נעץ פֿאַרבינדונג:
- Ensure the Ethernet cable is securely connected to both the NVR and the router.
- Check if your router is functioning correctly.
- Verify network settings in the NVR's menu (e.g., DHCP enabled). - Cameras Not Displaying/Recording:
- Confirm IP cameras are powered on and connected to the network.
- Check camera IP addresses and ensure they are discoverable by the NVR.
- Verify camera credentials (username/password) are correctly entered in the NVR's camera management.
- Ensure the HDD is installed and formatted correctly for recording. - ווייַט אַקסעס נישט ארבעטן:
- Ensure the NVR has an active internet connection.
- Verify the P2P function is enabled in the NVR's network settings.
- Check your smartphone/tablet's internet connection.
- Ensure the correct device ID is entered in the XMeye app. - נעבעך ווידעא קוואַליטעט:
- Ensure cameras are set to their highest resolution (e.g., 4K/8MP).
- Check network bandwidth if experiencing lag or pixelation, especially for remote viewing.
7. ספּעסאַפאַקיישאַנז
| שטריך | באַשרייַבונג |
|---|---|
| מאָדעל נומער | NVR1616PF-4K |
| נומער פון טשאַנאַלז | 16 |
| האַכלאָטע | 16*4K 8MP |
| ווידעא רעזולטאַט | 1x VGA, 1x HDMI |
| אַודיאָ רעזולטאַט | 1x RCA |
| נעץ פּאָרט | 1x RJ45 10M/100M |
| וסב פּאָרט | 2 קס וסב 2.0 |
| סטרימינג ספּעציפֿיקאַציע | ONVIF |
| רעקאָרד מאָדע | Manual > Alarm > Motion Detection > Timing |
| ווידעא זוכן | צייט, דאַטע, געשעעניש, קאַנאַל זוכן |
| מאַכט | DC 12V |
| קאַסע גרייס | 260 מ״מ x 43 מ״מ x 190 מ״מ (10.24"ל x 7.48"ברייט x 1.69"ה) |
| הדד צובינד | סאַטאַ (מאַקס 6 טב) |
| APP | XMeye |
| קאַנעקטיוויטי טעכנאָלאָגיע | עטערנעט, הדמי, יו-עס-בי, ווגא |
| אַודיאָ אַרייַנשרייַב | מיקראָפאָן |
| פּונקט וואָג | 1.01 קילאָגראַמס |
8. וואָראַנטי און שטיצן
For warranty information, please refer to the documentation provided with your purchase or contact SECULINK customer support directly. Technical support is available through the manufacturer's official channels. Please visit the SECULINK webזייטל פֿאַר די מערסט אַרויף-צו-דאַטע שטיצע רעסורסן, אָפֿט געשטעלטע פֿראַגעס, און קאָנטאַקט אינפֿאָרמאַציע.