
1. הקדמה
The Italeri 1:72 F-4E/F Phantom II is a detailed scale model kit of the iconic McDonnell Douglas F-4E/F Phantom II fighter-bomber. This kit allows enthusiasts to assemble a faithful replica of one of the most recognized aircraft in military aviation history. Originally designed for the US Navy, the F-4 Phantom II was widely adopted by the US Air Force and achieved significant commercial success worldwide. The 'E' version, specifically developed for the US Air Force, featured an M61 Vulcan cannon in the nose and could be equipped with AIM-9 Sidewinder and AIM-7 Sparrow air-to-air missiles. Powered by two powerful J-79 General Electric engines, the Phantom II could exceed speeds of 1,240 knots (approximately 2,300 km/h). Several aircraft continue to fly in the air forces of Greece, Turkey, and Korea, having undergone extensive modernization programs.

Image 1.1: A completed Italeri 1:72 F-4E/F Phantom II model kit, showcasing the aircraft in flight.
2. זיכערקייַט אינפֿאָרמאַציע
Warning: Not suitable for children under 14 years.
This model kit contains small parts and requires the use of sharp tools and adhesives. Adult supervision is recommended for younger modelers. Always work in a well-ventilated area when using paints and glues. Keep all components and tools out of reach of small children.
3. פּעקל אינהאַלט
Your Italeri 1:72 F-4E/F Phantom II model kit includes:
- Plastic model kit parts (on sprues)
- Assembly instructions (illustrated step-by-step guide)
- Decal sheet for various versions
4. Setup: Required Tools and Materials
To successfully assemble your model kit, you will need the following items, which are ניט אַרייַנגערעכנט in the box and must be purchased separately:
- Modeling Knife or Sprue Cutters: For carefully removing parts from the sprues.
- Plastic Cement/Glue: Specifically designed for plastic model kits.
- Fine Sandpaper or Files: For cleaning up mold lines and sprue attachment points.
- פּיינט: Acrylic or enamel paints suitable for plastic models, according to your chosen color scheme.
- Paint Brushes or Airbrush: For applying paint.
- פּינצעט: For handling small parts and decals.
- Decal Setting Solution: To help decals conform to surfaces and eliminate silvering.
5. Operating: Assembly Instructions
The assembly of this high-quality Italeri kit requires careful attention to the step-by-step illustrated instructions provided in the box. Follow these general guidelines:
- Part Preparation: Carefully remove each part from its sprue using a modeling knife or sprue cutters. Clean any excess plastic (flash) or mold lines with fine sandpaper or a file.
- טרוקן פּאַסיק: Before applying glue, always dry-fit parts to ensure a proper fit. This helps identify any potential issues and allows for adjustments.
- גלוינג: Apply plastic cement sparingly to one of the mating surfaces. Hold the parts together firmly until the glue sets. Avoid using too much glue, as it can damage the plastic.
- גיי די מאַנואַל: Refer to the included assembly manual for the precise order of construction. The manual provides detailed diagrams for each step.
5.1. שליסל קאָמפּאָנענטן איבערview
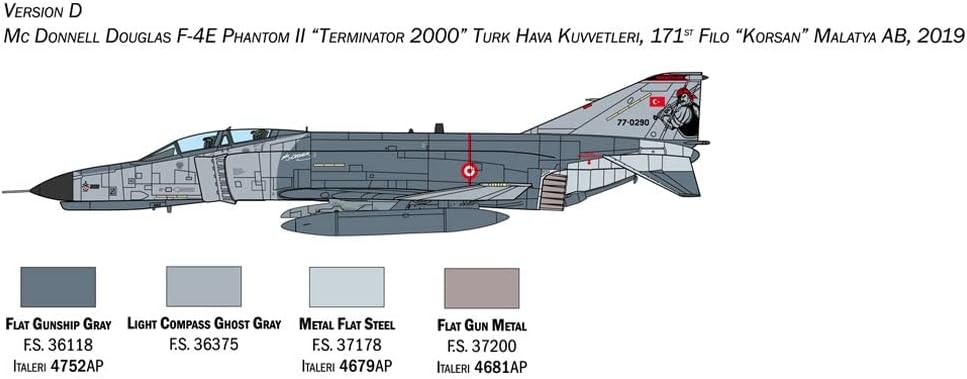
Image 5.1.1: Sprue with fuselage and cockpit parts.

Image 5.1.2: Sprue with wing and tail components.

Image 5.1.3: Sprue with missile armaments.

Image 5.1.4: Sprue with external fuel tanks.

Image 5.1.5: Clear plastic sprue with canopy parts.

Image 5.1.6: Additional clear plastic sprue.
6. Painting Guide
The F-4E/F Phantom II model kit offers several painting options based on historical aircraft. You can choose to paint your model according to your preferences or follow the detailed color schemes provided for specific versions. Ensure surfaces are clean and dry before painting. Apply thin, even coats of paint for the best results.
6.1. Version A: F-4E Phantom II (US Air Force, 1991)

Image 6.1.1: Painting scheme for Version A, US Air Force F-4E Phantom II.
6.2. Version B: F-4E Phantom II (Hellenic Air Force, 1991)
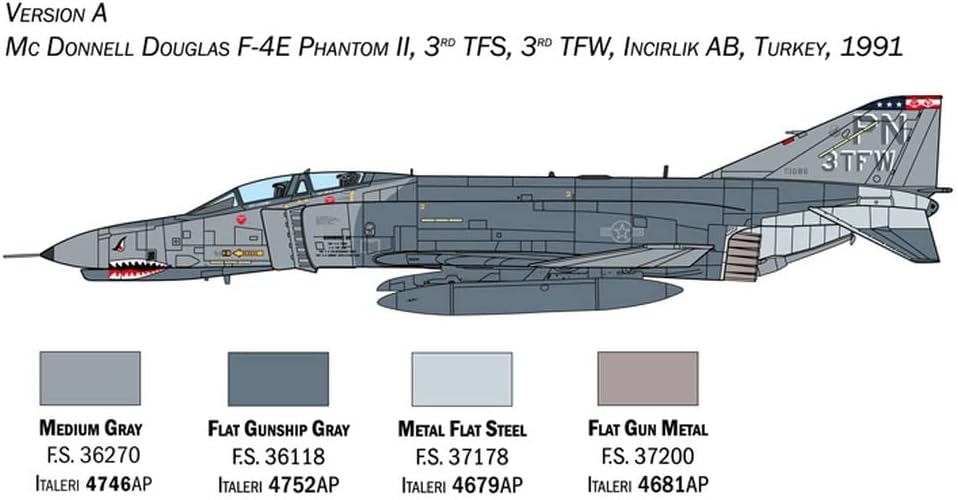
Image 6.2.1: Painting scheme for Version B, Hellenic Air Force F-4E Phantom II.
6.3. Version C: F-4F Phantom II (Luftwaffe, 2007)
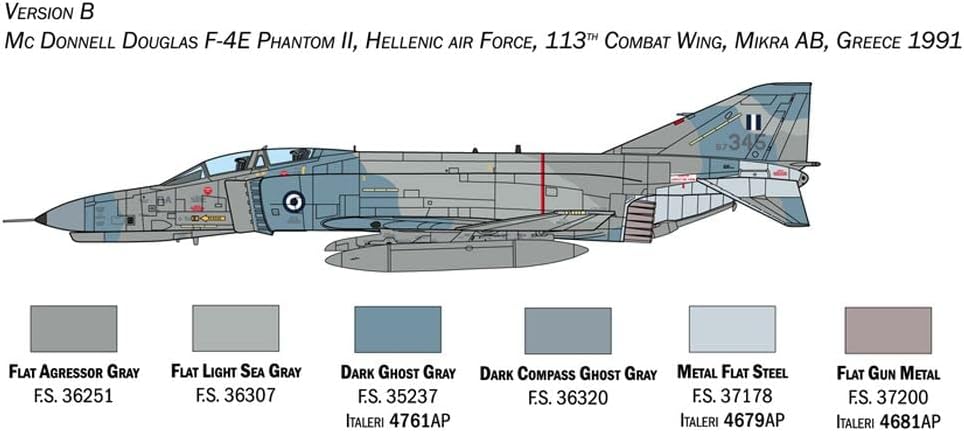
Image 6.3.1: Painting scheme for Version C, Luftwaffe F-4F Phantom II.
6.4. Version D: F-4E Phantom II 'Terminator 2000' (Turkish Air Force, 2019)

Image 6.4.1: Painting scheme for Version D, Turkish Air Force F-4E Phantom II 'Terminator 2000'.
7. דעקאַל אַפּפּליקאַטיאָן
Decals add the final details and markings to your model. Follow these steps for best results:
- צוגרייטן די ייבערפלאַך: Ensure the painted surface where the decal will be applied is smooth and glossy. A clear gloss coat can be applied if your paint finish is matte.
- Cut Decal: Carefully cut out the desired decal from the sheet using a sharp hobby knife or scissors, leaving a small margin around the artwork.
- Soak Decal: Dip the decal in lukewarm water for 10-20 seconds until it can slide freely on its backing paper.
- Apply Decal: Gently slide the decal from its backing paper onto the model surface. Position it carefully using tweezers or a wet brush.
- אַראָפּנעמען איבעריק וואַסער: Blot away any excess water with a soft, lint-free cloth or cotton swab.
- Setting Solution (Optional but Recommended): Apply a decal setting solution to help the decal conform to panel lines and irregular surfaces, and to eliminate 'silvering' (air trapped under the decal).
- Seal Decal: Once dry, apply a clear coat (gloss or matte, depending on your desired finish) over the decals to protect them and blend them into the model's surface.

Image 7.1: Decal sheet included with the model kit.
8. וישאַלט
Once your Italeri F-4E/F Phantom II model is complete, proper care will ensure its longevity and appearance:
- שטויב: Regularly dust your model with a soft brush or a can of compressed air to prevent dust buildup.
- ווייַז סוויווע: Display your model in a stable environment, away from direct sunlight, extreme temperatures, and high humidity, which can cause paint fading or warping.
- האַנדלינג: Handle the model by its sturdy parts, such as the fuselage or wings, to avoid damaging delicate components like antennas or landing gear.
9. טראָובלעשאָאָטינג
Here are some common issues encountered during model assembly and their solutions:
- פּאַרץ ניט פּאַסיק:
לייזונג: Dry-fit parts before gluing. If a part doesn't fit, gently sand or file the edges until it fits snugly. Avoid forcing parts together. - Excess Glue (Glue Blobs):
לייזונג: Use glue sparingly. If excess glue appears, let it dry completely, then carefully scrape or sand it away. For clear parts, use glues specifically designed not to fog plastic. - Decal Silvering:
לייזונג: Ensure the surface is glossy before applying decals. Use a decal setting solution to help the decal conform and eliminate air bubbles. Apply a clear coat over the finished decals. - Paint Issues (Uneven Coat, Brush Strokes):
לייזונג: Always apply paint in thin, multiple coats rather than one thick coat. Ensure paint is properly thinned. Use good quality brushes or an airbrush for smoother finishes.
10. ספּעסאַפאַקיישאַנז
| שטריך | דעטאַל |
|---|---|
| סאָרט | Italeri |
| מאָדעל נאָמען | F-4E/F Phantom II |
| מאָדעל נומער | 1448ס |
| וואָג | 1:72 |
| מאַטעריאַל | פּלאַסטיק |
| פארזאמלט לענג | 26.7 סענטימעטער (10.5 אינטשעס) |
| אַרייַנגערעכנט קאַמפּאָונאַנץ | Plastic model kit parts, Assembly instructions |
| ספּעציעלע פֿעיִקייטן | Super Decals for 4 versions, M61 Vulcan cannon for F-4E version |
| רעקאַמענדיד עלטער | 14 יאר און העכער |
11. וואָראַנטי אינפֿאָרמאַציע
This Italeri model kit is covered by the statutory warranty as per applicable consumer protection laws. Please retain your proof of purchase for any warranty claims.
12. שטיצן
For additional assistance, detailed product information, or to inquire about replacement parts, please visit the official Italeri website or contact their customer service department. Contact details can typically be found on the Italeri packaging or their official webפּלאַץ.
You can visit the Italeri store on Amazon: Italeri Store