
1. הקדמה
This manual provides essential information for the safe and efficient use of your iiyama G2470HSU-B1 23.8-inch IPS Full HD 165Hz Gaming Monitor. Please read these instructions thoroughly before operating the device and retain them for future reference.
2. זיכערקייַט אינפֿאָרמאַציע
- שטעלט נישט אויס דעם מאָניטאָר צו רעגן אָדער פייכטקייט צו פאַרמייַדן פייער אָדער שאָק געפאַרן.
- עפֿנט נישט דעם מאָניטאָר casinז. עס זענען נישטאָ קיין טיילן וואָס דער באַניצער קען סערוויסן אינעווייניק. לאָזט איבער אַלע סערוויסינג צו קוואַליפֿיצירטע סערוויס פּערסאָנעל.
- זיכער מאַכן אַז די ווענטילאַציע איז ריכטיק. נישט פאַרשפּאַרן די ווענטילאַציע עפענונגען.
- ניצן בלויז די מאַכט שנור סאַפּלייד מיט די מאָניטאָר.
- שטעלט דעם מאָניטאָר אויף אַ סטאַבילער, גלאַטער ייבערפלאַך כּדי צו פאַרהיטן אַז ער זאָל נישט פאַלן.
- ויסמיידן פּלייסינג שווער אַבדזשעקץ אויף די מאַכט שנור.
3. פּעקל אינהאַלט
באַשטעטיקט אַז אַלע זאכן וואָס זענען אויסגערעכנט אונטן זענען פאַראַן אין אייער פּעקל:
- iiyama G2470HSU-B1 Monitor
- מאָניטאָר שטאַנד (באַזע און האַלדז)
- מאַכט קאַבלע
- HDMI קאַבלע
- DisplayPort קאַבלע
- וסב אַפּסטרים קאַבלע
- באַניצער מאַנואַל (דעם דאָקומענט)
4. סעטאַפּ
4.1 צוזאַמענשטעלן דעם שטאַנד
- לייגט פֿאָרזיכטיק דעם מאָניטאָר מיטן פּנים אַראָפּ אויף אַ ווייכן, ריינעם שטאָף כּדי צו פֿאַרמייַדן קראַצן.
- Attach the stand neck to the back of the monitor. Ensure it clicks securely into place.
- Attach the stand base to the neck and tighten the screw at the bottom of the base.

פיגורע 4.1: פראָנט view פונעם מאָניטאָר מיטן שטאַנד.
4.2 קאַנעקטינג די מאָניטאָר
פאַרבינדן די מאָניטאָר צו דיין קאָמפּיוטער אָדער אנדערע דעוויסעס מיט די צונעמען קייבאַלז.
- ווידעא ינפּוט: Connect either an HDMI cable or a DisplayPort cable from your computer's graphics card to the corresponding port on the monitor.
- וסב כאַב: Connect the USB upstream cable from your computer to the USB-B port on the monitor to enable the monitor's USB 2.0 ports.
- אַודיאָ רעזולטאַט: If desired, connect headphones or external speakers to the 3.5mm audio output jack.

Figure 4.2: Monitor input ports.
4.3 מאַכט קאַנעקשאַן
פֿאַרבינדט דעם מאַכט קאַבל צום מאָניטאָר'ס מאַכט אַרייַנגאַנג און דערנאָך שטעקט דעם אַנדערן עק אין אַ געערדטן עלעקטרישן ווענטיל.
5. אַפּערייטינג ינסטרוקטיאָנס
5.1 מאַכט אויף / אַוועק
Press the power button located on the rear of the monitor to turn it on or off. The power indicator light will illuminate when the monitor is on.
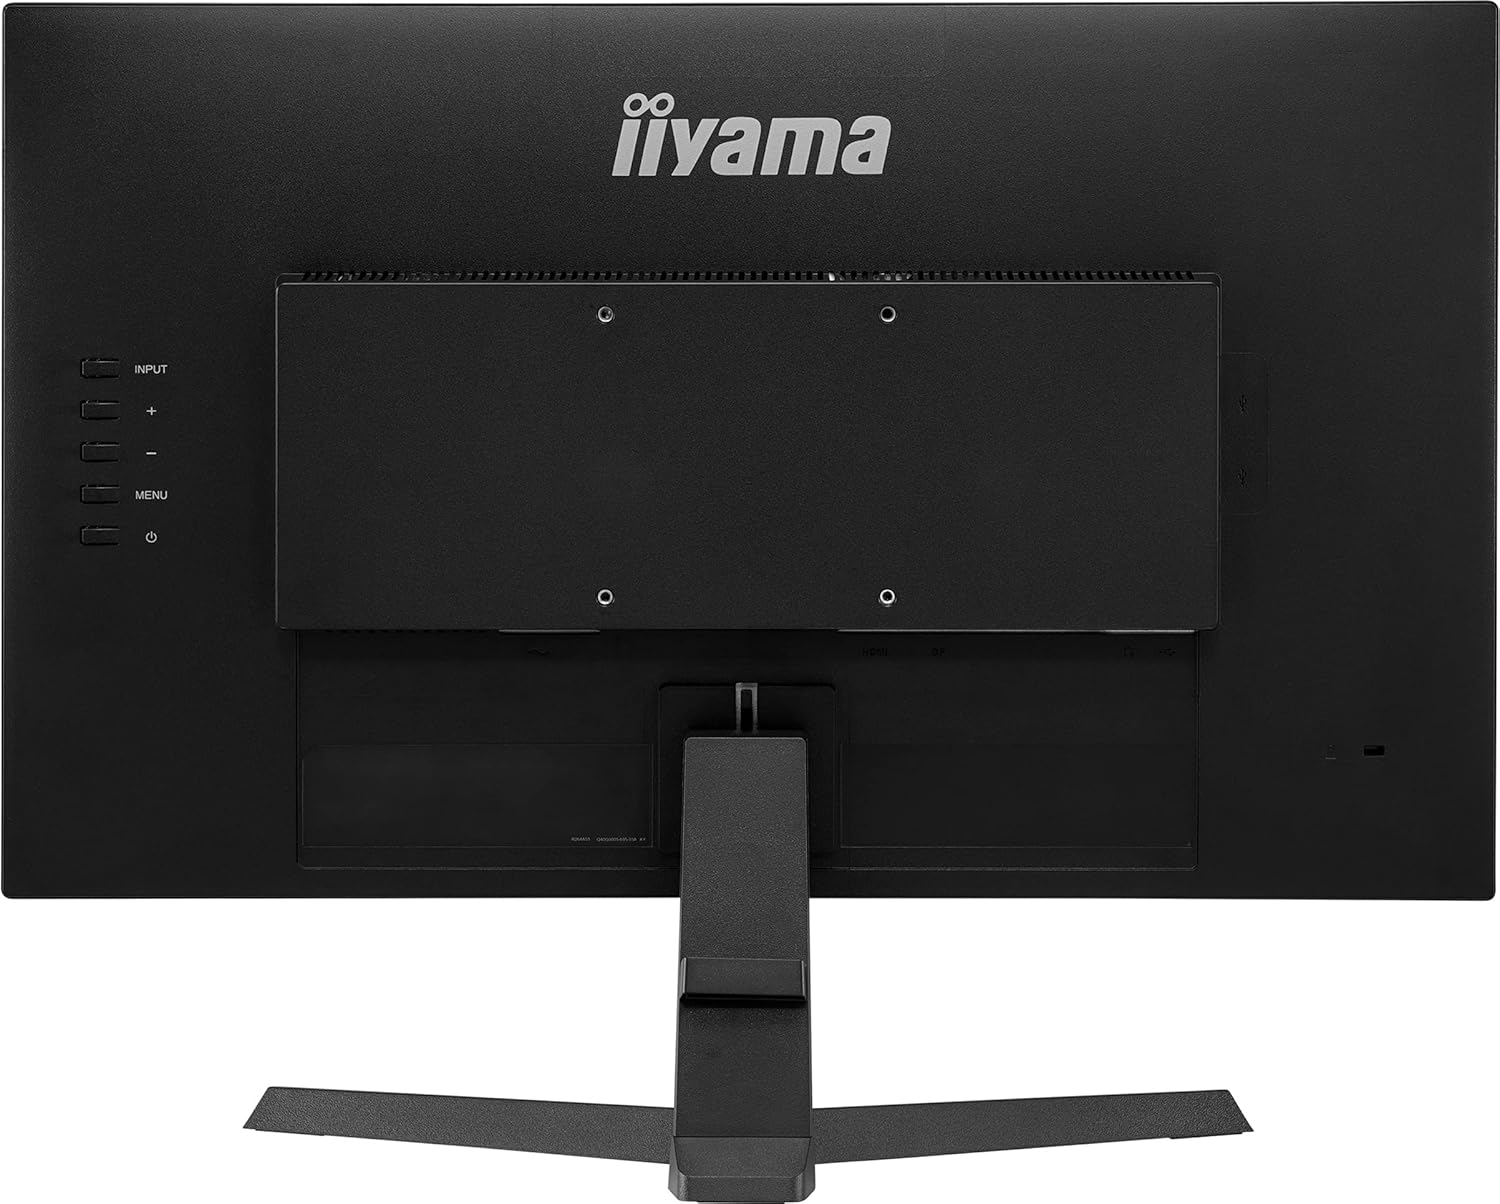
פיגורע 5.1: דערציען view מיט קאָנטראָל קנעפּלעך.
5.2 אויף-סקרין ווייַז (אָסד) מעניו
The OSD menu allows you to adjust various monitor settings. Use the buttons on the rear of the monitor to navigate and select options.
- אַרייַנשרייַב: Select the video input source (HDMI, DisplayPort).
- בילד: אַדזשאַסטירן העלקייט, קאָנטראַסט, שאַרפֿקייט און קאָליר טעמפּעראַטור.
- אַודיאָ: Control volume and mute settings.
- OSD סעטאַפּ: Configure OSD language, position, and timeout.
- גיימינג סעטטינגס: Access features like Black Tuner, FreeSync, and response time overdrive.
5.3 אַדזשאַסטירן רעפרעש קורס
To utilize the 165Hz refresh rate, ensure your graphics card and connection cable (DisplayPort recommended) support it. Adjust the refresh rate through your computer's display settings:
- Windows: Right-click on the desktop > Display settings > Advanced display settings > Display adapter properties > Monitor tab > Screen refresh rate.
- macOS: סיסטעם סעטטינגס > דיספּלייז > רעפרעש קורס.
5.4 פריסינק טעכנאָלאָגיע
This monitor supports AMD FreeSync technology, which synchronizes the monitor's refresh rate with your graphics card's frame rate to reduce screen tearing and stuttering. Ensure FreeSync is enabled in the monitor's OSD menu and your graphics card software.
6. וישאַלט
6.1 רייניקן דעם עקראַן
ווישט אָפּ דעם עקראַן מיט אַ ווייכן, לינט-פֿרײַעם שטאָף. פֿאַר שווערע פֿלעקן, דampווישט דעם שטאָף מיט אַ מילדן, נישט-אַבראַוויזיוון עקראַן רייניגער. שפּריצט נישט רייניגער גלייך אויף דעם עקראַן.
6.2 רייניקן דעם Casing
ניצט אַ ווייכע, טרוקענע שטאָף צו רייניקן דעם מאָניטאָרasinז. פֿאַרמײַדן ניצן שטאַרקע וואַשפּולווער אָדער סאָלווענטן.
7. טראָובלעשאָאָטינג
| פּראָבלעם | מעגלעך סיבה | לייזונג |
|---|---|---|
| קיין בילד אויף פאַרשטעלן | שטראָם קאַבל אָפּגעטיילט; ווידעא קאַבל אָפּגעטיילט; אומרעכט אַרייַנגאַנג מקור אויסגעקליבן. | קאָנטראָלירט די מאַכט און ווידעא קאַבל קאַנעקשאַנז; סעלעקטירט די ריכטיקע אַרייַנגאַנג מקור דורך די OSD מעניו. |
| בילד איז פארשוואומען אדער פארדרייט | פאַלשע רעזאָלוציע; גראַפיקס דרייווער פּראָבלעם. | Set resolution to 1920x1080; Update graphics drivers. |
| סקרין פליקער | Refresh rate mismatch; Cable issue; FreeSync not properly configured. | Ensure refresh rate is set correctly (165Hz); Try a different video cable; Verify FreeSync settings. |
| קיין קלאַנג פֿון רעדנערס/כעדפאָונז | Volume too low; Audio cable disconnected; Incorrect audio output selected on PC. | Adjust volume in OSD and PC; Check audio cable connection; Select monitor as audio output on PC. |
8. ספּעסאַפאַקיישאַנז
| שטריך | באַשרייַבונג |
|---|---|
| סאָרט | iiyama |
| מאָדעל נומער | G2470HSU-B1 |
| פאַרשטעלן גרייס | 24 אינטשעס (23.8") viewקענען) |
| ווייַז טיפּ | IPS געפירט |
| האַכלאָטע | 1920x1080 (פול HD) |
| דערפרישן קורס | 165 הז |
| ענטפער צייט | 0.8 מיליסעקאַנדז |
| אַספּעקט פאַרהעלטעניש | 16:9 |
| קאַנטראַסט פאַרהעלטעניש | 1100:1 |
| ברייטנאַס | 250 סי / מ² |
| Viewינג אַנגלע | 178 גראַד (האָריזאָנטאַל/ווערטיקאַל) |
| קאַנעקטיוויטי | 1x HDMI, 1x DisplayPort, 2x USB 2.0, Audio Out |
| אַדאַפּטיוו סינק | FreeSync |
| נאָך פֿעיִקייטן | Flicker-Free, Black Tuner |
| מאַונטינג טיפּ | וואַנט מאָונט (VESA קאָמפּאַטיבל) |
| פּונקט וואָג | 3.2 קילאָגראַמס |
| מאַכט קאַנסאַמשאַן | 20 וואטס |
8.1 ענערגיע אינפֿאָרמאַציע

Figure 8.1: Energy Label.
פֿאַר דעטאַלירטע פּראָדוקט אינפֿאָרמאַציע און ענערגיע עפֿעקטיווקייט דאַטן, ביטע זען די אָפֿיציעלע EPREL דאַטאַבאַזע: https://eprel.ec.europa.eu/qr/160426
9. וואָראַנטי און שטיצן
The iiyama G2470HSU-B1 monitor comes with a limited warranty. Please refer to the warranty card included in your package or visit the official iiyama webזייטל פֿאַר דעטאַלירטע וואָראַנטי טערמינען און באדינגונגען.
For technical support, service inquiries, or further assistance, please contact iiyama customer support through their official channels.