
iseevy ISV-TWC9-4K60
ISEEVY ISV-TWC9-4K60 9 Channel 4K60 UHD Video Wall Controller User Manual
Model: ISV-TWC9-4K60 | Brand: ISEEVY
1. הקדמה
The ISEEVY ISV-TWC9-4K60 is a professional 9-channel 4K60 UHD Video Wall Controller designed for creating dynamic and versatile video wall displays. This device allows for the distribution of a single video signal across multiple monitors, enabling various splicing modes and display configurations. It supports high-resolution inputs up to 3840x2160@60Hz and offers features like image rotation and edge masking for seamless visual presentations.

פיגורע 1: ISEEVY ISV-TWC9-4K60 Video Wall Controller. This image displays the ISEEVY ISV-TWC9-4K60 Video Wall Controller unit positioned below a nine-screen video wall, configured in a 3x3 arrangement, showcasing a vibrant tropical island landscape.
2. זיכערקייַט אינפֿאָרמאַציע
- ענשור געהעריק ווענטאַליישאַן אַרום די מיטל צו פאַרמייַדן אָוווערכיטינג.
- שטעלט נישט אויס דעם אפאראט צו פייכטקייט, רעגן, אדער עקסטרעמע טעמפעראטורן.
- ניצן בלויז די צוגעשטעלט מאַכט אַדאַפּטער.
- Avoid disassembling the unit; refer servicing to qualified personnel.
- האַלטן די מיטל אַוועק פון שטאַרק מאַגנעטיק פעלדער.
3. פּעקל אינהאַלט
ביטע באַשטעטיקן אַז אַלע זאכן זענען פאַראַן אין דיין פּעקל:
- ISEEVY ISV-TWC9-4K60 Video Wall Controller
- מאַכט אַדאַפּטער
- ווייַט קאָנטראָל
- באַניצער מאַנואַל
4. פּראָדוקט איבערview
4.1. פראָנט פּאַנעל

פיגורע 2: Front Panel. A front-angle view of the ISEEVY ISV-TWC9-4K60 Video Wall Controller. The front panel features a power indicator, IR receiver, and control buttons labeled SPLICING, SOURCE, MENU, OK, UP, DOWN, LEFT, and RIGHT, along with a '4K Ultra HD' logo.
די פראָנט פּאַנעל גיט צוטריט צו וויכטיקע קאָנטראָלן און אינדיקאַטאָרן:
- מאַכט געפֿירט: ינדיקייץ מאַכט סטאַטוס.
- IR ופנעמער: For remote control operation.
- קאָנטראָל קנעפּלעך: SPLICING, SOURCE, MENU, OK, UP, DOWN, LEFT, RIGHT for navigation and function selection.
4.2. דערציען פּאַנעל

פיגורע 3: Rear Panel. The rear panel of the ISEEVY ISV-TWC9-4K60 Video Wall Controller, displaying multiple HDMI input ports (HDMI1, HDMI2), a DisplayPort (DP) input, an Audio output (3.5mm jack), nine HDMI output ports (HDMI1-HDMI9), and an AC power input with a power switch.
די הינטערשטע פּאַנעל האַלט אַלע אַרייַנגאַנג און אַרויסגאַנג קאַנעקשאַנז:
- HDMI Inputs (HDMI1, HDMI2): פֿאַרבינדט HDMI קוואַל דעוויסעס.
- DisplayPort (DP) Input: Connect DisplayPort source devices.
- Audio Output (3.5mm Jack): For external audio connection (HDMI outputs do not carry audio).
- HDMI Outputs (HDMI1-HDMI9): Connect to individual display monitors.
- אַק מאַכט אַרייַנשרייַב: פאַרבינדן די מאַכט אַדאַפּטער.
- מאַכט סוויטש: צו קער די מיטל אויף / אַוועק.
4.3. שליסל פֿעיִקייטן
- Multiple splicing modes with 9 HDMI outputs (e.g., 3x3, 2x4, 4x2, 2x3, 3x2, 2x2, 1x4, 4x1, 1x2, 2x1, 3x1, 1x3).
- Supports 3840*2160 4K@60Hz HDMI 2.0, 3840*2160 4K@30Hz HDMI 1.4, and 3840*2160 4K@60Hz DP 1.2 inputs.
- Allows simultaneous display of multiple input sources.
- Supports multiple display mode presets for quick switching.
- Features 90/180/270 degree rotation and mirror display.
- Includes image cropping and edge mask functions.
- Controllable via front panel buttons and remote control.
- Each HDMI output supports resolutions up to 1920*1080P@60Hz.
5. סעטאַפּ און ייַנמאָנטירונג
5.1. קשר דיאַגראַמע

פיגורע 4: Connection Diagram. This diagram shows how to connect various input devices such as a player, laptop, and PC to the HDMI and DisplayPort inputs of the ISEEVY Video Wall Controller. The controller's nine HDMI outputs are then connected to individual screens forming a 3x3 video wall. An audio output is also shown connected to external speakers.
5.2. ינסטאַלירונג סטעפּס
- Connect Input Sources: Connect your HDMI (e.g., media player, laptop) or DisplayPort (e.g., PC) source devices to the corresponding input ports on the rear panel of the controller.
- Connect Output Displays: Connect up to nine display monitors to the HDMI output ports (HDMI1-HDMI9) on the rear panel. Ensure each display is powered on.
- קאָננעקט אַודיאָ (אָפּטיאָנאַל): If external audio is required, connect speakers or an audio system to the 3.5mm Audio output jack.
- מאַכט אויף: Connect the provided power adapter to the AC power input on the controller and plug it into a power outlet. Flip the power switch to the ON position.
- ערשט קאַנפיגיעריישאַן: Once powered on, the controller will initialize. Use the front panel buttons or remote control to select your desired input source and configure the video wall layout.
6. אַפּערייטינג ינסטרוקטיאָנס
6.1. Splicing Modes
The controller supports various video wall splicing modes to suit different display requirements. Use the SPLICING button on the front panel or remote to cycle through available modes.

פיגורע 5: Multiple Splicing Modes. This image illustrates different video wall configurations supported by the controller, including standard landscape arrangements like 3x3, 2x4, and 4x2. It also demonstrates portrait mode setups, such as a 2x4 rotated 90 degrees and a 3x3 rotated 90 degrees, showcasing the flexibility in display orientation.
Common splicing modes include:
- 3x3: Nine screens arranged in three rows and three columns.
- 2x4: Two rows, four columns.
- 4x2: Four rows, two columns.
- 1xN / Nx1: Single row or single column configurations (e.g., 1x4, 4x1).
- Other combinations like 2x3, 3x2, 2x2, 1x2, 2x1, 3x1, 1x3.
6.2. Display Modes (Multi-Input Display)
The controller supports displaying multiple input sources simultaneously on the video wall. Use the מקור button to select the active input or switch between different display modes.
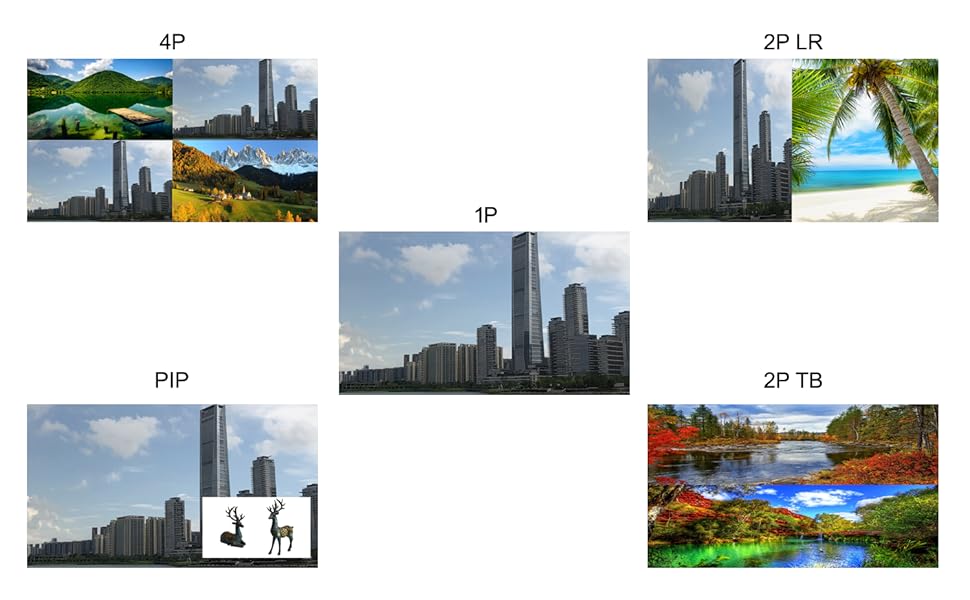
פיגורע 6: Five Display Modes. This graphic presents five distinct display modes: 1P (single large image), 4P (four images displayed simultaneously), PIP (a smaller image overlaid on a larger one), 2P LR (two images side-by-side), and 2P TB (two images stacked vertically). These modes demonstrate the controller's ability to manage and arrange multiple video inputs on the display.
Available display modes include:
- 1P (Single Picture): Displays one input source across the entire video wall.
- 4P (Four Pictures): Displays four different input sources simultaneously.
- PIP (Picture-in-Picture): Displays a secondary input source as an overlay on the main input.
- 2P LR (Two Pictures Left-Right): Displays two input sources side-by-side.
- 2P TB (Two Pictures Top-Bottom): Displays two input sources stacked vertically.
6.3. Image Rotation and Edge Mask
The controller supports advanced image manipulation for optimal display.

פיגורע 7: Image Rotation and Edge Mask. This image demonstrates advanced display features. It shows an object rotated 90 degrees for portrait screen compatibility and another rotated 180 degrees. Additionally, it illustrates the edge mask function, which compensates for display bezels to create a more continuous image across multiple screens.
- ראָוטיישאַן: Images can be rotated 90, 180, or 270 degrees, which is useful for portrait mode displays.
- שפּיגל אַרויסווייַזונג: אַלאַוז מירערינג פון די בילד.
- Edge Mask: This function compensates for the bezels (frames) of the individual display monitors, creating a more seamless and continuous image across the entire video wall. This feature is crucial for professional video wall installations.
6.4. רימאָוט קאָנטראָל אָפּעראַציע
The included remote control provides full functionality for navigating menus, selecting inputs, changing splicing modes, and adjusting display settings. Point the remote control towards the IR receiver on the front panel of the controller.
7. ספּעסאַפאַקיישאַנז
| שטריך | באַשרייַבונג |
|---|---|
| פּראָדוקט דימענשאַנז | 12.6 X 10.24 X 2.76 אינטשעס |
| פּונקט וואָג | 8.56 פונט |
| אַרייַנשרייַב רעזאַלושאַנז | 3840*2160 4K@60Hz (HDMI 2.0, DP 1.2), 3840*2160 4K@30Hz (HDMI 1.4) |
| רעזולטאַט רעזאַלושאַנז | 1920*1080, 1280x800, 1280x700, 1024x768, 1366x768, 1280x1024 (per HDMI output) |
| אַרייַנשרייַב פּאָרץ | HDMI (x2), DisplayPort (x1) |
| רעזולטאַט פּאָרץ | HDMI (x9), 3.5mm Audio (x1) |
| קאָליר | שוואַרץ |
| פאַבריקאַנט | Iseevy Limited |
| קאַמפּאַטאַבאַל דעוויסעס | טעלעוויזיע |
| טיפּ קאַבלע | HDMI |
8. טראָובלעשאָאָטינג
- קיין ווייַז:
- Ensure all cables (input, output, power) are securely connected.
- Verify that the input source is powered on and outputting a signal.
- Check that the correct input source is selected on the controller.
- Confirm that all display monitors are powered on and set to the correct HDMI input.
- Incorrect Splicing Mode:
- ניצן די SPLICING button or remote control to cycle through available modes until the desired layout is achieved.
- Ensure the number of connected displays matches the selected splicing mode.
- Image Distortion or Flickering:
- Check cable quality; use high-quality HDMI/DP cables.
- Ensure input and output resolutions are compatible.
- Restart the controller and all connected devices.
- קיין אַודיאָ:
- Remember that HDMI outputs do not carry audio. Connect external speakers to the 3.5mm Audio output jack.
- Verify external audio system connections and power.
- רימאָוט קאָנטראָל נישט ארבעטן:
- קוק און פאַרבייַטן באַטעריז.
- זיכער מאַכן אַז עס זענען נישטאָ קיין שטערונגען צווישן דעם ווײַטקאָנטראָל און דעם קאָנטראָללער'ס IR ופנעמער.
9. וואָראַנטי און שטיצן
For warranty information and technical support, please refer to the documentation provided with your purchase or contact ISEEVY customer service through their official channels. Keep your purchase receipt for warranty claims.
Ask a question about this manual
Ask about setup, troubleshooting, compatibility, parts, safety, or missing instructions. Manuals+ will review the question and use this page’s manual context to help answer it.