
Docooler XUH6362338938855GM
Docooler JINGSHA X99-8D3 Motherboard User Manual
Model: XUH6362338938855GM
1. הקדמה און איבערview
The Docooler JINGSHA X99-8D3 is a high-performance ATX gaming motherboard designed for LGA2011 V3 processors. It features four-channel DDR3 memory support, an M.2 NVME slot for high-speed storage, and multiple PCI-E expansion slots, making it suitable for demanding computing tasks and gaming setups. This manual will guide you through the installation, configuration, and maintenance of your motherboard.
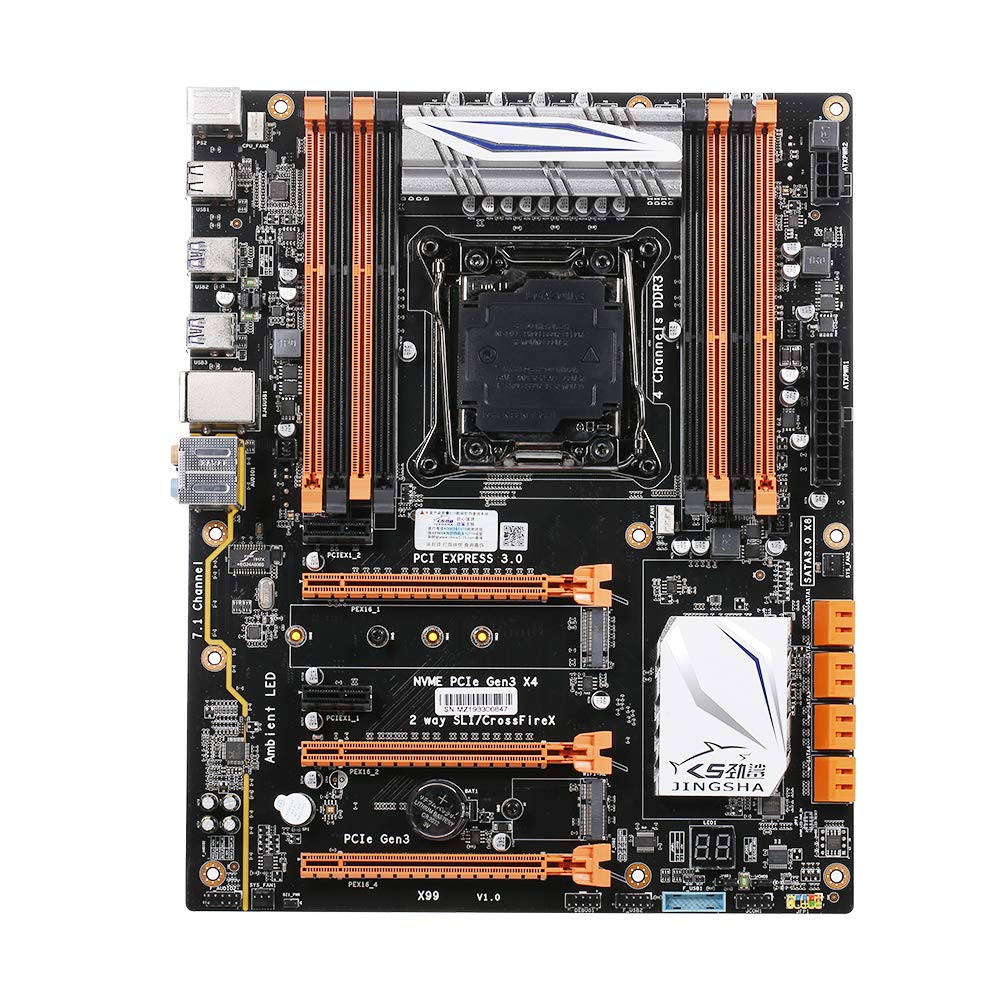
פיגור 1.1: פון אויבן אַראָפּ view of the Docooler JINGSHA X99-8D3 Motherboard, showcasing its layout with CPU socket, RAM slots, and various expansion slots.
2. שליסל פֿעיִקייטן
- M.2 NVME Support: Equipped with an M.2 hard disk port, supporting high-speed PCI-E NVME X4 for optimal operating system and application driver performance.
- Quad-Channel DDR3 Memory: Features 8 DDR3 memory slots across 4 channels, significantly improving capacity and performance, supporting up to 256GB.
- Digital Diagnostic Card: Integrated digital diagnostic card automatically tests hardware devices to ensure proper operation and assist in troubleshooting.
- Multiple PCI-E Expansion Slots: Provides 3 PCI-E expanded slots, configurable as X16/X8 to handle various workloads and multi-GPU setups.
- דוראַבאַל קאַנסטראַקשאַן: Built with a 10-layer PCB and high-quality capacitors for enhanced stability and heat resistance.

Figure 2.1: Diagram illustrating the six core technologies and features of the motherboard, including 4-channel DDR3*8, M.2 hard disk interface, digital diagnostic card, 7.1 channel audio, SATA3.0*8 interface, and Crossfire support.
3. פּעקל אינהאַלט
ביטע באַשטעטיקן אַז אַלע זאכן וואָס זענען אויסגערעכנט אונטן זענען פאַראַן אין אייער פּעקל:
- 1x Docooler JINGSHA X99-8D3 Motherboard
- 1 קס סאַטאַ קאַבלע
- 1x I/O Baffle (Backplate)
- 1x CPU Fan Board
- A bag of screws
4. ספּעסאַפאַקיישאַנז
| שטריך | באַשרייַבונג |
|---|---|
| מאָדעל | X99-8D3 |
| פאָרם פאַקטאָר | אַטקס |
| Graphic Slot | PCIE3.0 16X*3 |
| נעץ קאַרד | גיגאַביט נעטוואָרק קאַרד |
| אַודיאָ קאַנאַל | 7.1 קאַנאַל |
| CPU Type Support | LGA2011 V3 (2629V3/2649V3/2669V3/2678V3/2696V3/2676V3/2673V3) |
| פּקב לייַערס | 10 לייַערס |
| זכּרון שפּעלטל | DDR3*8 |
| מאַקסימום זכּרון קאַפּאַציטעט | 256 גיגאבייט |
| SATA צובינד | SATA3.0*8, M.2 NVME |
| PS/2 Interface | מויז / קלאַוויאַטור |
| מאַכט צושטעלן | 8 PIN*1, 24 PIN*1 |
| וסב צובינד | וסב 3.0 * 6, וסב 2.0 * 6 |
| Expanded Interface | PCIE 1X*2, M.2 WIFI*1 |
| נומער גרייס | 30.2 X 24.4 סענטימעטער (11.89 X 9.61 אינטש) |
| פּונקט וואָג | 930.5 ג (32.82 אַז) |

פיגורע 4.1: דעטאַילעד view of the motherboard's rear I/O panel, showing PS/2 ports, USB 2.0, USB 3.0, Gigabit Network Port, and 7.1 Audio Ports.
5. סעטאַפּ און ייַנמאָנטירונג
Before beginning installation, ensure your system is powered off and unplugged from the wall outlet. Handle the motherboard by its edges to avoid static discharge.
5.1 ינסטאָלינג די קפּו
- Locate the LGA2011 V3 CPU socket on the motherboard.
- Gently push down the CPU retention lever and swing it open.
- Align the triangular mark on your CPU with the corresponding mark on the socket. Carefully place the CPU into the socket without forcing it.
- פֿאַרמאַכט דעם ריטענשאַן לעווער צו פֿעסטשטעלן די סי-פּי-יו.
- טראָגט אויף אַ דין, גלייכן שיכט פון טערמישער פּאַסטע אויף דער אויבערשטער טייל פון די סי-פּי-יו.
- Install the CPU cooler according to its manufacturer's instructions, ensuring proper contact and pressure.

פיגורע 5.1: נאָענט-אַרויף view of the LGA2011 V3 CPU socket on the motherboard, ready for CPU installation.
5.2 Installing RAM Modules
- עפֿנט די קליפּס אויף ביידע ענדס פֿון די DDR3 זכּרון סלאָץ.
- גלייכט אויס דעם קערב אויפן ראַם מאָדול מיטן שליסל אין דעם זכּרון סלאָט.
- Press down firmly on both ends of the RAM module until the clips snap into place, securing the module.
- For optimal performance, install RAM modules in matching pairs across the four channels as indicated in the motherboard manual or silkscreen.

פיגורע 5.2: View of the eight DDR3 RAM slots on the motherboard, showing their arrangement for quad-channel memory configuration.
5.3 Installing Storage Devices (M.2 NVME & SATA)
- M.2 NVME SSD: Locate the M.2 slot. Insert the M.2 SSD at an angle into the slot, then gently push it down and secure it with the provided screw.
- SATA דרייווס: Connect your SATA SSDs or HDDs to the SATA 3.0 ports using SATA data cables. Ensure the power supply SATA power connectors are also attached to the drives.

Figure 5.3: Close-up of the M.2 interface on the motherboard, highlighting its position and the PCI-E Gen3 X4 connection for high-speed data transfer.
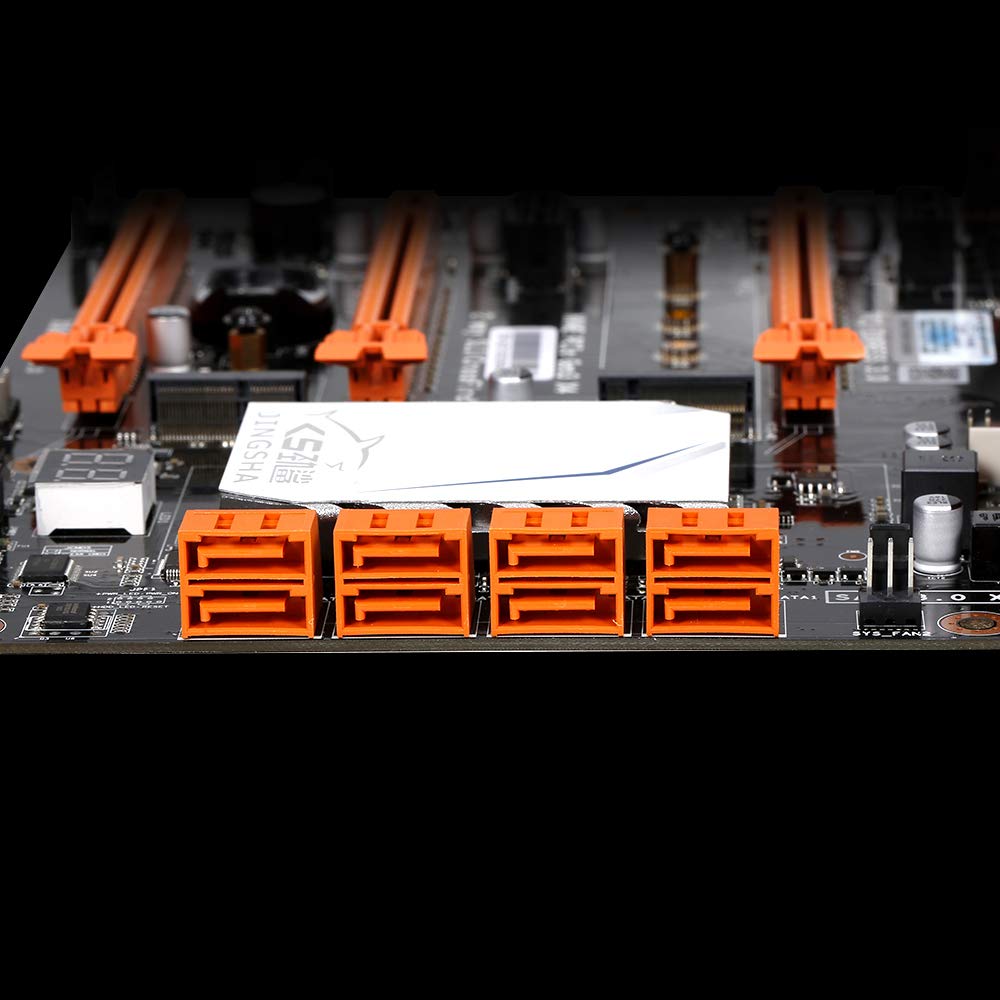
פיגורע 5.4: View of the eight orange SATA 3.0 ports on the motherboard, providing ample connectivity for storage devices.
5.4 קאַנעקטינג מאַכט צושטעלן
- פֿאַרבינדט דעם 24-פּין ATX מאַכט קאַנעקטאָר פֿון אייער מאַכט צושטעל יוניט (PSU) צום קאָרעספּאָנדירנדיקן פּאָרט אויף דער מוטערבאָרד.
- Connect the 8-pin CPU power connector (EPS12V) from your PSU to the 8-pin port near the CPU socket.
5.5 אינסטאַלירן עקספּאַנשאַן קאַרדס (PCIe)
- Locate the desired PCI-E 3.0 x16 or x1 slots.
- אַראָפּנעמען די קאָראַספּאַנדינג יקספּאַנשאַן סלאָט דעקל פון דיין פּיסי קעסטל.
- Align the expansion card with the slot and press down firmly until it is fully seated. Secure the card with a screw to the case.

פיגור 5.5: ווינקלדיק view of the motherboard, highlighting the three PCI Express 3.0 x16 slots and the smaller PCIe x1 slots, ready for graphics cards and other expansion cards.
6. אפערירן די מוטערבאָרד
6.1 ערשטער בוט און בייאָוס סעטאַפּ
- נאָך דעם ווי איר צוזאַמענשטעלט אַלע קאָמפּאָנענטן, פֿאַרבינדט דעם מאָניטאָר, קלאַוויאַטור און מויז.
- Power on your system. During the initial boot sequence, repeatedly press the DEL or F2 key (common for JINGSHA motherboards) to enter the BIOS/UEFI setup utility.
- אין די בייאָוס, וועריפיצירט אַז אַלע אינסטאַלירטע קאָמפּאָנענטן (CPU, RAM, סטאָרידזש) ווערן ריכטיק דעטעקטירט.
- Configure boot order to prioritize your operating system installation media (USB drive or DVD).
- ראַטעוועט די ענדערונגען און פֿאַרלאָזט בייאָס. די סיסטעם וועט זיך ריסטאַרטן.
6.2 אַפּערייטינג סיסטעם ינסטאַלירונג
Follow the instructions provided with your operating system (e.g., Windows, Linux) to complete the installation process. Ensure you install all necessary drivers for the motherboard's chipsets, network, audio, and other components from the manufacturer's website or included driver disc.
7. וישאַלט
געהעריקע אויפהאלטונג גאראנטירט די לאנגעוויטי און סטאבילן אפעראציע פון אייער מאדערבאארד.
- באַזייַטיקונג פון שטויב: רעגולער רייניקט שטויב פון די מאַדערבאָרד און קאָמפּאָנענטן מיט קאָמפּרעסירטע לופט. זיכערט זיך אַז די סיסטעם איז אויסגעלאָשן און נישט אַרייַנגעשטעקט פון די פּלאַטפֿאָרמע איידער איר רייניקט.
- בייאָוס דערהייַנטיקונגען: Periodically check the Docooler or JINGSHA official website for BIOS updates. BIOS updates can improve compatibility, stability, and performance. Follow update instructions carefully to avoid damaging the motherboard.
- דרייווער דערהייַנטיקונגען: האַלט אייערע סיסטעם דרייווערס אַפּדייטיד צו ענשור אָפּטימאַל פאָרשטעלונג און קאָמפּאַטאַבילאַטי מיט נייַ ווייכווארג און האַרדווער.
- ינווייראַנמענאַל טנאָים: Operate the motherboard in a well-ventilated environment with stable temperature and humidity to prevent overheating and component degradation.
8. טראָובלעשאָאָטינג
די סעקציע באהאנדלט אלגעמיינע פראבלעמען וואס איר קענט באגעגענען.
8.1 קיין מאַכט / קיין שטיוול
- זיכער מאַכן אַז די 24-פּין ATX און 8-פּין CPU מאַכט קאַנעקטאָרס זענען זיכער אַרייַנגעשטעקט אין די מוטערבאָרד.
- Check if the power supply unit (PSU) is switched on and connected to a working power outlet.
- Verify that the front panel power button cable is correctly connected to the motherboard's header.
8.2 קיין אַרויסווייַזונג רעזולטאַט
- Ensure your graphics card (if dedicated) is properly seated in its PCI-E slot and has all necessary power cables connected.
- Check that your monitor cable is securely connected to the graphics card or motherboard (if integrated graphics are used, though X99 typically requires a dedicated GPU).
- Try reseating your RAM modules. Incorrectly seated RAM is a common cause of no display.
8.3 POST Code Display (Digital Diagnostic Card)
The motherboard is equipped with a digital diagnostic card (POST code display) that shows a two-digit code during boot-up. Refer to the motherboard's detailed technical documentation (often available on the manufacturer's website) for a list of POST codes and their meanings. This can help pinpoint the exact component causing a boot failure.

פיגורע 8.1: נאָענט-אַרויף view showing the integrated digital diagnostic card (POST code display) on the motherboard, which assists in identifying hardware issues during boot.
9. וואָראַנטי און שטיצן
For warranty information and technical support, please refer to the documentation provided with your purchase or visit the official Docooler or JINGSHA webזייטל. האַלט דיין קויפן באַווייַז פֿאַר וואָראַנטי קליימז.
Ask a question about this manual
Ask about setup, troubleshooting, compatibility, parts, safety, or missing instructions. Manuals+ will review the question and use this page’s manual context to help answer it.