
KICKER KEY2004
KICKER KEY2004 4-Channel Smart Ampליפער באַניצער מאַנואַל
Model: KEY2004 (47KEY2004)
1. הקדמה
This manual provides detailed instructions for the installation, setup, operation, and maintenance of your KICKER KEY2004 4-Channel Smart Amplifier. The KEY2004 integrates an amplifier with an AI-driven Digital Signal Processor (DSP) to optimize your vehicle's audio system. This product is designed to enhance your listening experience by automatically correcting sound characteristics specific to your vehicle's interior.
2. זיכערקייַט אינפֿאָרמאַציע
שטענדיק אָבסערווירן די פאלגענדע זיכערהייט מיטלען צו פאַרמייַדן שאָדן אָדער שאָדן צו די פּראָדוקט און פאָרמיטל:
- Disconnect the vehicle's battery negative terminal before beginning any installation.
- זיכער מאַכן אַז אַלע וויירינג איז ריכטיק ראָוטאַד און פארזיכערט צו פאַרמייַדן קניפּן אָדער שעדיקן.
- Use appropriate gauge wiring and fuses as specified. Incorrect fusing can lead to fire or equipment damage.
- באַראַטן זיך מיט אַ פאַכמאַן אינסטאַללער אויב איר זענט נישט זיכער וועגן קיין טייל פון די ינסטאַלירונג פּראָצעס.
- דו זאלסט נישט אַרבעטן די ampליפיער אין נאַס אָדער דamp באדינגונגען.
- ויסמיידן מאַונטינג די amplifier in locations exposed to direct sunlight or excessive heat.
Important Fuse Note: The KICKER KEY2004 amplifier requires a 20A fuse for proper protection. If using an aftermarket wiring kit, verify the included fuse matches this requirement. A 60A fuse, for example, is oversized and will not adequately protect the ampליפער.
3. פּעקל אינהאַלט
Your KICKER KEY2004 package includes the following items:
- KICKER KEY2004 4-Channel Smart Ampליפער
- Auto-EQ Microphone with Selector Switch
- Wiring Harnesses (Power, Speaker, RCA inputs)
- מאַונטינג ייַזנוואַרג
If purchased as a bundle, the Rockville RWK82 8 Gauge 4 Channel Car Amplifier Wiring Installation Kit includes:
- (2) 17 ft High Grade Twisted Pair 100% Copper RCA Cables
- 17 ft 8 Gauge Translucent Blue SuperFlex Power Cable
- 17 ft 18 Gauge Blue Remote Cable
- 17 ft 16 Gauge Clear Speaker Wire
- 3 ft 8 Gauge SuperFlex Ground Wire
- Gold Plated AGU Heat Resistant Fuse Holder
- 60 Amp AGU Gold Plated Fuse (Note: Replace with 20A fuse for KEY2004)
- 7 ft Split Tube Loom
- Accessories: Wire Ties, Ring Terminals, Butt Connectors, Spades, Grommets
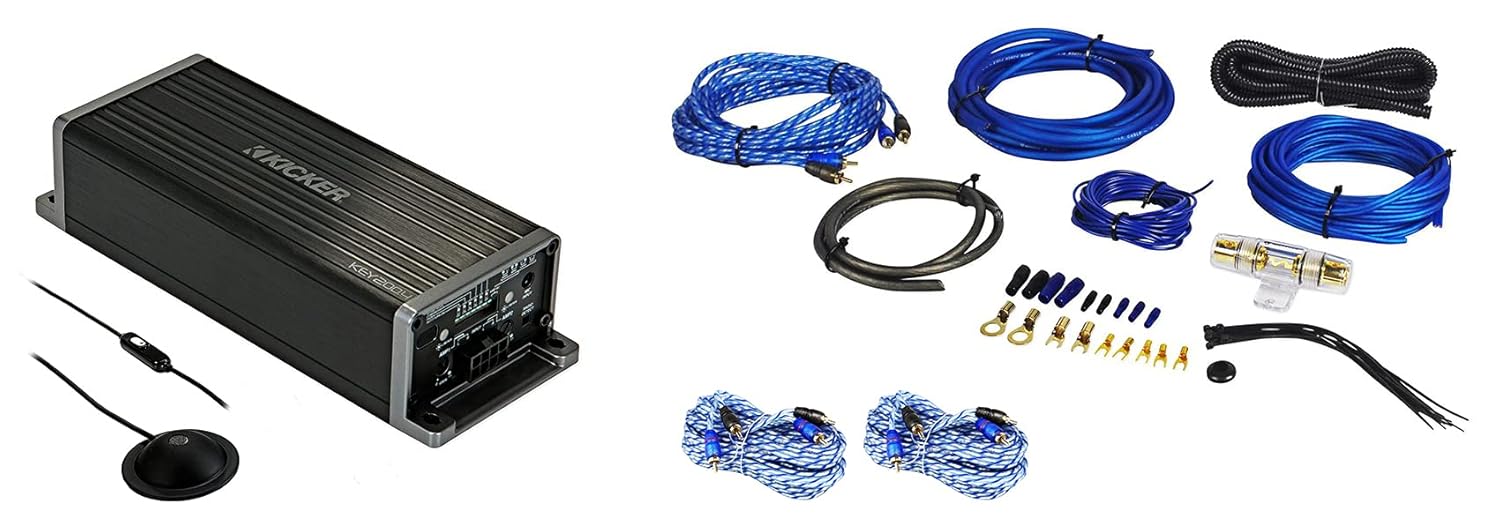
Image: Kicker KEY2004 Smart Amplifier shown alongside the components of the Rockville RWK82 wiring installation kit.

Image: The Kicker KEY2004 amplifier unit with its included Auto-EQ microphone and remote switch.

Image: Various components of the Rockville RWK82 wiring kit, including power cables, RCA cables, fuse holder, and terminals.
4. פּראָדוקט איבערview: KICKER KEY2004 Smart Ampליפער
The KICKER KEY2004 is a compact 4-channel amplifier designed to deliver 50 watts RMS per channel. Its primary innovation is the integrated AI-driven Digital Signal Processor (DSP) with Auto-EQ functionality, which automatically analyzes and corrects your vehicle's acoustic environment for optimal sound quality.
שליסל פֿעיִקייטן:
- Auto-EQ: Utilizes a microphone to analyze and automatically correct the vehicle's acoustic response.
- AI-driven DSP: Advanced digital signal processing for sound optimization.
- FIT2 Technology: Kicker's Fail-Safe Integration Technology for superior input signal compatibility.
- Start/Stop Vehicle Technology Compatible: Designed to work seamlessly with modern vehicle start/stop systems.
- Auto 40-Band Equalizer: Automatically adjusts 40 frequency bands for precise sound tuning.
- ביי-Amp פיייקייט: Allows for bi-amplification setups (defeasible).
- Auto Compressor: Dynamic range compression (defeasible).
- Kicker EQ Preset: Pre-programmed Kicker sound signature (defeasible).
- Auto Time Alignment: Automatically corrects speaker timing for improved sound staging (defeasible).
- Auto Level Adjustment: Adjusts levels in Bi-Amp בלויז מאָדע.
- Auto Speaker Size Detection: Automatically identifies connected speaker sizes.
- 24dB Crossovers: Selectable high-pass filters at 60, 80, or 120Hz (defeasible).
קאָנטראָלס און קאַנעקשאַנז:
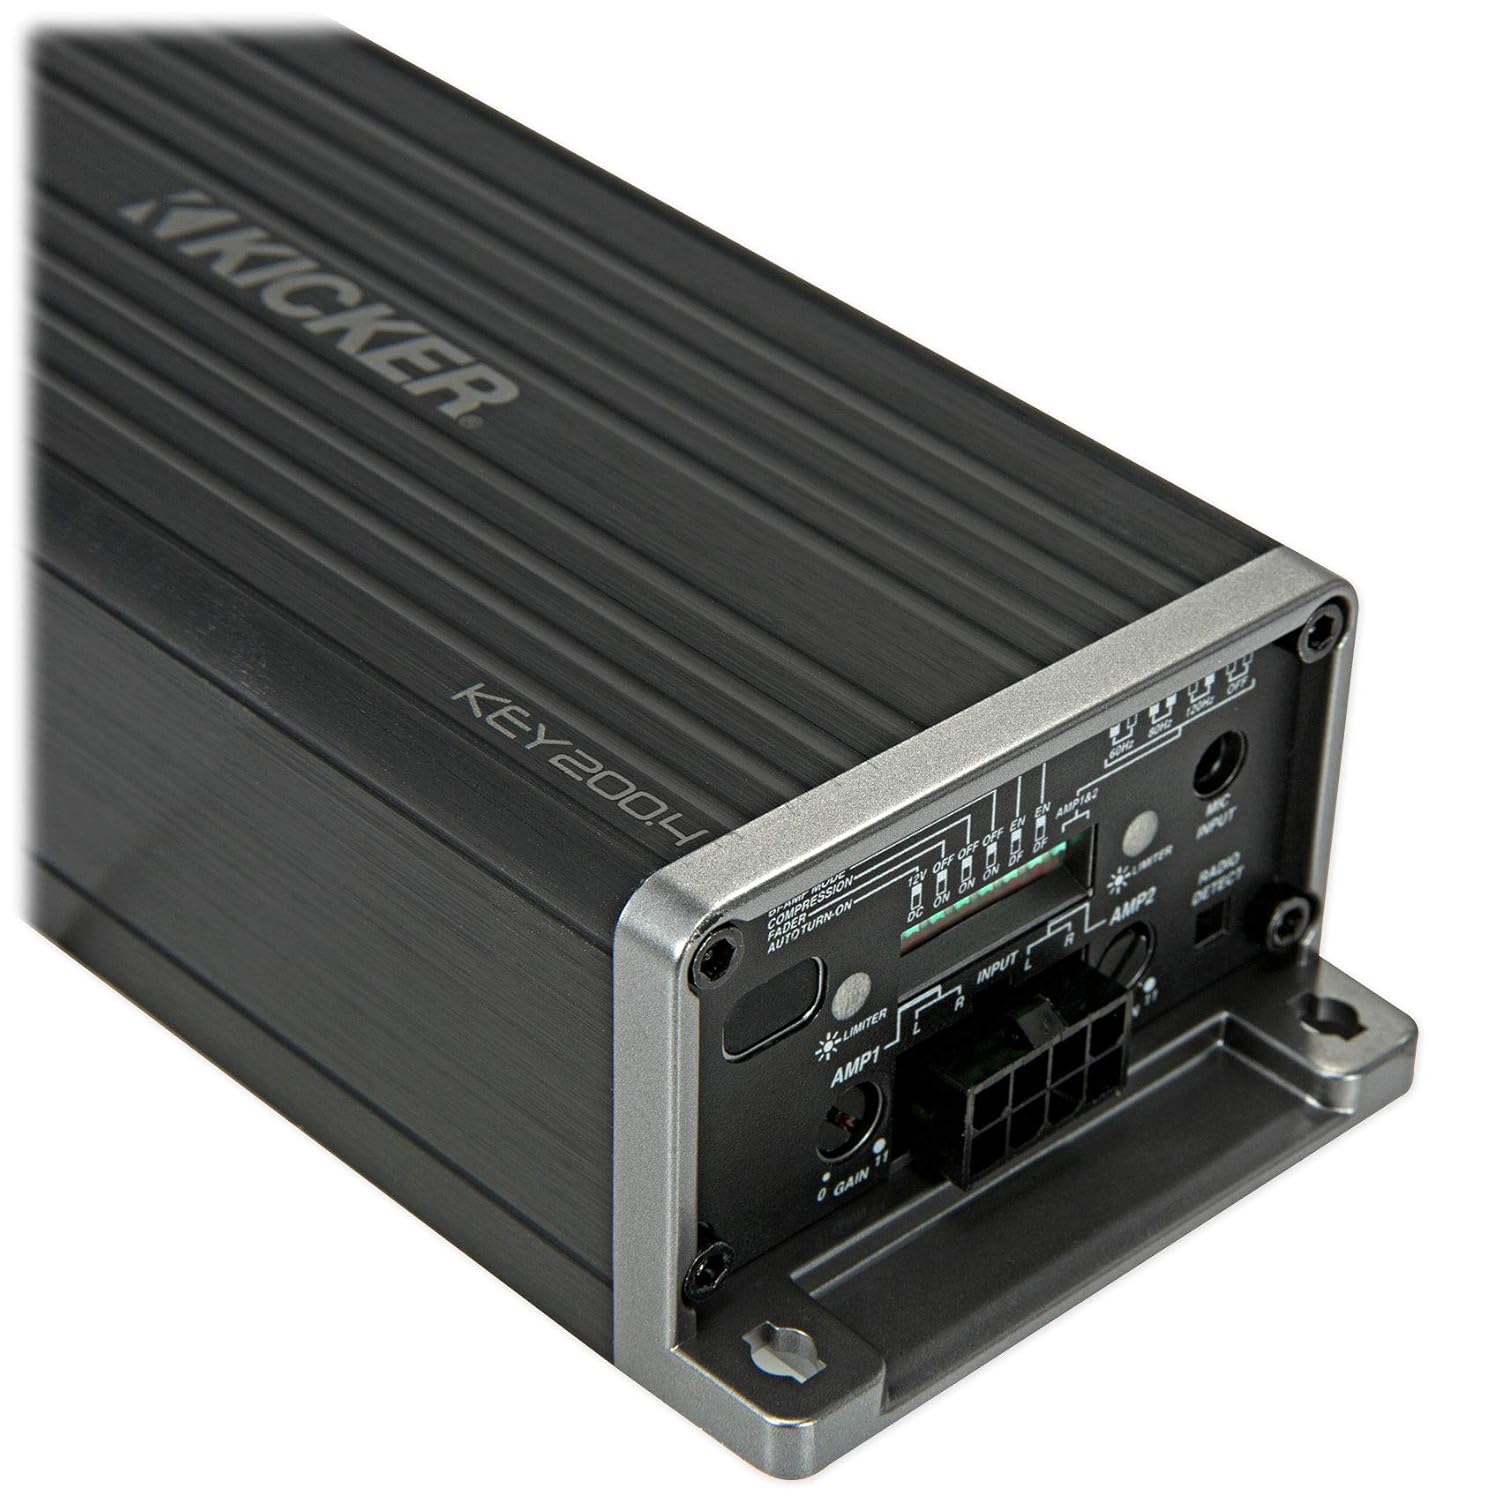
בילד: נאָענט-אַרויף view of the Kicker KEY2004 amplifier's input and control panel, showing gain adjustments, input selectors, and various switches.
די amplifier features input terminals for both high-level (speaker level) and low-level (RCA) signals, gain controls for each channel pair, and switches for crossover settings and other DSP functions. The included microphone connects to a dedicated port for the Auto-EQ process.

Image: The various wiring harnesses provided with the Kicker KEY2004, including the main power/speaker harness and the microphone cable.
5. ינסטאַלירונג
Proper installation is crucial for optimal performance and safety. If you are not comfortable with electrical wiring, seek professional assistance.
5.1 מאָנטירן די Ampליפער
- Choose a dry, stable location away from heat sources and direct sunlight.
- ענשור טויגן ווענאַליישאַן אַרום די ampליפער.
- סיקיורלי אָנקלאַפּן די amplifier using the provided hardware to prevent movement during vehicle operation.
5.2 וויירינג קאַנעקשאַנז
איידער איר מאַכט קיין קאַנעקשאַנז, דיסקאַנעקט די נעגאַטיוו באַטעריע וואָקזאַל פון די פאָרמיטל.
- מאַכט דראָט: Connect the 8-gauge power cable (from RWK82 kit) directly to the positive terminal of the vehicle's battery. Install the fuse holder within 18 inches (45 cm) of the battery.
- פיוס ינסטאַלירונג: לייג אריין א 20 א קאָריק into the fuse holder. The 60A fuse included in the RWK82 kit is too large for the KEY2004 and must be replaced.
- ערד דראָט: Connect the 8-gauge ground wire (from RWK82 kit) from the amplifier to a clean, solid metal point on the vehicle chassis. The ground point should be free of paint and corrosion.
- Remote Turn-On Wire: Connect the 18-gauge blue remote wire (from RWK82 kit) from the amplifier to the remote turn-on output of your head unit. If your head unit lacks a remote output, the KEY2004 can use DC offset sensing or audio signal sensing for turn-on.
- אַרייַנשרייַב סיגנאַל:
- RCA (Low-Level) Input: Use the twisted pair RCA cables (from RWK82 kit) to connect the amplifier's RCA inputs to the RCA outputs of your head unit.
- Speaker Level (High-Level) Input: If your head unit does not have RCA outputs, connect the speaker wires from your head unit directly to the amplifier's high-level input harness.
- רעדנער ווירעס: Connect the 16-gauge clear speaker wires (from RWK82 kit) from the amplifier's speaker outputs to your vehicle's speakers. Ensure correct polarity (+ to + and – to –).

בילד: אויבן view of the Kicker KEY2004 ampליפיער, ווײַזנדיק זײַן קאָמפּאַקטן דיזײַן און היץ זינק פֿינס.
6. Setup: Auto-EQ and Initial Configuration
The KEY2004's primary feature is its Auto-EQ capability, which automatically tunes your system. Follow these steps for initial setup:
- פאַרבינדן מיקראָפאָן: Plug the Auto-EQ microphone into the dedicated port on the ampליפער.
- מיקראָפאָן אָרט: Place the microphone at the primary listening position (e.g., driver's headrest).
- Set Head Unit Volume: Turn your head unit volume to approximately 75% of its maximum.
- Start Auto-EQ: Press and hold the Auto-EQ button on the amplifier (or the remote switch if applicable) until the LED indicator changes. The amplifier will play a series of test tones.
- וואַרטן פֿאַר קאַמפּלישאַן: Allow the process to complete. This may take several minutes. The amplifier will indicate completion (refer to the specific LED patterns in the full manual).
- סטרויערן געווינס: After Auto-EQ, adjust the amplifier's gain controls to match the output of your head unit. Start with the gain at minimum and slowly increase until you hear distortion, then back off slightly.
- קראָססאָווער סעטטינגס: Select the desired high-pass filter frequency (60Hz, 80Hz, or 120Hz) using the switches on the amplifier, depending on your speaker size and type.
- אָפּטיאָנאַל פֿעיִקייטן: Enable or disable Bi-Amp Capability, Auto Compressor, Kicker EQ Preset, Auto Time Alignment, and Auto Speaker Size Detection as desired. These are defeasible.
The Auto-EQ process should be performed in a quiet environment with the vehicle's engine off.
7. אַפּערייטינג די Ampליפער
Once installed and set up, the KICKER KEY2004 operates automatically with your vehicle's audio system. The AI-driven DSP continuously works to maintain optimal sound quality based on the initial Auto-EQ calibration.
- מאַכט אויף / אַוועק: די amplifier will turn on and off with your head unit (via remote wire or signal sensing).
- באַנד קאָנטראָל: Use your head unit's volume control for overall system volume.
- געזונט אַדזשאַסטמאַנץ: While the KEY2004 provides automatic optimization, minor adjustments can still be made via your head unit's tone controls if desired. However, significant changes may negate some benefits of the Auto-EQ.
8. וישאַלט
The KICKER KEY2004 ampדער ליפיער דאַרף מינימאַל וישאַלט צו ענשור לאַנג-טערמין פאָרשטעלונג.
- רייניקונג: ווישט אויס פון צייט צו צייט די ampווישט אָפּ די אויסערלעכע זייט פון דעם לופטליפֿער מיט אַ ווייכן, טרוקענעם שטאָף. ניצט נישט קיין שטרענגע כעמיקאַלן אָדער אַברייסיוו רייניקונגסמיטלען.
- פֿאַרבינדונגען: קאָנטראָלירט פון צייט צו צייט אַלע וויירינג פֿאַרבינדונגען צו זיכער מאַכן אַז זיי זענען זיכער און פֿרײַ פֿון קעראָוזשאַן.
- ווענטילאַטיאָן: פאַרזיכערן אַז די amplifier's cooling fins are not obstructed to prevent overheating.
- פיוס טשעק: אויב די amplifier stops working, check the fuse in the power line. Replace it only with a fuse of the correct rating (20A).
9. טראָובלעשאָאָטינג
If you experience issues with your KICKER KEY2004 ampליפיער, זעט די פאלגענדע אלגעמיינע פראבלעמען און לייזונגען:
| פּראָבלעם | מעגלעך סיבה | לייזונג |
|---|---|---|
| קיין מאַכט | Blown fuse; loose power/ground wire; no remote turn-on signal. | Check and replace fuse (20A); verify all power and ground connections; check remote wire connection or ensure DC offset/audio sensing is active. |
| קיין געזונט | No input signal; loose speaker wires; ampלייפיער אין שוץ מאָדע. | Verify RCA/high-level input connections; check speaker wire connections; check amplifier status LED for protect mode indication. |
| פאַרקרימט סאָונד | Gain set too high; poor input signal; incorrect Auto-EQ. | רעדוצירן amplifier gain; ensure head unit output is clean; re-run Auto-EQ process. |
| Ampאיבערהיצונג פון ליפיער | Insufficient ventilation; impedance mismatch. | פאַרזיכערן amplifier is in a well-ventilated area; verify speaker impedance matches ampליפיער ספּעסאַפאַקיישאַנז. |
10. ספּעסאַפאַקיישאַנז
| שטריך | באַשרייַבונג |
|---|---|
| מאַכט רעזולטאַט (RMS) | 50 watts x 4 channels @ 4 Ohm stereo |
| אָפטקייַט ענטפער | 20 הז - 20 כז, + 0 / -1 דב |
| Input Sensitivity (High Level) | 250 מוו - 10 וו |
| סיגנאַל-צו-נויז ראַטיאָ | >90dB, אַ-ווייטיד, שייַעך: רייטאַד מאַכט |
| אַקטיוו קראָססאָווער | 24dB/octave, selectable high pass or all pass @ 60, 80, or 120Hz |
| דימענשאַנז (ה רענטגענ וו רענטגענ ל) | 1-11/16" x 2-3/4" x 7-3/8" (4.3 x 7 x 18.7 cm) |
| מאַקסימום צושטעלן וואָלtage | 10 Volts (Operating range typically 10-16V) |
| מאַונטינג טיפּ | Freestanding |
| נומער פון טשאַנאַלז | 4 |
11. וואָראַנטי און שטיצן
KICKER products are designed for reliable performance. For specific warranty information, please refer to the warranty card included with your product or visit the official KICKER website. For technical support, contact KICKER customer service.
For the most comprehensive and up-to-date information, including detailed wiring diagrams and advanced setup options, please refer to the official KICKER KEY2004 product manual:
Download Official KICKER KEY2004 Manual (PDF)

Image: Product packaging for the Kicker KEY2004, highlighting key features and a QR code linking to the official product manual.
Ask a question about this manual
Ask about setup, troubleshooting, compatibility, parts, safety, or missing instructions. Manuals+ will review the question and use this page’s manual context to help answer it.