
1. הקדמה
This manual provides detailed instructions for the installation, operation, and maintenance of your Suuwer S701 Non-Programmable Thermostat. This thermostat is designed for use with 1 Heat/1 Cool conventional single-stage heating and cooling systems. Please read this manual thoroughly before installation and operation to ensure proper function and safety.

בילד 1.1: פראָנט view of the Suuwer S701 Non-Programmable Thermostat, displaying room temperature and set temperature on a blue backlit screen.
2. זיכערקייַט אינפֿאָרמאַציע
- שטענדיק אויסשליסן די עלעקטריע צום הייצונג/קילונג סיסטעם ביים הויפט פיוז אדער קרייז ברעיקער פאנעל איידער איר אינסטאלירט אדער סערוויסט דעם טערמאסטאט.
- This thermostat operates on 24VAC power or 2 AAA batteries. Do not connect to line voltage (120-240V) systems.
- If you are inexperienced with electrical wiring, it is recommended to seek professional assistance for installation.
- Ensure all wiring connections are secure to prevent short circuits or damage to the system.
3. פּעקל אינהאַלט
באַשטעטיקן אַז אַלע זאכן זענען פאַראַן אין דיין פּעקל:
- Suuwer S701 Thermostat Unit
- ייַנמאָנטירונג מאַנואַל
- קאַבלע לאַבעלס
- מאָונטינג סקרוז (2)
- וואנט אַנקערז (2)

Image 3.1: Illustration of the Suuwer S701 thermostat and its included accessories.
4. סיסטעם קאָמפּאַטאַביליטי
The Suuwer S701 thermostat is designed for specific HVAC systems. Please review the compatibility information carefully before installation.
4.1 Compatible Systems
- קאַנווענשאַנאַל סינגלע-Stage Heating & Cooling (with C-wire or without C-wire)
- Gas Fireplace (24 Volts)
- גאז / אויל / עלעקטרישער אויוון (נאר הייצונג)
- נאָר מיט ראַדיאַנט באַהיצונג דורך קעסל
- נאָר מיט געצוואונגענע לופט באַהייצונג אין אויוון
- Cooling Only (with C-wire or without C-wire)
באַמערקונג: Verify your existing thermostat base is wired with 2 to 5 wires. Systems with 6 to 8 wires are generally not supported by this model.
4.2 Incompatible Systems
- מולטיסtage Heating & Cooling (e.g., 1H/2C, 2H/2C)
- HVAC Heat Pump Systems (e.g., 2H/1C, 4H/2C)
- PTACs (Packaged Terminal Air Conditioners)
- 3-wire Hydronic (Hot Water) Systems
- Dual Fuel/Hybrid Heating Systems
- שורה וואָלtage Systems (120-240V electric baseboards heat)
- Mini Split Heat Pump Air Conditioners
- RV Air Conditioners (Mach and Roughneck series)
- קאָנוועקטאָרס
- Radiant Ceiling Heat
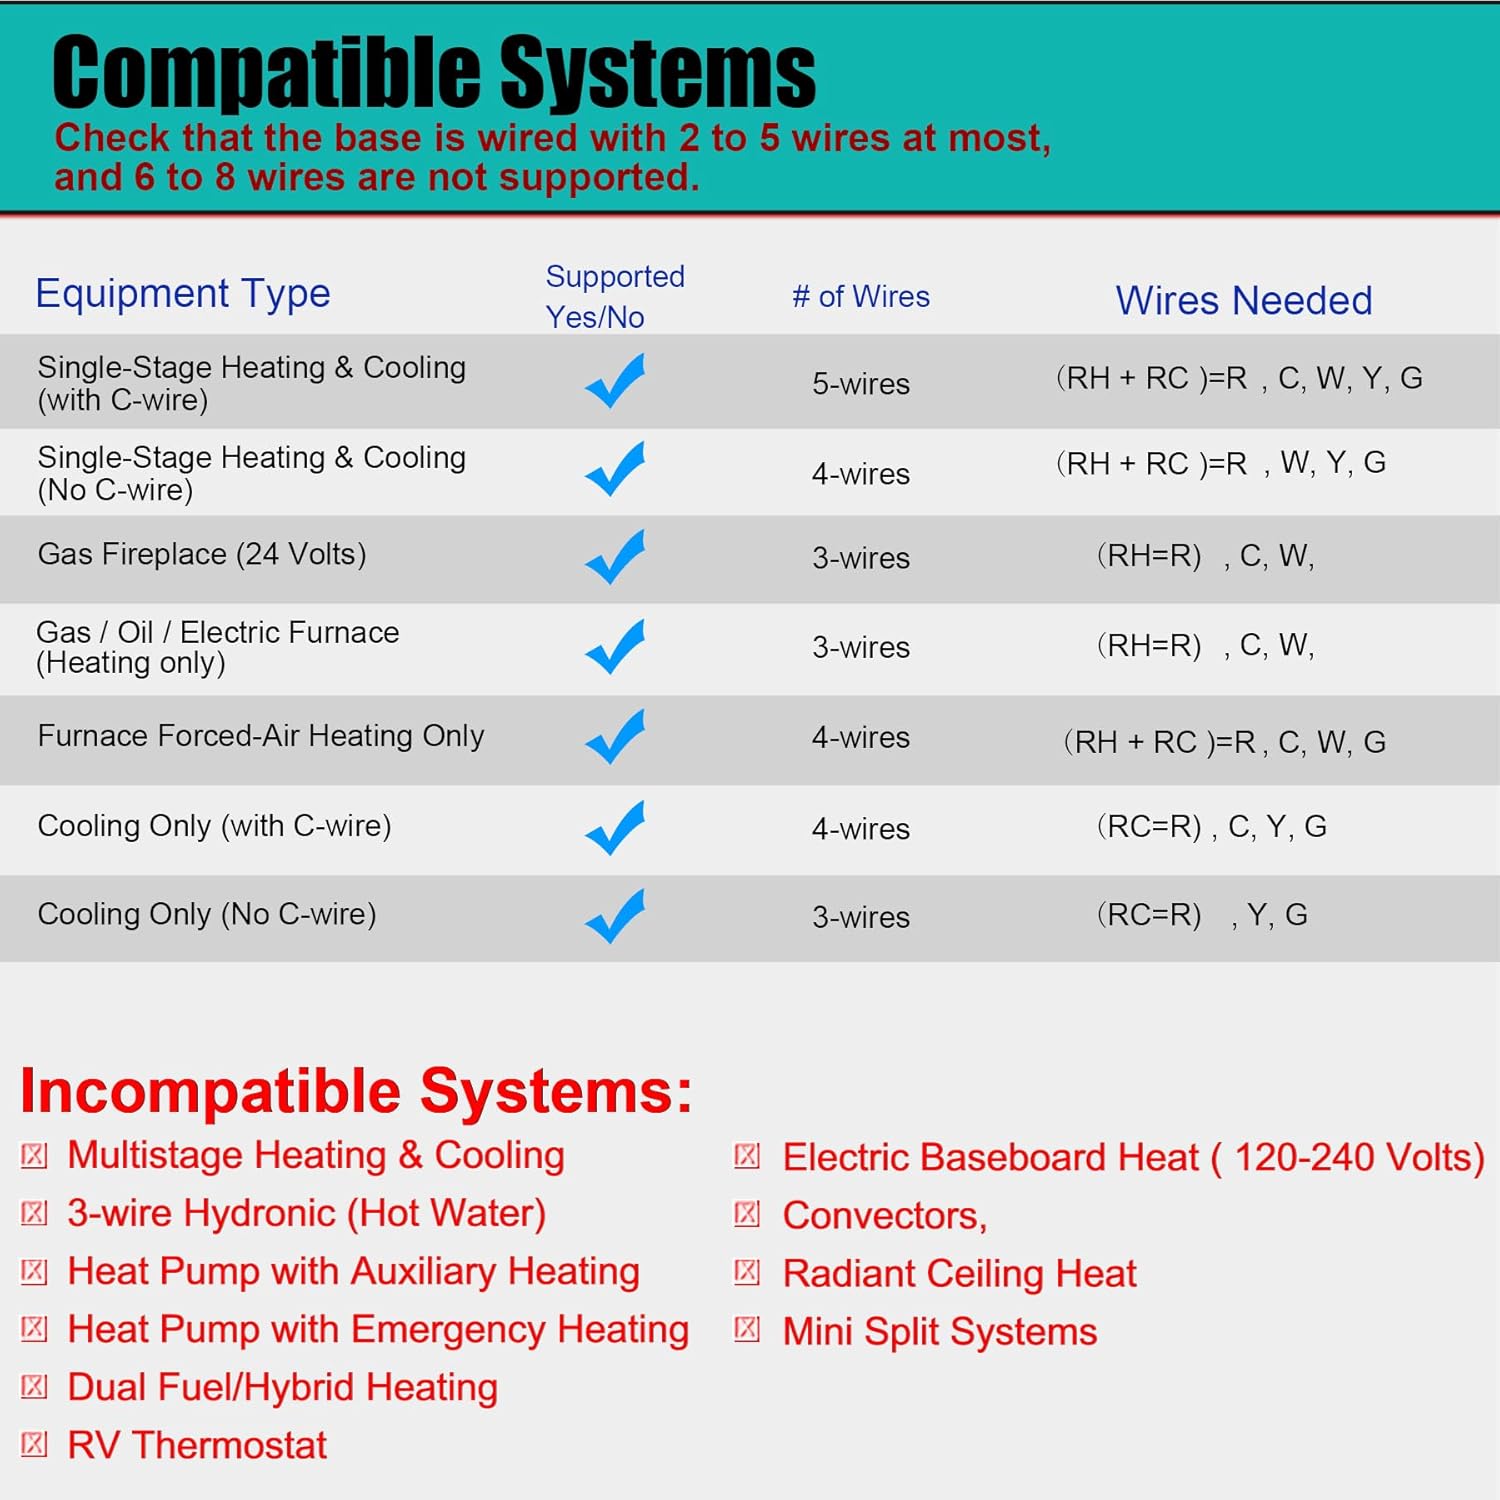
Image 4.1: Detailed compatibility chart for the Suuwer S701 thermostat.
5. סעטאַפּ און ייַנמאָנטירונג
Follow these steps for proper installation. It is recommended to take a picture of your old thermostat's wiring before disconnecting any wires.
5.1 אַראָפּנעמען דיין אַלטן טערמאָסטאַט
- קער אַוועק מאַכט: געפינט דעם קרייז ברעיקער אדער פיוז באקס וואס קאנטראלירט אייער הייצונג און קיל סיסטעם און מאכט אויס די מאכט.
- אַראָפּנעמען דעקל: פֿאָרזיכטיק אַראָפּנעמען דעם דעקל פֿון אײַער אַלטן טערמאָסטאַט.
- Photograph wiring: Take a clear picture of the wiring connections, noting which wire is connected to each terminal.
- Label wires: Use the provided cable labels to mark each wire according to its terminal designation (e.g., R, W, Y, G, C).
- Disconnect wires: דיסקאָנעקט די דראָטן פון די אַלטע טערמינאַלס.
- Remove old base: שרויפט אַראָפּ און נעמט אַראָפּ די מאָונטינג באַזע פֿון דער אַלטער טערמאָסטאַט פֿון דער וואַנט.
5.2 Mounting the New Thermostat
- Position base: Hold the new Suuwer S701 thermostat base against the wall where you want to mount it.
- Mark screw holes: Mark the positions for the mounting screws. If possible, use existing screw holes.
- בויער האָלעס: If new holes are needed, drill pilot holes and insert the wall anchors.
- זיכערע באַזע: Pull the wires through the opening in the thermostat base and secure the base to the wall using the provided screws.
5.3 וויירינג קאַנעקשאַנז
Connect the labeled wires to the corresponding terminals on the Suuwer S701 thermostat base. Refer to the wiring diagram below and your photograph for accuracy.
- R/RC: 24VAC power (often jumpered, see diagram)
- G: דרינענדיק בלאָווער (פאָכער)
- Y: 1סט-סtage קיל
- W: 1סט-סtagE היץ
- C: Common wire (optional for battery-powered operation, but recommended for continuous backlight)

Image 5.1: Wiring diagram and system switch setting for the Suuwer S701 thermostat.
5.4 Setting the System Switch (GAS/ELEC)
On the back of the thermostat unit, locate the small switch labeled 'GAS' and 'ELEC'.
- אויב איר האָט אַ gas or oil furnace, שטעלן די באַשטימען צו גאַז.
- אויב איר האָט אַ electric furnace, שטעלן די באַשטימען צו ELEC.
5.5 ינסטאָלינג באַטעריז
The thermostat can be powered by 24VAC or 2 AAA batteries. Batteries are required for operation if no C-wire is connected. Even with a C-wire, batteries provide backup power.
- Open the battery compartment on the front of the thermostat.
- אַרײַנשטעלן צוויי נײַע AAA אַלקאַליין באַטעריעס, און זיכער מאַכן אַז די פּאָלאַריטעט איז ריכטיק (+/-).
- נאָענט די באַטאַרייע אָפּטייל.
5.6 Attaching the Thermostat to the Base
Align the thermostat unit with the mounted base and gently push it into place until it clicks securely.
5.7 Restoring Power
Once the thermostat is securely mounted and wired, turn the power back on at the main circuit breaker or fuse box.
6. אַפּערייטינג ינסטרוקטיאָנס
The Suuwer S701 is a non-programmable thermostat, offering straightforward manual control of your home's temperature.

Image 6.1: Display and controls of the Suuwer S701 thermostat.
6.1 ווייַז איבערview
The large LCD with blue backlight shows the current room temperature and the set temperature. The backlight activates for 10 seconds when any button is pressed.
- צימער: ווײַזט די איצטיקע אַמביאַנט טעמפּעראַטור.
- שטעלן אין: Displays the desired temperature setting.
- Cool/Heat/Off: Indicates the current system mode.
- Fan ON/AUTO: ינדיקייץ די קראַנט פאָכער מאָדע.
6.2 אַדזשאַסטירן טעמפּעראַטור
ניצן די + (אַרויף) און - (Down) buttons on the right side of the thermostat to adjust the desired temperature setting. Each press changes the temperature by 1 degree Fahrenheit.
6.3 סיסטעם מאָדע אויסוואל
ניצן די סיסטעם switch located at the bottom right of the thermostat to select the operating mode:
- קיל: Activates the cooling system when the room temperature rises above the set temperature.
- היץ: אַקטיוויזירט די הייצונג סיסטעם ווען די צימער טעמפּעראַטור פאַלט אונטער די איינגעשטעלטע טעמפּעראַטור.
- OFF: שטעלט אויס ביידע הייצונג און קיל סיסטעמען.
6.4 ווענטילאַטאָר מאָדע אויסוואַל
ניצן די פאָכער switch located at the bottom left of the thermostat to select the fan operating mode:
- אָטאַמאַטיק: דער ווענטילאַטאָר אַרבעט נאָר ווען די הייצונג אָדער קיל סיסטעם אַרבעט אַקטיוו. דאָס איז די מערסט געוויינטלעכע און ענערגיע-עפעקטיוו סעטינג.
- אויף: דער ווענטילאַטאָר לויפֿט קאָנטינויִערלעך, נישט קוקנדיק צי די הייצונג אָדער קיל סיסטעם איז אַקטיוו.
6.5 Adjusting Temperature Swing (Cycle Rate)
The temperature swing, also known as cycle rate or differential, determines how much the temperature can vary from your setpoint before the system turns on. A smaller swing results in more frequent, shorter cycles, while a larger swing results in less frequent, longer cycles.
The swing is adjustable from 0.2°F to 2°F. The factory default is 0.5°F for both heating and cooling.

Image 6.2: Thermostat display showing the temperature swing setting.
To adjust the temperature swing:
- דריקן און האַלטן די פאָכער button for approximately 3 seconds until the display changes to show the current swing setting.
- ניצן די + (אַרויף) אָדער - (Down) buttons to adjust the swing value.
- דרוק די פאָכער button again to toggle between heating and cooling swing settings.
- The thermostat will automatically save the setting after a few seconds of inactivity.
7. וישאַלט
7.1 באַטערי פאַרבייַט
When the low battery indicator (a battery icon) appears on the display, it is time to replace the batteries. Replace with two new AAA alkaline batteries. Refer to Section 5.5 for battery installation steps.
7.2 רייניקונג
ווישט אָפּ די אויסערלעכע זייט פון דעם טערמאָסטאַט מיט אַ ווייכן, טרוקענעם שטאָף.amp שטאָף. דו זאלסט נישט נוצן אַברייסיוו קלינערז אָדער סאָלוואַנץ.
8. טראָובלעשאָאָטינג
אויב איר טרעפט פּראָבלעמען מיט אייער טערמאָסטאַט, זעט די פאלגענדע געוויינטלעכע פּראָבלעמען און לייזונגען:
| פּראָבלעם | מעגלעך סיבה | לייזונג |
|---|---|---|
| אַרויסווייַזן איז ליידיק | No power, dead batteries, or tripped circuit breaker. | Check batteries and replace if necessary. Ensure power is on at the circuit breaker. Verify wiring connections. |
| הייצונג/קילונג סיסטעם רעאגירט נישט | Incorrect system mode, incorrect wiring, or system issue. | Ensure SYSTEM switch is set to HEAT or COOL. Verify wiring. Check if furnace/AC unit has power. |
| טעמפּעראַטור מעסטונג מיינט נישט ריכטיק | Thermostat location, or calibration needed. | Ensure thermostat is not in direct sunlight or near heat sources. The thermostat has a room temperature calibration adjustment for +/-1-degree F. Consult the full installation manual for advanced settings. |
| Low Battery Indicator (battery icon) | באַטעריז זענען נידעריק. | Replace with two new AAA alkaline batteries immediately. |
| Compressor short cycling (turning on/off too frequently) | Temperature swing set too low. | Adjust the temperature swing to a higher value (e.g., 1.0°F or 1.5°F). |
פֿאַר מער דעטאַלירטע פּראָבלעם־לייזונג, ביטע זעט די פראבלעם-פארלעשונג אנווייזונג (PDF).
9. ספּעסאַפאַקיישאַנז
- מאָדעל: S701
- פּראָדוקט דימענשאַנז: 0.98"ד רענטגענ 4.72"וו רענטגענ 3.86"ה
- נומער וואָג: 6.7 אונס (0.42 פונט)
- קאָליר: בלוי באַקלייט
- מאַטעריאַל: פּלאַסטיק
- ווייַז טיפּ: לקד מיט בלוי באַקלייט
- פאַרשטעלן גרייס: 4.5 אינטשעס
- קאָנטראָל טיפּ: Push Button / Button Control
- מאַונטינג טיפּ: וואנט בארג
- מאַכט מקור: 24 Volts (AC) or 2 AAA Batteries
- טעמפּעראַטורע קאָנטראָל ראַנגע: 44°F צו 90°F
- Room Temperature Display Range: 41°F צו 95°F
- טעמפּעראַטור אַקיעראַסי: +/-1°F
- ספּעציעלע פֿעיִקייטן: Non-Programmable, Separate Heating and Cooling Swing (0.2°F to 2°F), Low Battery Indicator, 5 Minute Compressor Delay Protection (Selectable ON or OFF)
- UPC: 709327753278
10. וואָראַנטי און שטיצן
10.1 וואָראַנטי אינפֿאָרמאַציע
The Suuwer S701 Non-Programmable Thermostat comes with a 2-יאָר זאָרג-פֿרײַ גאַראַנטיע פֿון דעם קויפֿדאַטום. די וואָראַנטי דעקט חסרונות אין מאַטעריאַלן און אַרבעט אונטער נאָרמאַלן באַנוץ. ביטע באַהאַלטן אייער קויפֿבאַווייַז פֿאַר וואָראַנטי קלאַגעס.
10.2 קונה שטיצן
For technical assistance, troubleshooting, or warranty inquiries, please contact Suuwer customer service. We offer 24-hour customer service to assist you.
נאָך רעסורסן: