
1. הקדמה
Thank you for choosing the Oster OS-WDA3200 Water Dispenser. This manual provides essential information for the safe and efficient operation, installation, and maintenance of your new appliance. Please read these instructions thoroughly before use and retain them for future reference.
2. זיכערקייַט אינסטרוקציעס
צו זיכער מאַכן זיכערע אָפּעראַציע, שטענדיק נאָכפאָלגן די גרונטלעכע פּריקאָשאַנז:
- לייענען אַלע ינסטראַקשאַנז איידער ניצן די אַפּפּליאַנסע.
- דו זאלסט נישט אַרבעטן קיין אַפּפּליאַנסע מיט אַ דאַמידזשד שנור אָדער צאַפּן, אָדער נאָך די אַפּפּליאַנסע מאַלפאַנגקשאַנז אָדער איז דאַמידזשד אין קיין שטייגער.
- טונקט נישט איין דעם עלעקטרישן שנור, שטעקער, אדער דעם אפאראט אליין אין וואסער אדער אנדערע פליסיקייטן.
- Keep the appliance out of reach of children. The hot water dispenser features a child safety lock, but supervision is always recommended.
- פאַרזיכערן די אַפּפּליאַנסע איז געשטעלט אויף אַ סטאַביל, גלייַך ייבערפלאַך.
- Do not block ventilation openings. Maintain adequate space around the dispenser for proper airflow.
- Unplug the dispenser from the power outlet before cleaning or performing any maintenance.
- דער מיטל איז בלויז פֿאַר דרינענדיק נוצן.
3. פּראָדוקט איבערview
The Oster OS-WDA3200 is a floor-standing water dispenser designed to provide hot, ambient, and cold water. It features compressor cooling for efficient performance and a child safety lock for the hot water tap.
שליסל פֿעיִקייטן:
- Three Water Outlets: Hot, Ambient, and Cold
- Efficient Compressor Cooling
- Child Safety Lock for Hot Water
- Removable Drip Tray for Easy Cleaning
- Floor Standing Design
קאַמפּאָונאַנץ:

פיגורע 3.1: פראָנט View. This image displays the front of the Oster OS-WDA3200 water dispenser, showing the three water taps for hot, ambient, and cold water, along with the Oster branding and indicator lights.
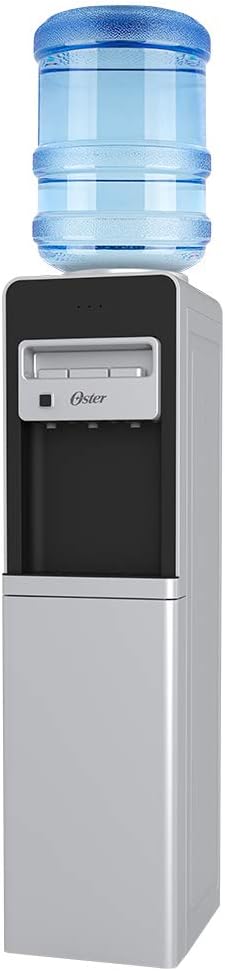
Figure 3.2: Water Bottle Installation. This image illustrates the Oster OS-WDA3200 water dispenser with a standard 5-gallon water bottle placed on top, ready for use.

Figure 3.3: Child Safety Lock. אַ נאָענט-אַרויף view of the child safety lock button, located next to the hot water tap, designed to prevent accidental dispensing of hot water.

Figure 3.4: Storage Compartment. This image shows the lower door of the dispenser open, revealing a convenient storage compartment.

פיגורע 3.5: דערציען View. The back of the dispenser, displaying the compressor unit, cooling coils, and power switches for heating and cooling functions.
4. סעטאַפּ
4.1 אַנפּאַקינג
- פֿאָרזיכטיק אַרויסנעמען דעם דיספּענסער פֿון זײַן פּאַקעט.
- אַראָפּנעמען אַלע פּאַקינג מאַטעריאַלן, טייפּ און פּראַטעקטיוו פילם.
- Inspect the dispenser for any signs of damage. If damaged, do not use and contact customer service.
4.2 פּלייסמאַנט
- Place the dispenser on a firm, level surface capable of supporting its weight when full.
- Ensure there is at least 10 cm (4 inches) of space between the back and sides of the dispenser and any walls or other objects for proper ventilation.
- Avoid placing the dispenser in direct sunlight or near heat sources (e.g., ovens, radiators) to maintain cooling efficiency.
- Do not place the dispenser in an area where the temperature will drop below 10°C (50°F).
4.3 וואַסער פלאַש ינסטאַלירונג
- Clean the neck of a new 3 or 5-gallon water bottle.
- Remove the protective cap from the water bottle.
- Carefully lift the water bottle and place it upright onto the support collar on top of the dispenser. Ensure it is seated firmly.
- Water will begin to flow into the dispenser's internal reservoirs.
4.4 Initial Power-On and Flushing
- Once the water bottle is installed and water has filled the reservoirs (this may take a few minutes), plug the dispenser into a grounded 120V electrical outlet.
- Locate the power switches on the back of the unit (refer to Figure 3.5). Turn on the cooling switch (usually blue or green) and the heating switch (usually red).
- Before consuming water, flush the system: Dispense and discard at least two cups of water from each tap (hot, ambient, cold) to ensure the system is clean and free of air bubbles.
- Allow approximately 15-30 minutes for the water to reach optimal cold and hot temperatures.
5. אַפּערייטינג ינסטרוקטיאָנס
5.1 Dispensing Cold Water
Place a cup under the cold water tap (typically blue). Press the cold water lever or button to dispense cold water. Release to stop.
5.2 Dispensing Ambient Water
Place a cup under the ambient water tap (typically gray or white). Press the ambient water lever or button to dispense room temperature water. Release to stop.
5.3 דיספּענסינג הייס וואַסער
The hot water tap (typically red) is equipped with a child safety lock.
- שטעלט אַ היץ-קעגנשטעליקע גלעזל אונטערן הייסן וואַסער קראַן.
- Simultaneously press the child safety lock button (refer to Figure 3.3) and the hot water lever/button.
- Release the lever/button to stop the flow of hot water. Release the safety lock button.
WARNING: Hot water can cause severe burns. Always use caution and ensure the child safety lock is engaged when not in use.
6. וישאַלט
6.1 רייניקן די טראָפּן טאַץ
The drip tray (located below the taps) collects spilled water and should be emptied and cleaned regularly.
- Carefully remove the drip tray by pulling it forward.
- Empty any collected water and wash the tray with mild soap and warm water.
- גוט אויסשווענקען און טרוקן איידער איר עס צוריקשטעלט.
6.2 רייניקונג פון די אויסערליכע זייט
ווישט די אויסערלעכע ייבערפלאַכן פון דעם דיספּענסער מיט אַ ווייכן, דamp שטאָף. ניצט נישט קיין שרײַבנדיקע רייניגער, סאָלווענטן, אדער שטרענגע כעמיקאַלן, ווײַל די קענען שאַטן די ענדיקונג.
6.3 Draining the Unit (for storage or extended non-use)
- ציען אויס דעם דיספּענסער פֿון דער עלעקטרישער אַוטלעט.
- אַראָפּנעמען די וואַסער פלאַש.
- Place a large bucket or container under the drain plug, usually located at the back or bottom of the unit.
- Remove the drain plug to allow all water to empty from the reservoirs.
- אַמאָל אויסגעטריקנט, צוריקשטעלן די אויסטריקעניש פּלאָג זיכער.
- Dispense water from all taps until no more water comes out.
- Allow the interior to air dry completely before storing.
7. טראָובלעשאָאָטינג
If you encounter issues with your water dispenser, refer to the following common problems and solutions:
| פּראָבלעם | מעגלעך סיבה | לייזונג |
|---|---|---|
| קיין קאַלט וואַסער | Cooling switch off; water bottle empty; dispenser unplugged; ventilation blocked. | Ensure cooling switch is on; replace water bottle; check power connection; clear ventilation. |
| קיין הייס וואַסער | Heating switch off; water bottle empty; dispenser unplugged. | Ensure heating switch is on; replace water bottle; check power connection. |
| וואַסער ליקינג | Water bottle cracked or improperly seated; drain plug loose. | Replace water bottle; reseat bottle; tighten drain plug. |
| דיספּענסער איז טומלדיק | Normal compressor operation; dispenser not level. | This is normal during cooling cycles. Ensure dispenser is on a level surface. |
| Water has unusual taste | New dispenser (initial taste); old water bottle; dispenser needs cleaning. | Flush system thoroughly; replace water bottle; perform full cleaning. |
If the problem persists after attempting these solutions, please contact Oster customer service.
8. ספּעסאַפאַקיישאַנז
| שטריך | דעטאַל |
|---|---|
| מאָדעל נומער | OS-WDA3200 |
| סאָרט | אָסטער |
| קאָליר | ווייַס |
| מאַטעריאַל | פּלאַסטיק |
| דימענסיעס (L X W X H) | 26 X 33 X 101 סענטימעטער (10.2 X 13 X 39.8 אינטשעס) |
| וואָג | 13.2 קג (29.1 לבס) |
| Voltage | 120 וואלטס |
| ייַנמאָנטירונג טיפּ | שטאָק שטייענדיק |
9. וואָראַנטי און שטיצן
For warranty information, technical support, or service inquiries, please refer to the warranty card included with your product or visit the official Oster webזייטל. האַלט אייער קויף קוויטל ווי אַ באַווייַז פון קויפן.