
1. הקדמה
This manual provides detailed instructions for the setup, operation, maintenance, and troubleshooting of the URayCoder H.265/H.264 IP Video Decoder, Model UHCVD265-1-4K. This device is designed to decode various IP video streams and output them via HDMI, VGA, or CVBS interfaces, supporting resolutions up to 4K UHD.
2. פּראָדוקט איבערview
2.1 שליסל פֿעיִקייטן
- Supports H.265 and H.264 video decoding.
- Decodes multiple types of video streams from various video encoders and IP cameras.
- Multi-channel decoding: Supports up to 4 channels simultaneously.
- Multi-protocol support: HTTP(S), RTSP, RTMP, SRT, HLS(M3U8), UDP, RTP, Multicast, Unicast, FLV, ONVIF.
- 4K UHD resolution support: Up to 3840x2160P@30fps output.
- Output interfaces: HDMI, VGA, CVBS.
2.2 Physical Features and Ports
The URayCoder IP Video Decoder features various ports for connectivity and control.

פיגורע 1: Rear panel of the URayCoder IP Video Decoder, showing the Reset button, Audio output, CVBS output, VGA output, HDMI output, LAN port, and DC12V power input.
- באַשטעטיק קנעפּל: Used to restore factory settings or restart the device.
- אַודיאָ רעזולטאַט: 3.5mm jack for audio output.
- CVBS רעזולטאַט: קאָמפּאָסיטע ווידעא רעזולטאַט.
- VGA רעזולטאַט: Video Graphics Array output.
- HDMI רעזולטאַט: High-Definition Multimedia Interface output.
- לאַן פּאָרט: RJ45 Ethernet port for network connection.
- DC12V Input: Power input for the 12V DC adapter.

פיגורע 2: Diagram illustrating the various streaming protocols supported by the decoder, including RTMP, RTSP, HTTPS, M3U8, HLS, SRT, UDP, and ONVIF.
3. סעטאַפּ
3.1 יקערדיק קאַנעקשאַן
Follow these steps to connect your URayCoder IP Video Decoder:
- Connect the DC12V power adapter to the decoder and a power outlet.
- Connect an Ethernet cable from your network router/switch to the decoder's LAN port.
- Connect your display device (monitor, TV) to the decoder using an HDMI, VGA, or CVBS cable.
- Ensure your IP camera or video encoder is connected to the same network and is streaming video.

פיגורע 3: Connection diagram showing an IP camera or other video stream source connected via the internet to the URayCoder Video Decoder, which then outputs to a display via CVBS, VGA, or HDMI.
3.2 אַקסעס די Web צובינד
The decoder is configured via a web-באזירטע אינטערפייס. צו צוקומען דערצו:
- Ensure your computer is on the same network as the decoder.
- עפענען א web browser and enter the decoder's IP address. The default IP address is typically provided in the packaging or can be discovered using network scanning tools.
- Log in using the default username and password (refer to your device's specific documentation for default credentials).
4. אָפּעראַציע
4.1 Adding Video Streams (Address Setting)
To decode a video stream, you must provide its URL אין די web צובינד.
- נאַוויגירן צו די אַדרעס באַשטעטיקן אָפּטיילונג אין די web צובינד.
- Enter the full stream URL (e.g., RTSP, RTMP, HLS) for each channel you wish to decode.
- For RTSP streams, a common format is
rtsp://username:password@IP_Address:554/cam/realmonitor?channel=1&subtype=0. סטרויערןusername,password,IP_Address, אוןchannelas per your camera/encoder configuration. - דריקט צולייגן צו ראַטעווען די סעטטינגס.
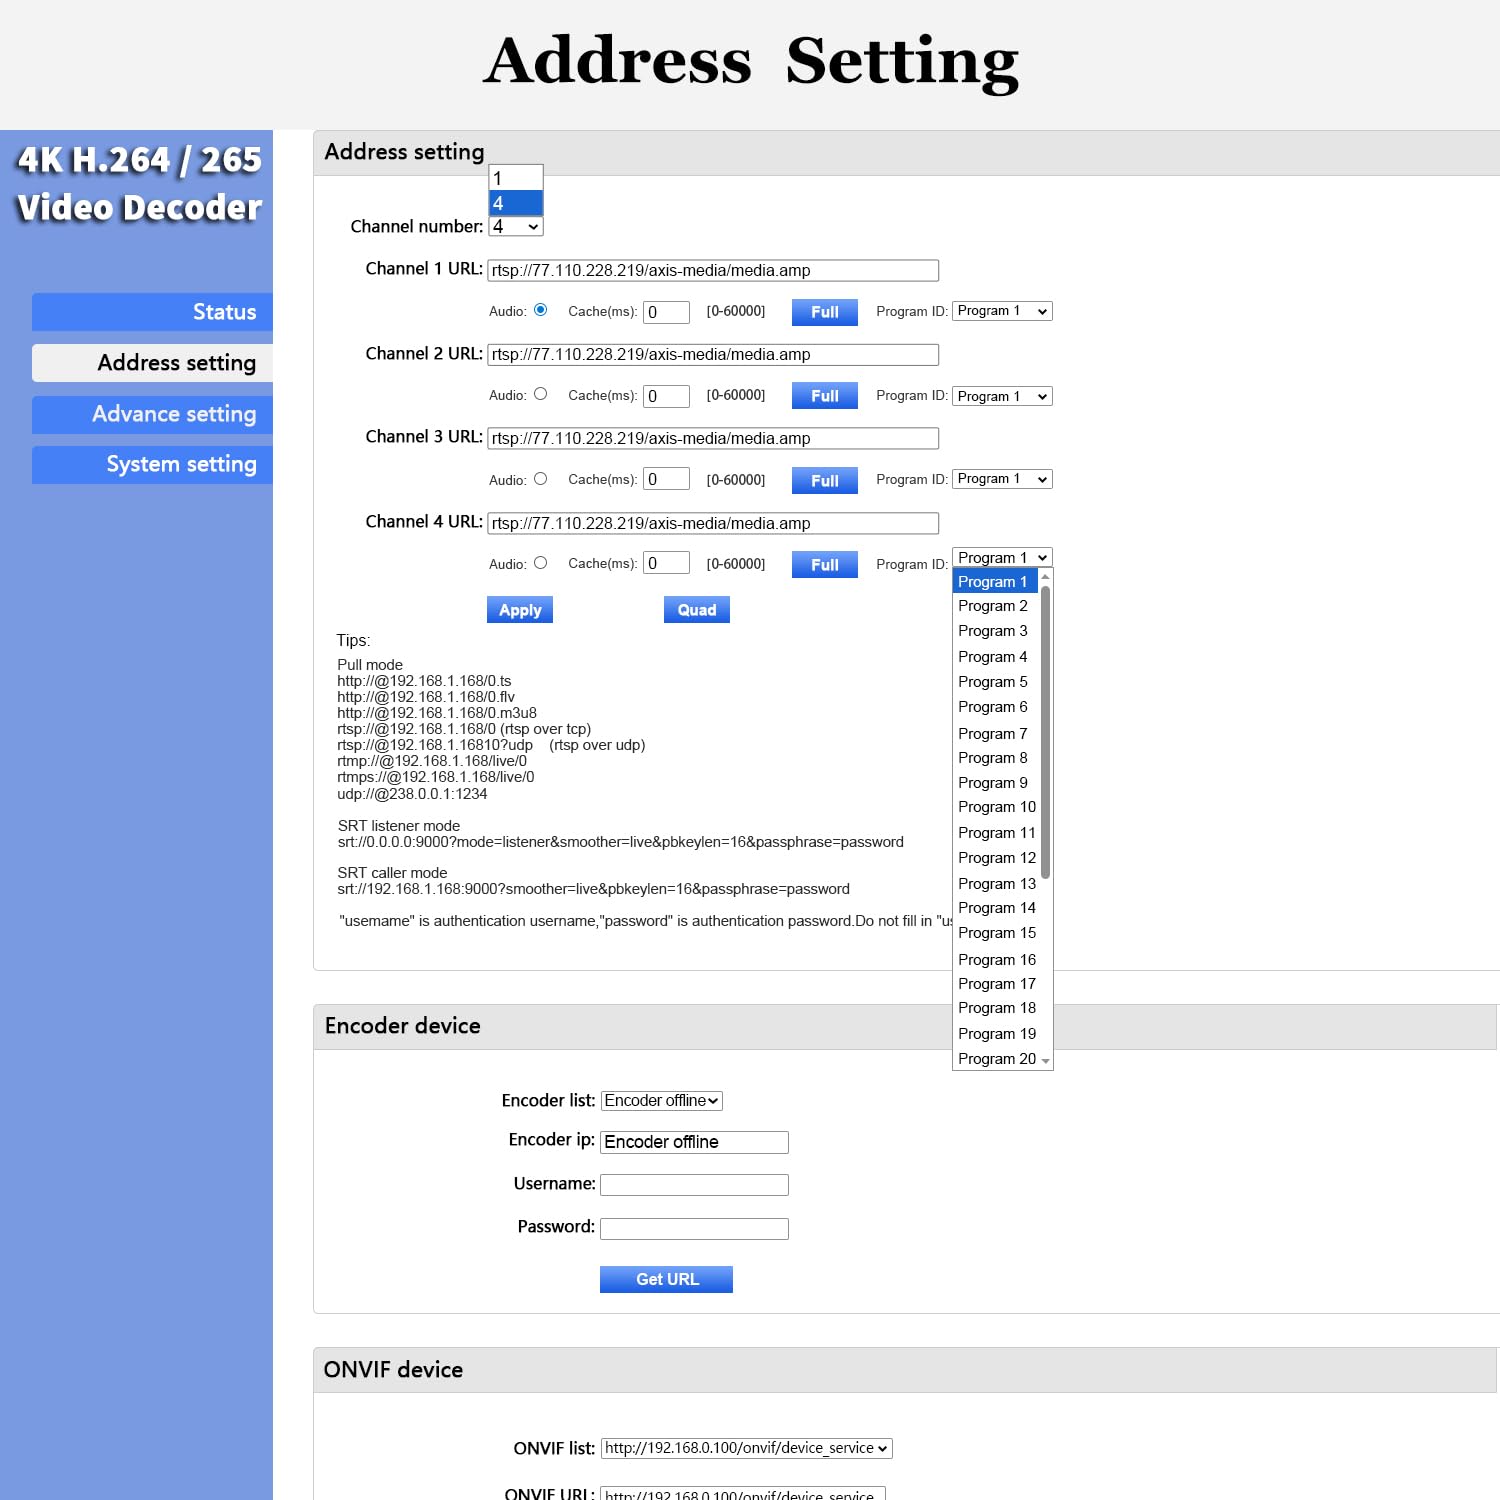
פיגורע 4: סקרינשאט פון די web interface's 'Address Setting' page, showing fields for entering stream URLs for up to four channels and options for audio and cache settings.
4.2 Multi-channel Decoding and Display Layouts
The decoder supports displaying multiple video streams simultaneously.
- אין די web צובינד, נאַוויגירן צו Channel Layout אונטער שטייַגן באַשטעטיקן.
- Select your desired layout (e.g., Fullscreen for a single channel, Quarter Display for four channels, or other custom layouts).
- Configure the display regions for each channel as needed.
- דריקט צולייגן.

פיגורע 5: Illustration of multi-channel output, showing four distinct video inputs being decoded and displayed simultaneously on a single screen in a quad layout.

פיגורע 6: סקרינשאט פון די web interface's 'Channel Layout' settings, offering various display templates like Fullscreen, Quarter Display, and custom picture-in-picture styles.
4.3 Output Settings (System Output)
Adjust the video output parameters to match your display and preferences.
- גיין צו סיסטעם באַשטעטיקן > סיסטעם רעזולטאַט.
- אויסקלייַבן די געוואלט הד רעזולטאַט resolution (e.g., 1080P60, 3840x2160P@30).
- סטרויערן HDMI color, CVBS רעזולטאַט format (PAL/NTSC), rotation, and scaling as needed.
- Fine-tune brightness, contrast, hue, saturation, and volume.
- דריקט צולייגן.

פיגורע 7: סקרינשאט פון די web interface's 'System Output' settings, showing options for HD output resolution, HDMI color, CVBS format, rotation, scaling, and image adjustments like brightness and contrast.
4.4 On-Screen Display (OSD Setting)
You can add text or image overlays to your video output.
- נאַוויגירן צו שטייַגן באַשטעטיקן > Osd setting.
- Enable a region, select the type (Text, Image, Roll text, Time).
- Enter the desired text or configure image settings, including position, font size, background color, and opacity.
- דריקט צולייגן.

פיגורע 8: סקרינשאט פון די web interface's 'OSD Setting' page, demonstrating how to configure on-screen display elements like text, including status, type, transparency, position, text content, font size, and color.
4.5 סטאַטוס ווייַז
Monitor the decoder's operational status through the web צובינד.
- אַקסעס די web interface and click on סטאַטוס.
- This page displays system information such as device name, runtime, CPU usage, memory usage, network status, HDMI format, and the status of each decoding channel, including URL, frame rate, bit rate, and any decoding errors.

פיגורע 9: סקרינשאט פון די web interface's 'Status' page, showing system status details like device name, runtime, CPU/memory usage, network status, HDMI format, and detailed status for each video channel, including URL, frame rate, and bit rate.
5. וישאַלט
To ensure optimal performance and longevity of your decoder:
- האַלטן די מיטל אין אַ געזונט-ווענאַלייטיד געגנט צו פאַרמייַדן אָוווערכיטינג.
- רייניקט די אויסערליכע זייט מיט א ווייכן, טרוקענעם טוך. פארמיידט פליסיקע רייניגער.
- קאָנטראָלירט פּעריִאָדיש דעם פאַבריקאַנט'ס website for firmware updates to improve performance and add new features. Firmware updates are typically performed via the web צובינד אונטער סיסטעם באַשטעטיקן > Upgrade and Backup.
- Ensure stable power supply to prevent unexpected shutdowns.
6. טראָובלעשאָאָטינג
די סעקציע באהאנדלט אלגעמיינע פראבלעמען וואס איר קענט באגעגענען.
6.1 קיין ווידעא ארויסגאַנג
- טשעק קאַנעקשאַנז: Ensure all cables (power, network, HDMI/VGA/CVBS) are securely connected.
- Verify Display Input: Confirm your display is set to the correct input source (HDMI, VGA, AV).
- סטרים URL אַקיעראַסי: Double-check the stream URL entered in the אַדרעס באַשטעטיקן. Incorrect IP addresses, usernames, passwords, or channel numbers are common causes.
- נעץ קאַנעקטיוויטי: Ensure the decoder and the video source (IP camera/encoder) are on the same network and can communicate.
- Source Availability: Confirm the video source is actively streaming.
6.2 Multi-channel Display Issues (e.g., Black Screen on a Channel)
- רעזאָלוציע לימיטאַציעס: When displaying multiple channels, especially in quad view, the decoder may have limitations on the combined resolution it can handle. For example, 4K streams might not display simultaneously with other high-resolution streams. Consider using sub-streams (lower resolution streams) from your cameras for multi-view לייאַוץ.
- RTSP Sub-stream: If your camera supports it, change
subtype=0(main stream) tosubtype=1(sub-stream) in the RTSP URL for multi-channel viewing to reduce bandwidth and processing load. Exampלאַ:rtsp://username:password@IP_Address:554/cam/realmonitor?channel=1&subtype=1. - אַפּאַראַט קאַנפיגיעריישאַן: Access your camera's settings directly to adjust sub-stream resolutions if necessary.
6.3 Decoder Not Accessible via Web צובינד
- IP אַדרעס: Verify the decoder's IP address. If unknown, use a network scanner or reset the device to factory defaults (which will revert to a default IP, usually 192.168.1.168).
- נעץ סעטטינגס: Ensure your computer's IP address is in the same subnet as the decoder.
- פירעוואַלל: Temporarily disable any firewalls on your computer to rule out blocking access.
6.4 Decoder Constantly Pinging/Chatty on Network
- The decoder may perform network activities like DNS, NTP, etc. If this is a concern in a sensitive network environment, consider isolating it using firewall policies to restrict outgoing connections to only necessary services.
7. ספּעסאַפאַקיישאַנז
| מאָדעל נומער | UHCVD265-1-4K |
| פּראָדוקט דימענשאַנז | 5.91 X 3.94 X 1.18 אינטשעס |
| וואָג | 1.15 פונט |
| צובינד טיפּ | HDMI+CVBS+VGA |
| נומער פון טשאַנאַלז | 4 (Max simultaneous decoding) |
| ווידעא דיקאָודינג | ה.265, ה.264 |
| מאַקסימום רעזולטאַט רעזאָלוציע | 3840 קס 2160 פּ @ 30 פפּס |
| שטיצט פּראָטאָקאָלס | HTTP(S), RTSP, RTMP, SRT, HLS(M3U8), UDP, RTP, Multicast, Unicast, FLV, ONVIF |
8. וואָראַנטי און שטיצן
URayCoder provides free lifetime technical support and warranty for all its video decoders. For assistance, please refer to the contact information provided with your product or visit the official URayCoder webפּלאַץ.