
1. הקדמה
This manual provides essential information for the installation, operation, and maintenance of your Itek Meshcore 36B Gaming Tower PC Case. Please read this manual thoroughly before beginning assembly to ensure proper setup and safe usage. Keep this manual for future reference.
זיכערקייַט אינפֿאָרמאַציע
- Always disconnect power from all components before installation or maintenance.
- האַנדלט מיט טעמפּערד גלאָז פּאַנאַלז מיט וואָרענונג צו פאַרמייַדן ברייקידזש.
- פֿאַרמײַדן אויסצושטעלן דעם קעסטל צו עקסטרעמע טעמפּעראַטורן אָדער פֿײַכטקייט.
- האַלטן קליין טיילן אַוועק פון קינדער.
2. פּעקל אינהאַלט
באַשטעטיקן אַז אַלע קאָמפּאָנענטן זענען פאַראַן אין דער פּאַקעט:
- Itek Meshcore 36B PC Case
- 4 x 14cm ARGB Fans (3 pre-installed in front, 1 pre-installed in rear)
- ARGB Fan Hub
- Accessory box (screws, cable ties, standoffs, etc.)
- באַניצער מאַנואַל (דעם דאָקומענט)
3. פּראָדוקט איבערview
The Itek Meshcore 36B is an ATX gaming tower designed for optimal airflow, ease of assembly, and modern aesthetics. It features a perforated mesh front panel, four pre-installed ARGB fans, and a tempered glass side panel.
שליסל פֿעיִקייטן
- Excellent Airflow: Full mesh front panel and four pre-installed ARGB fans (3 front, 1 rear) for efficient cooling.
- טעמפּערד גלאז זייט פּאַנעל: גיט אַ קלאָר view of internal components and RGB lighting.
- מאָדערן קאַנעקטיוויטי: Includes 2x USB 3.0 ports and 1x USB-C port on the front/side I/O panel.
- אָרגאַניזירט ינלענדיש: Separate compartment for the power supply unit (PSU) and storage drives (HDD/SSD) for clean cable management.
- ברייט קאַמפּאַטאַבילאַטי: Supports ATX motherboards, graphics cards up to 420mm, CPU coolers up to 174mm, and liquid cooling radiators up to 360mm.
קאָמפּאָנענט לעגיטימאַציע

פיגורע 3.1: פראָנט view of the Itek Meshcore 36B PC case, showcasing the mesh front panel and three 14cm ARGB fans.

Figure 3.2: Angled front-side view, highlighting the tempered glass panel and front I/O ports (USB 3.0, Type-C).

Figure 3.3: Rear-side view, illustrating the rear exhaust fan and expansion slots.

פיגורע 3.4: ינלענדיש view from the tempered glass side, detailing the motherboard tray and component layout.
4. סעטאַפּ און ייַנמאָנטירונג
Follow these steps for assembling your PC components within the Itek Meshcore 36B case.
4.1 צוגרייטן דעם פאַל
- שטעלט דעם קעסטל אויף א סטאַבילער, גלאַטער ייבערפלאַך.
- Carefully remove the tempered glass side panel by unscrewing the thumb screws at the rear and gently pulling the panel away. Set it aside on a soft, non-abrasive surface.
- Remove the solid metal side panel on the opposite side to access the cable management area.
4.2 מאָטהערבאָאַרד ינסטאַללאַטיאָן
- אינסטאלירט דעם I/O שילד (אויב נישט פריער אַטאַטשט צו אייער מוטערבאָרד) אין דער הינטערשטער עפענונג פון דעם קעיס.
- Align the motherboard with the standoffs in the case. Ensure the standoffs match your ATX motherboard's screw holes.
- באַפעסטיקט דאָס מאַדערבאָרד מיט די צוגעשטעלטע שרויפן. נישט צו שטאַרק אָנציִען.
4.3 מאַכט סופּפּלי יוניט (פּסו) ינסטאַלירונג
- Locate the PSU compartment at the bottom rear of the case.
- Slide the PSU into the compartment from the rear of the case, ensuring the fan faces downwards (if the case has a bottom vent) or upwards.
- באַפֿעסטיקן די PSU מיט שרויפֿן פֿון דער הינטערשטער זײַט פֿון דער קעיס.
4.4 סטאָרידזש דרייוו אינסטאַלאַציע (HDD/SSD)
The case features dedicated bays for 3.5" HDDs and 2.5" SSDs, typically located in the PSU shroud area or behind the motherboard tray.
- For 3.5" HDDs: Slide the drive into the designated drive cage and secure with screws.
- For 2.5" SSDs: Mount the SSD onto the designated brackets, usually found behind the motherboard tray, and secure with screws.
4.5 גראַפיקס קאַרטל און יקספּאַנשאַן קאַרטל ינסטאַלירונג
- אַראָפּנעמען די נייטיקע יקספּאַנשאַן סלאָט דעקל פון די הינטערשטע טייל פון די קעסטל.
- Insert the graphics card or other expansion card into the appropriate PCIe slot on the motherboard.
- Secure the card with the provided screw or latch mechanism.
4.6 קאַבלע מאַנאַגעמענט
The Meshcore 36B offers 21mm of cable management space behind the motherboard tray.
- Route all necessary cables (PSU, data, front panel) through the cutouts in the motherboard tray.
- Use the included cable ties to bundle and secure cables, ensuring they do not obstruct airflow or interfere with side panel closure.
- Connect the front panel connectors (USB 3.0, USB-C, audio, power/reset switches, LED indicators) to the corresponding headers on your motherboard.
- Connect the ARGB fan hub to your motherboard's ARGB header (if available) for software control, or use the integrated controller for basic lighting effects. Ensure all fans are connected to the hub.
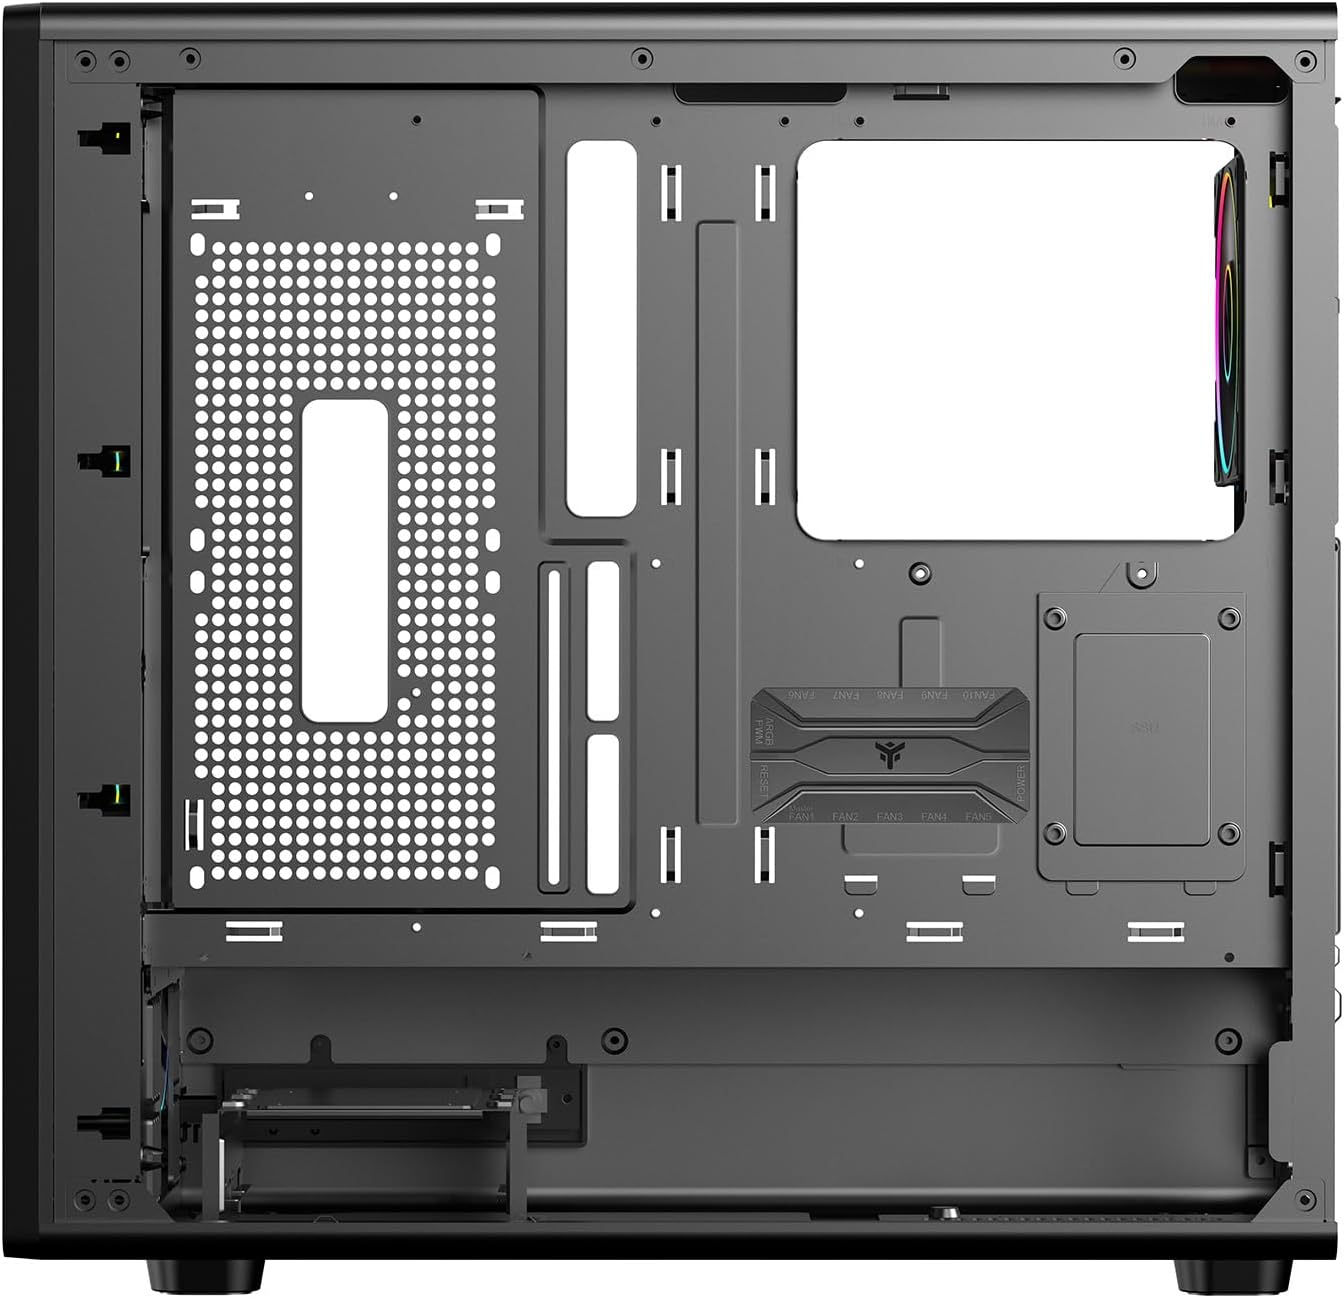
פיגורע 4.1: ינלענדיש view from the backplate side, illustrating cable management options.
5. אַפּערייטינג ינסטרוקטיאָנס
5.1 מאַכט אויף
- Once all components are installed and cables are connected, replace both side panels.
- Connect your monitor, keyboard, mouse, and other peripherals.
- פֿאַרבינדט דעם מאַכט קאַבל צום PSU און אַ וואַנט אַוטלעט.
- Flip the power switch on the PSU to the 'ON' position.
- Press the power button on the front panel of the case to start your computer.
5.2 פראָנט פּאַנעל קאָנעקטיוויטי
The front/side I/O panel provides convenient access to:
- 2 x USB 3.0 פּאָרטן: פֿאַר הויך-גיכקייט דאַטן אַריבערפירן מיט קאָמפּאַטיבלע דעוויסעס.
- 1 x USB-C Port: For modern USB Type-C devices.
- אַודיאָ דזשעקס: פֿאַר כעדפאָונז און מיקראָפאָנען.
- מאַכט קנעפּל: צו אנצינדן/אויסלעשן די סיסטעם.
- באַשטעטיק קנעפּל: צו ריסטאַרט די סיסטעם.
- LED ינדיקאַטאָרס: For power and HDD activity.
5.3 ARGB לייטינג קאָנטראָל
The pre-installed ARGB fans are connected to an ARGB hub. Lighting can be controlled in two ways:
- מאַדערבאָרד ווייכווארג קאָנטראָל: If the ARGB hub is connected to a compatible 3-pin 5V ARGB header on your motherboard, you can use your motherboard's RGB software (e.g., ASUS Aura Sync, MSI Mystic Light, Gigabyte RGB Fusion) to synchronize and customize lighting effects.
- Integrated Controller: If not connected to a motherboard ARGB header, the hub typically has a button (often labeled 'LED' or 'RGB') on the case's front I/O panel or directly on the hub itself to cycle through pre-set lighting modes and colors.
6. וישאַלט
רעגולערע אויפהאלטונג העלפט זיכער מאכן די בעסטע פאָרשטעלונג און לאַנגלעבעדיקייט פון אייער פּיסי קעסטל.
6.1 שטויב פילטער רייניקונג
The Meshcore 36B includes dust filters to prevent dust buildup inside the case. These filters should be cleaned periodically.
- Locate and remove the dust filters (typically on the top, front, and/or bottom of the case).
- רייניקט די פילטערס מיט קאמפרעסט לופט, א ווייכע בארשט, אדער דורך שווענקען מיט וואסער (מאכט זיכער אז זיי זענען אינגאנצן טרוקן איידער איר לייגט זיי צוריק אריין).
- צוריקשטעלן די שטויב פילטערס.
6.2 אַלגעמיינע רייניקונג
- ניצן אַ ווייך, דamp cloth to wipe down exterior surfaces. Avoid abrasive cleaners.
- פֿאַר די טעמפּערד גלאָז טאַפליע, ניצט אַ גלאָז רייניגער און אַ מיקראָפיבער שטאָף צו ויסמיידן שטריכן.
- Periodically use compressed air to clear dust from internal components and fan blades.
7. טראָובלעשאָאָטינג
If you encounter issues with your PC case, refer to the following common problems and solutions.
7.1 Fans Not Spinning / ARGB Not Lighting Up
- קוק די מאַכט קאַנעקשאַנז: Ensure all fans are properly connected to the ARGB hub, and the hub itself is receiving power from the PSU (usually via a SATA power connector).
- Check ARGB Signal: If using motherboard software control, verify the ARGB hub is connected to a 3-pin 5V ARGB header on the motherboard and that the software is correctly configured.
- Try Integrated Controller: If motherboard control fails, try using the physical button on the case or hub to cycle through lighting modes.
7.2 Front Panel USB/Audio Ports Not Working
- Verify Motherboard Connections: Ensure the USB 3.0, USB-C, and audio headers from the front panel are securely connected to the correct pins on your motherboard. Refer to your motherboard manual for header locations.
- Check Drivers: Ensure you have installed the latest chipset and audio drivers for your motherboard.
7.3 סיסטעם איבערהיצונג
- Clean Dust Filters: Ensure dust filters are clean and not obstructing airflow.
- Check Fan Orientation: Verify that fans are installed with correct airflow direction (front fans typically intake, rear/top fans exhaust).
- Improve Cable Management: Poor cable management can restrict airflow. Re-route cables for better air circulation.
8. ספּעסאַפאַקיישאַנז
| שטריך | באַשרייַבונג |
|---|---|
| סאָרט | יטעק |
| מאָדעל נאָמען | Itek Case MESHCORE 36B |
| מאָדעל נומער | ITGCAMC36B |
| טיפּ פון קאַסטן | טורעם |
| מאָטהערבאָאַרד קאַמפּאַטאַבילאַטי | אַטקס |
| מאַטעריאַל | Metal, Plastic, Tempered Glass |
| קאָליר | שוואַרץ |
| קאָאָלינג אופֿן | לופט |
| פאַר-אינסטאַלירן פאַנס | 4 x 14cm ARGB Fans (3 Front, 1 Rear) |
| פראָנט איך / אָ פּאָרץ | 2 קס וסב 3.0, 1 קס וסב-C |
| מאַקסימום גפּו לענג | 420 מם |
| מאַקסימום קפּו קולער הייך | 174 מם |
| פליסיק קאָאָלינג שטיצן | אַרויף צו 360 מם |
| קאַבלע מאַנאַגעמענט ספעיס | 21 מם |
| נאָך פֿעיִקייטן | Dust Filter, Perforated Front, ARGB Lighting, Integrated Fan |
9. וואָראַנטי און שטיצן
9.1 פּראָדוקט וואָראַנטי
The Itek Meshcore 36B PC Case comes with a 24-חודש וואָראַנטי from the date of purchase. This warranty covers manufacturing defects and faulty components under normal use. It does not cover damage caused by misuse, accidents, unauthorized modifications, or improper installation.
9.2 טעכניש שטיצן
For technical assistance, troubleshooting beyond this manual, or warranty claims, please contact Itek customer support through their official website or the retailer where the product was purchased. Please have your product model number (ITGCAMC36B) and proof of purchase ready when contacting support.


