
1. הקדמה
This manual provides instructions for the proper setup, operation, and maintenance of your Acer B247Y 23.8-inch LED LCD Monitor. Please read this manual thoroughly before using your monitor to ensure optimal performance and to prevent damage.
The Acer B247Y is a 23.8-inch Full HD (1920 x 1080) monitor featuring an IPS panel for wide viewing angles, an anti-glare display, and a frameless design on three sides. It includes multiple connectivity options and an ergonomic stand for comfortable viewing.
2. פּעקל אינהאַלט
באַשטעטיקט אַז אַלע זאכן זענען פאַראַן אין אייער פּעקל. אויב עפּעס פעלן אָדער זענען געשעדיגט, קאָנטאַקטירט אייער הענדלער.
- Acer B247Y 23.8-inch LED LCD Monitor
- מאָניטאָר שטאַנד (באַזע און האַלדז)
- Power Adapter (Internal) and Power Cable
- ווגאַ קאַבלע
- דיספּלייַפּאָרט 1.2 קאַבלע
- HDMI קאַבלע
- Audio-in Cable (if included)
- Audio-out Cable (if included)
- באַניצער מאַנואַל (דעם דאָקומענט)
3. סעטאַפּ
3.1 צוזאַמענשטעלן דעם מאָניטאָר שטאַנד
The monitor comes with a detachable foot stand. Follow these steps to assemble:
- נעמט פֿאָרזיכטיק אַרויס דעם מאָניטאָר און שטאַנד קאָמפּאָנענטן פֿון דער פּאַקאַדזשינג.
- באַפעסטיקט דעם שטאַנד האַלדז צום מאָניטאָר פּאַנעל. מאַכט זיכער אַז עס קליקט זיכער אין פּלאַץ.
- Attach the stand base to the stand neck. Tighten any screws if provided, usually located on the underside of the base.
- שטעלט דעם צוזאַמענגעשטעלטן מאָניטאָר אויף אַ סטאַבילער, גלאַטער ייבערפלאַך.
באַמערקונג: The monitor also supports VESA mount (100 x 100 mm) for wall or arm mounting. Refer to your VESA mount kit instructions for installation.
3.2 קאַנעקטינג די מאָניטאָר
פאַרבינדן די מאָניטאָר צו דיין קאָמפּיוטער אָדער אנדערע דעוויסעס מיט די צונעמען קייבאַלז.
- ווידעא קשר:
- פֿאַרבינדט איין עק פֿון דעם DisplayPort קאַבל צום DisplayPort אַרויסגאַנג אויף אייער קאָמפּיוטער און דעם אַנדערן עק צום DisplayPort אַרייַנגאַנג אויף דעם מאָניטאָר.
- Alternatively, connect an HDMI cable from your computer's HDMI output to the monitor's HDMI input.
- For older systems, connect a VGA cable from your computer's VGA output to the monitor's VGA input.
- אַודיאָ קאַנעקשאַן:
- If using VGA or DisplayPort without audio, connect an audio cable from your computer's audio output to the monitor's audio-in port for integrated speakers.
- To connect external speakers or headphones, use the monitor's audio-out port.
- מאַכט קשר:
- פֿאַרבינדט דעם מאַכט קאַבל צום מאָניטאָר'ס מאַכט אַרייַנגאַנג, און דערנאָך שטעקט דעם אַנדערן עק אין אַ געערדטן עלעקטרישן ווענטיל.

Figure 3.2.1: Acer B247Y Monitor with Stand. This image illustrates the overall appearance of the monitor when fully assembled on its stand.
4. אַפּערייטינג ינסטרוקטיאָנס
4.1 פּאַוערינג אויף / אַוועק
דריק דעם מאַכט קנעפּל, וואָס געפינט זיך געוויינטלעך אויף דער אונטערשטער רעכטער זייט אָדער הינטערן מאָניטאָר, צו אנצינדן אָדער אויסלעשן דעם מאָניטאָר. די מאַכט אינדיקאַטאָר ליכט וועט זיך אָנצינדן ווען דער מאָניטאָר איז אָן.
4.2 Adjusting Monitor Settings (OSD)
The monitor features an On-Screen Display (OSD) menu for adjusting various settings. Use the control buttons (typically located near the power button) to navigate and select options within the OSD menu.
געוויינטלעכע OSD סעטטינגס אַרייַננעמען:
- בילד: Brightness, Contrast, Color Temperature, Gamma, Acer eColor Management modes (e.g., Dark Room, Eco).
- אַודיאָ: Volume control for integrated speakers or audio-out.
- אַרייַנשרייַב: Select the active video input source (VGA, DisplayPort, HDMI).
- OSD: OSD timeout, language.
- פאַרוואַלטונג: באַשטעטיק צו פאַבריק דיפאָלץ.
4.3 ערגאָנאָמישע אַדזשאַסטמאַנץ
The Acer B247Y monitor stand offers several ergonomic adjustments to optimize your viewדערפאַרונג:
- טילט: Adjust the screen angle from -5 degrees to 25 degrees (forward/backward).
- סוויוול: Rotate the monitor horizontally up to +/- 45 degrees.
- הייך אַדזשאַסטמאַנט: אַדזשאַסטירן די הייך פון דעם עקראַן ביז 120 מ״מ.
- דרייט: דריי דעם עקראַן 90 גראַד פֿאַר פּאָרטרעט viewing.
5. וישאַלט
געהעריגע אויפהאלטונג גאראנטירט די לאנגעוויטי און אפטימאלע פערפארמאנס פון אייער מאניטאר.
- רייניקונג די פאַרשטעלן: ווישט אָפּ דעם עקראַן מיט אַ ווייכן, לינט-פֿרײַעם שטאָף. פֿאַר שווערע פֿלעקן, דampen the cloth with a small amount of water or a non-abrasive screen cleaner. Do not spray liquid directly onto the screen.
- רייניקונג פון די Casing: ניצט אַ ווייכע, טרוקענע שטאָף צו רייניקן דעם מאָניטאָרasinז. פֿאַרמײַדן ניצן שטאַרקע דיטערדזשענטן אָדער אַברייסיוו רייניגער.
- ווענטילאַטיאָן: זיכערט זיך אז די ווענטילאציע עפענונגען אויפן מאָניטאָר זענען נישט פארשטאפט צו פארמיידן איבערהיצונג.
- מאַכט אַוועק: Always turn off the monitor and unplug it from the power outlet before cleaning or when not in use for extended periods.
6. טראָובלעשאָאָטינג
אויב איר טרעפט פּראָבלעמען מיט אייער מאָניטאָר, זעט די פאלגענדע געוויינטלעכע טראָובלעשווטינג טריט:
- No Power / Monitor Does Not Turn On:
- זיכער מאַכן אַז דער מאַכט קאַבל איז זיכער פארבונדן צו ביידע דעם מאָניטאָר און אַ אַרבעטנדיק עלעקטריש ווענטיל.
- באַשטעטיקן אַז די עלעקטרישע ווענטיל אַרבעט דורך אַרײַנשטעקן אַן אַנדער דעוויס.
- דריקן די מאַכט קנעפּל פעסט.
- No Image / "No Signal" Message:
- Check that the video cable (DisplayPort, HDMI, or VGA) is securely connected to both the monitor and your computer.
- זייט זיכער אז אייער קאמפיוטער איז אנגעצונדן און נישט אין שלאף מאָדע.
- ניצט דעם OSD מעניו צו מאַנועל אויסקלײַבן די ריכטיקע אינפוט מקור.
- פרובירט אן אנדערן ווידעא קאבל אדער פארט אויב פאראן.
- Image is Distorted or Unclear:
- זיכער מאַכן אַז די דיספּליי רעזאָלוציע אויף דיין קאָמפּיוטער איז געשטעלט צו די מאָניטאָר'ס נאַטירלעכע רעזאָלוציע (1920 x 1080).
- Adjust brightness, contrast, and other picture settings via the OSD menu.
- Check for any physical damage to the screen or cables.
- קיין קלאַנג פֿון רעדנערס:
- פֿאַרגרעסערט דעם קול ניצנדיק דעם OSD מעניו אָדער אייער קאָמפּיוטער'ס געזונט סעטטינגס.
- זיכער מאַכן אַז דער אַודיאָ קאַבל (אויב גענוצט) איז ריכטיק פארבונדן.
- באַשטעטיקט אַז די ריכטיקע אַודיאָ אַרויסגאַנג מיטל איז אויסגעקליבן אין אייער קאָמפּיוטער'ס געזונט סעטטינגס.
7. ספּעסאַפאַקיישאַנז
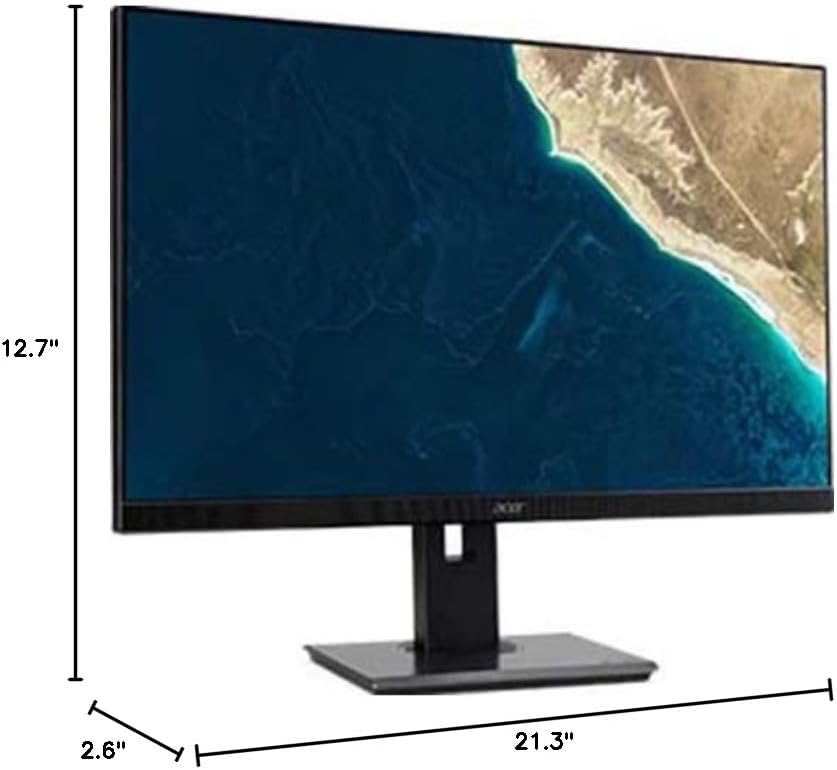
Figure 7.1.1: Acer B247Y Monitor Dimensions. This image shows the approximate height (12.7"), width (21.3"), and depth (2.6") of the monitor without the stand.
| שטריך | באַשרייַבונג |
|---|---|
| מאָדעל נומער | B247Y |
| פאַרשטעלן גרייס | 23.8 אינטשעס (60.5 סענטימעטער) |
| ווייַז טיפּ | LED LCD, IPS Panel, Anti-glare (AG) |
| מאַקסימום האַכלאָטע | 1920 רענטגענ 1080 (פול הד) |
| אַספּעקט פאַרהעלטעניש | 16:9 |
| דערפרישן קורס | 75 הז |
| ענטפער צייט | 4ms (גרוי-צו-גרוי) |
| ברייטנאַס (טיפּיש) | 250 סי / מ² |
| געבוירן קאַנטראַסט פאַרהעלטעניש | 1,000:1 |
| דינאַמיש קאַנטראַסט פאַרהעלטעניש | 100,000,000:1 |
| Viewינג אַנגלעס (ה/V) | 178° / 178° |
| קאַנעקטיוויטי | VGA, DisplayPort 1.2, HDMI, Audio-in, Audio-out |
| ינטעגראַטעד ספּיקערז | קסנומקס רענטגענ קסנומקסוו |
| ערגאָנאָמיק אַדזשאַסטמאַנץ | Tilt (-5° to 25°), Swivel (+/- 45°), Height Adjustment (120mm), Pivot (90°) |
| VESA Mount Support | 100 רענטגענ 100 מם |
| דימענשאַנז מיט שטיין (W x H x D) | 21.3" x 14.9"~19.6" x 7.6" (54.0cm x 37.9cm~49.9cm x 19.3cm) |
| וואָג מיט שטיין | 12.3 לב (5.6 קג) |
| מאַכט אַדאַפּטער | אינערלעכער |
| קאָליר | שוואַרץ |
8. וואָראַנטי און שטיצן
Your Acer B247Y monitor comes with a Limited Three-Year Warranty. Please retain your proof of purchase for warranty claims.
For technical support, service, or warranty inquiries, please refer to the official Acer support website or contact their customer service department. Contact information can typically be found on the Acer webזייטל אדער אין דער וואָראַנטי קאַרטל וואָס איז אַרייַנגערעכנט מיט אייער פּראָדוקט.
קענסינגטאָן לאַק: The monitor supports a Kensington lock for security. Attach a compatible Kensington lock (sold separately) to the security slot on the monitor to deter theft.