
הקדמה
Welcome to the world of sewing with your new Janome IT 1028 Glamour mechanical sewing machine. This manual provides essential information for the safe and efficient operation, setup, maintenance, and troubleshooting of your machine. Please read it thoroughly before using the machine to ensure optimal performance and longevity.
The Janome IT 1028 Glamour is designed for ease of use, featuring 12 stitch types, a free arm for circular sewing, an oscillating hook, automatic buttonholes, and adjustable stitch length and width. It also includes a double presser foot lift, feed dog lowering, a thread cutter, a needle threader, and a soft cover for protection.
זיכערקייַט אינסטרוקציעס
צו רעדוצירן די ריזיקירן פון עלעקטריש קלאַפּ, ברענט, פייַער אָדער שאָדן צו מענטשן:
- שטענדיק ארויסנעמען די מאַשין פון דער עלעקטרישער אַוטלעט גלייך נאָך באַניץ און איידער איר רייניגט, אַראָפּנעמט דעקל, אדער מאַכט קיין באַניצער סערוויס אַדזשאַסטמאַנץ.
- לאָזט נישט די מאַשין ווערן גענוצט ווי אַ שפּילצייַג. גרויסע ופמערקזאַמקייט איז נייטיק ווען די מאַשין ווערט גענוצט דורך אָדער לעבן קינדער.
- ניצט די מאַשין נאָר פֿאַר איר באַשטימטן נוץ ווי באַשריבן אין דעם מאַנואַל. ניצט נאָר אַטאַטשמאַנץ רעקאָמענדירט דורך דעם פאַבריקאַנט.
- ניצ קיינמאָל נישט די מאַשין אויב זי האט אַ צעבראָכענע שנור אָדער פּלאָג, אויב זי אַרבעט נישט ריכטיק, אויב זי איז געפֿאַלן אָדער געשעדיגט געוואָרן, אָדער איז געפֿאַלן אין וואַסער.
- קיינמאָל פאַלן אָדער אַרייַנלייגן קיין כייפעץ אין קיין עפן.
- דו זאלסט נישט נוצן ינ דרויסן.
- דו זאלסט נישט אַרבעטן ווו אַעראָסאָל (שפּריץ) פּראָדוקטן זענען געניצט אָדער ווו זויערשטאָף איז אַדמינאַסטערד.
- האַלטן פינגער אַוועק פון אַלע מאָווינג טיילן. ספּעציעלע זאָרג איז פארלאנגט אַרום די נייען מאַשין.
- שטענדיק נוצן די געהעריק נאָדל טעלער. די אומרעכט טעלער קענען אָנמאַכן די נאָדל צו ברעכן.
- דו זאלסט נישט נוצן בענט נעעדלעס.
- ציט אדער שטופט נישט דעם שטאָף בשעתן נייען. דאָס קען אָפּדרייען די נאָדל און מאַכן זי צעברעכן.
- מאַכט אויס די ניימאַשין ווען איר מאַכט סיי וועלכע אַדזשאַסטמאַנץ אין דער נאָדל געגנט, ווי למשל איינפֿעדמען די נאָדל, טוישן די נאָדל, איינפֿעדמען די שפּול, אָדער טוישן דעם דרוקער פֿוס.
- Always unplug the machine when removing the light bulb.
- צי ניט אָפּשטויסן דורך פּולינג אויף די שנור. צו ויסמעקן, אָנכאַפּן די צאַפּן, נישט די שנור.
פּראָדוקט איבערview
שליסל פֿעיִקייטן
- 12 Stitch Types: Versatile options for various sewing projects.
- פרייער אָרעם: Facilitates sewing cuffs, sleeves, and other small, circular items.
- Oscillating Hook: Ensures smooth and consistent stitch formation.
- אַדזשאַסטאַבאַל שטאָך לענג און ברייט: Provides control over stitch appearance.
- Automatic Four-Step Buttonhole: Simplifies the creation of professional-looking buttonholes.
- Double Presser Foot Lift: Allows for sewing thicker fabrics.
- Feed Dog Lowering: Useful for darning and free-motion quilting.
- פֿאָדעם שניידער: Conveniently trims threads.
- נאָדל פֿעדער: Assists in quickly threading the needle.
- ווייך קאָווער: Protects the machine from dust and damage.
מאַשין קאַמפּאָונאַנץ
Familiarize yourself with the main parts of your Janome IT 1028 Glamour sewing machine.

פיגורע 1: פראָנט view of the Janome IT 1028 Glamour sewing machine with the soft cover in place. This image shows the overall design and the stitch selection and length dials.

פיגורע 2: נאָענט-אַרויף view of the stitch selector dial (left) and stitch length dial (right) on the Janome IT 1028 Glamour. The decorative illustration on the machine body is also visible.
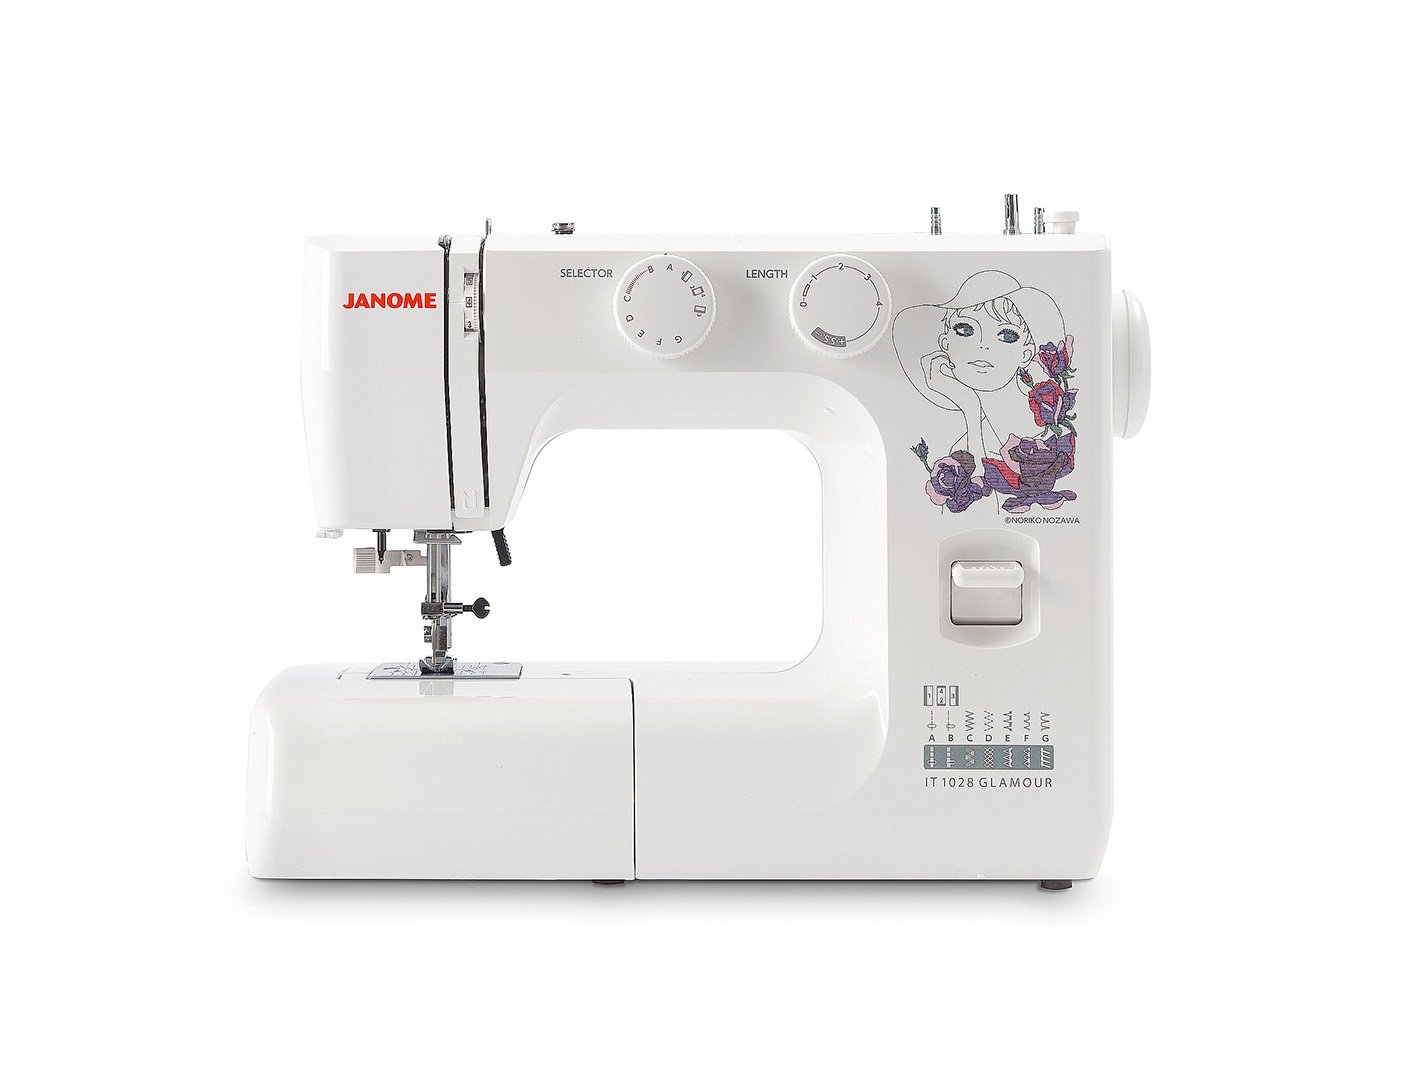
Figure 3: The Janome IT 1028 Glamour sewing machine with the accessory tray removed, revealing the free arm and the bobbin case area. This view is essential for bobbin insertion and cleaning.
סעטאַפּ
1. אַנפּאַקינג און פּלייסמאַנט
- נעמט פֿאָרזיכטיק אַרויס די מאַשין פֿון איר פֿאַרפּאַקונג.
- שטעלן די מאַשין אויף אַ סטאַביל, פלאַך ייבערפלאַך.
- Remove any protective films or packing materials.
2. מאַכט קאַנעקשאַן
- זיכער מאַכן אַז דער מאַשין'ס מאַכט קנעפּל איז אין דער "אויסגעלאָשן" פּאָזיציע.
- Connect the power cord to the machine's power input jack.
- צאַפּן די מאַכט שנור אין אַ פּאַסיק עלעקטריקאַל ווענטיל.
3. אויפוויקלען די שפּול
- שטעלן אַ שפּולקע פון פאָדעם אויף די שפּולקע שטיפט.
- פירט דעם פאדעם דורך דעם אויבערשטן פאדעם פירער און ארום דעם שפּול-וויקלונג שפּאַנונג דיסק.
- Insert the thread through the hole in the bobbin from the inside out.
- Place the bobbin onto the bobbin winder spindle and push the spindle to the right.
- Start the machine. The bobbin will wind automatically. Stop when the bobbin is full.
- Cut the thread and push the bobbin winder spindle to the left. Remove the bobbin.
4. Inserting the Bobbin
- קער אַוועק די מאַשין.
- Open the bobbin cover plate located on the free arm.
- Insert the bobbin into the bobbin case with the thread running in the direction indicated by the arrows.
- Pull the thread through the tension spring and into the guide slot.
- נאָענט די בינע דעקל טעלער.
5. Threading the Upper Thread
- הייבן די דריקן פֿיס ליפטער.
- שטעלן אַ שפּולקע פון פאָדעם אויף די שפּולקע שטיפט.
- פירט דעם פֿאָדעם דורך דעם אויבערשטן פֿאָדעם־פירער.
- Bring the thread down the right channel, up the left channel, and through the take-up lever from right to left.
- Continue guiding the thread down to the needle bar thread guide.
- Use the built-in needle threader or manually thread the needle from front to back.
- ציט ארום 6 אינטשעס פאדעם דורך די נאָדל אויג.
6. Bringing Up the Bobbin Thread
- האַלט דעם אויבערשטן פֿאָדעם לײַכט מיט אײַער לינקער האַנט.
- Turn the handwheel towards you to lower the needle into the needle plate and then raise it.
- The upper thread will catch the bobbin thread, forming a loop.
- Pull the loop to bring the bobbin thread up through the needle plate hole.
- ציט ביידע פֿעדעם (אויבערשטער און שפּול) אונטערן דרוק־פֿוס און צו דער הינטערשטער זייט פֿון דער מאַשין.
אַפּערייטינג ינסטראַקשאַנז
1. אויסוואל פון שטאָך
קער די שטאָך סעלעקטאָר רעדל (refer to Figure 2) to choose your desired stitch pattern. The available stitches are indicated by letters or symbols on the dial.
2. אַדזשאַסטירן שטאָך לענג און ברייט
- שטאָך לענג: ניצן די סטיטש לענג רעדל (refer to Figure 2) to adjust the length of your stitches. Higher numbers indicate longer stitches.
- שטאָך ברייט: For stitches that allow width adjustment, use the corresponding dial or setting. (Note: The Janome IT 1028 Glamour has adjustable stitch width, typically integrated with the stitch selector or a separate dial. Consult the machine's markings for specific controls.)
3. גרונטלעכע נייען
- שטעלן דיין שטאָף אונטער די פּרעסער פֿיס.
- נידעריקער דער דרוקער פֿיס ליפטער.
- קער אויף די מאַשין.
- Gently press the foot controller to start sewing. The harder you press, the faster the machine will sew.
- Guide the fabric gently with your hands, but do not pull or push forcefully.
- To secure the beginning and end of a seam, use the reverse lever to sew a few stitches backward.
- When finished, raise the needle to its highest position, lift the presser foot, and pull the fabric away from the machine.
- Use the built-in thread cutter or scissors to trim the threads.
4. Using the Free Arm
To use the free arm, simply slide off the accessory tray (refer to Figure 3). This exposes the narrow free arm, ideal for sewing small, tubular items like sleeves, pant hems, and cuffs.
5. Automatic Four-Step Buttonholes
The Janome IT 1028 Glamour features an automatic four-step buttonhole function. Refer to the stitch selector dial for the buttonhole settings (usually marked with a buttonhole symbol and steps 1-4).
- צוטשעפּען די קנעפּל לאָך פֿיס.
- Mark the buttonhole position on your fabric.
- Set the stitch selector to the first buttonhole step.
- Sew the first side of the buttonhole.
- Change the stitch selector to the next step and sew the bar tack.
- Continue through all four steps, following the machine's markings for each segment of the buttonhole.
- Carefully cut open the buttonhole using a seam ripper, ensuring not to cut the stitches.
וישאַלט
1. רייניקונג די מאַשין
Regular cleaning helps maintain your machine's performance. Always unplug the machine before cleaning.
- באָבין געגנט: Remove the needle plate and bobbin case. Use a small brush to remove lint and dust from the bobbin area and feed dogs.
- עקסטעריע: ווישט די אויסערליכע ייבערפלאַכן מיט אַ ווייכן, טרוקענעם שטאָף. ניצט נישט קיין שטרענגע כעמיקאַלן אדער שרײַבנדיקע רייניקונגסמיטלען.
2. נאָדל פאַרבייַט
Replace the needle regularly (after 8-10 hours of sewing) or if it becomes bent, dull, or damaged. A damaged needle can cause skipped stitches or fabric damage.
- קער אַוועק די מאַשין און אָפּשטעקן עס.
- לוסאַן די נאָדל קלamp שרויף.
- אַראָפּנעמען די אַלטע נאָדל.
- שטעקט אריין א נייע נאָדל מיט דער פלאַכער זײַט צו דער הינטערשטער זײַט פֿון דער מאַשין, און שטופּט זי אַרויף אַזוי ווײַט ווי זי וועט גיין.
- פאַרשטייַפן די נאָדל קלamp שרויף סיקיורלי.
טראָובלעשאָאָטינג
די סעקציע באהאנדלט אלגעמיינע פראבלעמען וואס איר קענט באגעגענען. פאר פראבלעמען וואס זענען נישט דא אויסגערעכנט, ביטע קאנטאקטירט קאסטומער סופארט.
| פּראָבלעם | מעגלעך סיבה | לייזונג |
|---|---|---|
| סקיפּט סטיטשיז | פאַלשע נאָדל, געבויגענע נאָדל, נישט ריכטיקע פֿעדעם, פאַלשע נאָדל גרייס פֿאַר שטאָף. | Replace needle, re-thread machine, ensure correct needle type/size. |
| פֿאָדעם ברייקידזש (אויבערשטער) | Improper threading, tension too tight, poor quality thread, bent needle, burr on needle plate. | Re-thread machine, adjust upper tension, use quality thread, replace needle, check needle plate for damage. |
| Thread Breakage (Bobbin) | Improperly wound bobbin, bobbin inserted incorrectly, lint in bobbin case, tension too tight. | Re-wind bobbin, re-insert bobbin correctly, clean bobbin case, adjust bobbin tension (if adjustable). |
| אַניוואַן סטיטשיז | Incorrect tension settings, pulling/pushing fabric, wrong presser foot. | Adjust tension, guide fabric gently, use appropriate presser foot. |
| מאַשין ניט סטאַרטינג | Not plugged in, power switch off, foot controller not connected. | Check power connections, ensure switch is ON, connect foot controller. |
ספּעסאַפאַקיישאַנז
- מאָדעל נומער: 8100000017663 (IT 1028 Glamour)
- סאָרט: JANOME
- מאַטעריאַל: פּלאַסטיק
- וואָג: 8 קילאָגראַמס
- Dimensions (P x L x H): 10 cm x 35 cm x 25 cm (Depth x Width x Height)
- מאַכט מקור: עלעקטריק קאַבלע
- שטאָך טיפּן: 12
- Hook Type: אַסאַלייטינג
- Buttonhole Type: Automatic Four-Step
וואָראַנטי און שטיצן
For warranty information, service, or technical support, please refer to the warranty card included with your product or contact your authorized Janome dealer or customer service center. Keep your purchase receipt as proof of purchase.