
הקדמה
This manual provides detailed instructions for the installation, operation, and maintenance of your MICTUNING 13Amp 125V AC Port Plug. Please read this manual thoroughly before installation and use to ensure proper function and safety.
פּראָדוקט פֿעיִקייטן
- Powerful AC Port Plug: Utilizes 3x12AWG (3.0mm2) heavy-duty wires, rated for 13 amps and 125 volts, ensuring optimal performance and power delivery.
- אַפּגריידיד פּלאַן: Features a re-designed power cord outlet centrally located at the back, making it suitable for various applications including battery chargers, engine block heaters, and home appliances. This design allows for mounting on thicker panels (1"-3") without obstruction.
- וועטערפּראָאָף קאַנסטראַקשאַן: Equipped with a snap-fit watertight cap that protects the plug from snow, ice, freezing rain, and other environmental elements.
- Flexible Connection: Includes a 16-inch integrated extension cord, providing flexibility for direct connection to an existing power source.
- גרינג ינסטאַלירונג: Designed for simple flush mounting with four screws, requiring only a 2-inch drilling hole. No additional hand wiring or cable modification is necessary for a clean, OEM-like appearance.
פּעקל אינהאַלט
- 1x AC Power Port Plug
- 4x מאַונטינג סקרוז
ינסטאַלירונג אינסטרוקציעס
Follow these steps for proper installation of your AC Port Plug:
- אויסקלייַבן מאַונטינג אָרט: Choose a flat, stable surface for installation. Ensure there is sufficient clearance behind the mounting surface for the plug's integrated cord.
- בויער האָלע: Using a 2-inch hole saw, carefully drill a circular hole at the selected mounting location.
- Insert Port Plug: Insert the AC Port Plug into the drilled hole. Ensure the plug is oriented correctly.
- זיכער מיט סקרוז: Use the four provided screws to secure the port plug firmly to the mounting surface.
- פאַרבינדן צו מאַכט מקור: Connect the integrated 16-inch extension cord to your existing power source.

Figure 1: Installation Steps Diagram

Figure 2: Securing the Port Plug
Video 1: Installation of RV AC Port Plug. This video demonstrates the process of drilling a hole, inserting the port plug, and securing it, highlighting the ease of installation.
Video 2: Installation of AC Port Plug with Spring-Loaded Cover. This video illustrates the installation of a similar AC port plug, focusing on the spring-loaded cover mechanism.
אַפּערייטינג ינסטראַקשאַנז
To use the MICTUNING AC Port Plug:
- Open the protective watertight cap by lifting it. The cap is designed to open up to 150 degrees for easy access.
- Insert a standard 125V AC plug from your device or extension cord into the port.
- מאַכן זיכער אַז די קשר איז זיכער.
- When not in use, remove the plug and close the watertight cap firmly to protect the port from environmental elements. The cap features a pressure release valve for easier plugging and unplugging.
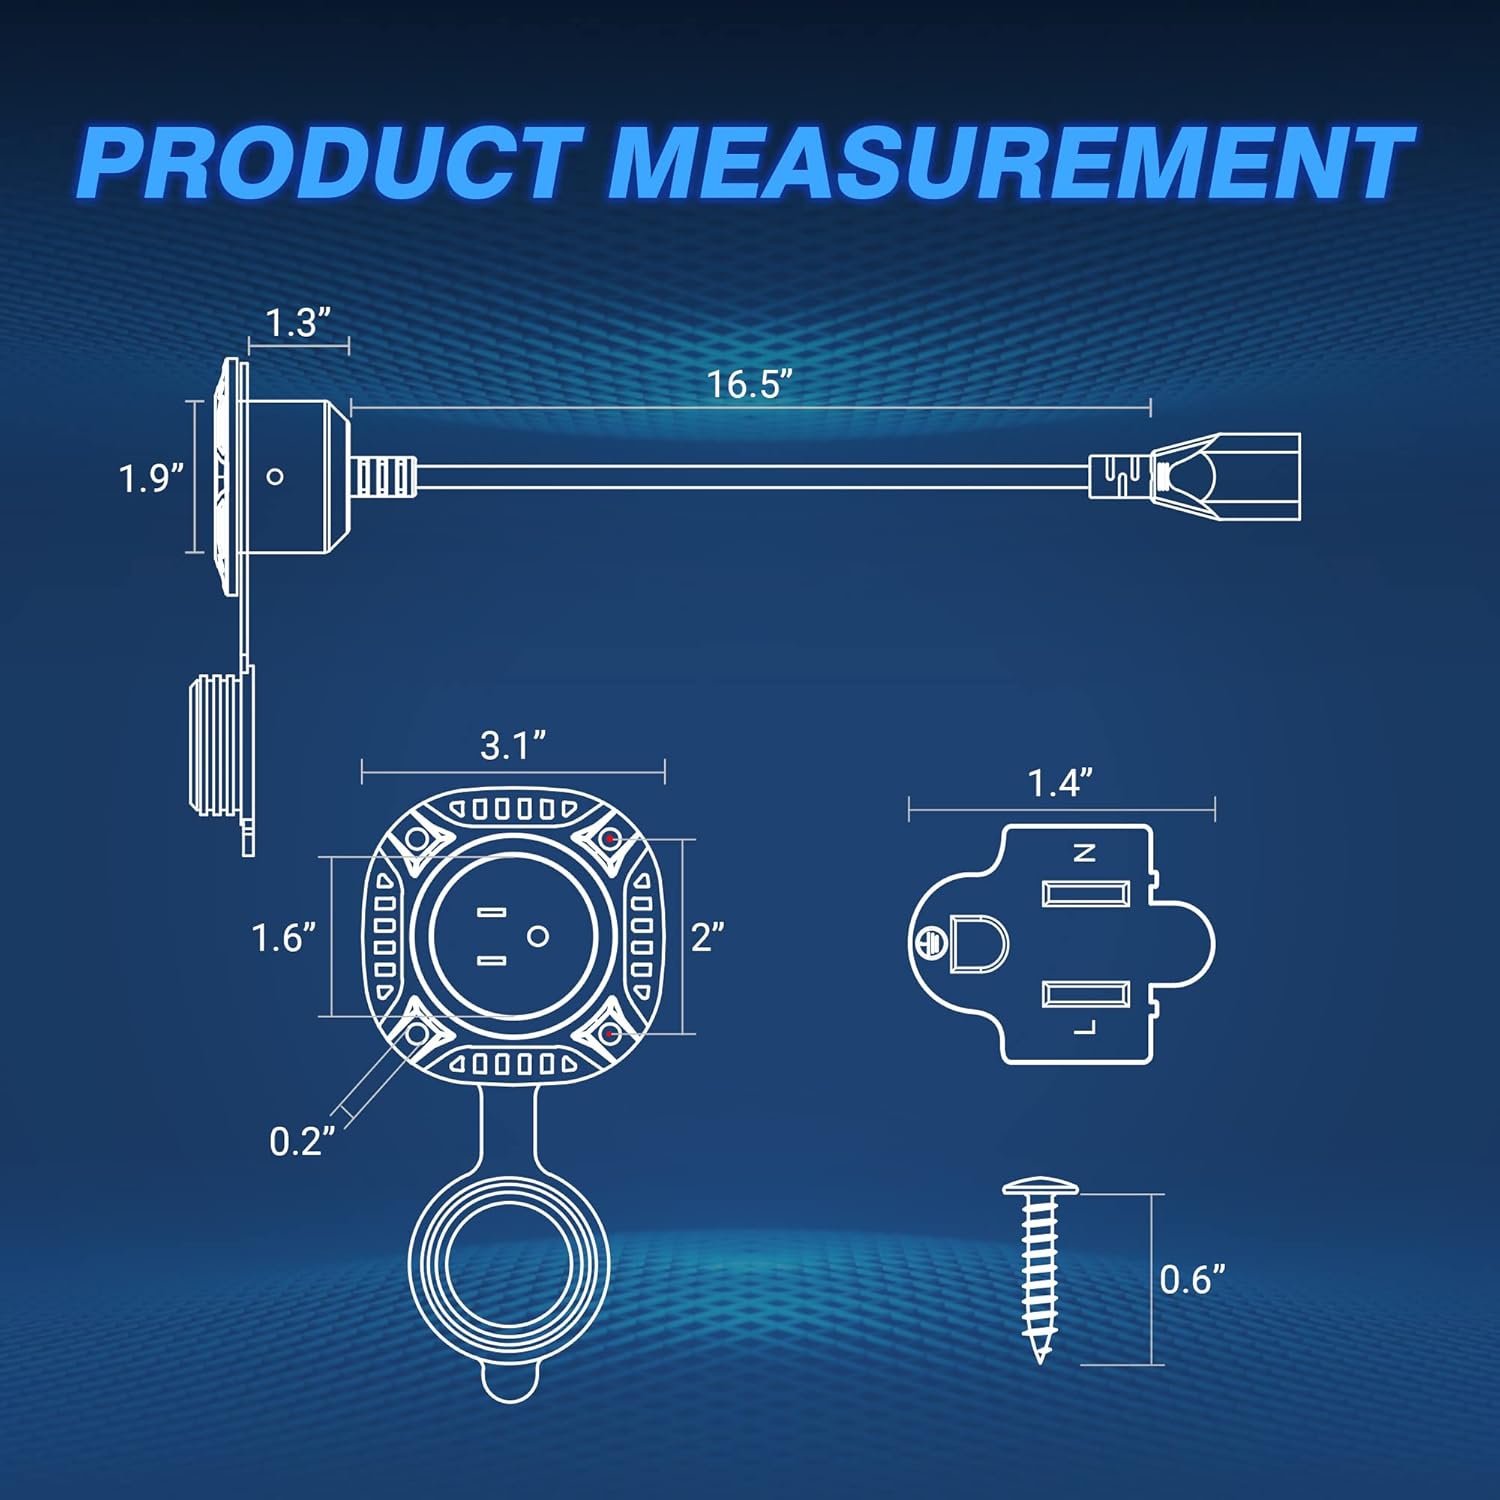
Figure 3: Plugged-in AC Port Plug
Video 3: MICTUNING 13Amp AC Port Plug with 16" Flexible Cord. This video provides a general overview of the product and its functionality, including opening and closing the cover.
וישאַלט
The MICTUNING AC Port Plug requires minimal maintenance. Regularly inspect the plug and cord for any signs of wear, damage, or corrosion. Ensure the watertight cap is always closed when the plug is not in use to prevent moisture and dust ingress. Clean the exterior with a damp שטאָף ווי דארף.
טראָובלעשאָאָטינג
If you experience issues with your AC Port Plug, consider the following:
- קיין מאַכט: Check the power source to ensure it is active. Verify that the plug is fully inserted into the port and the extension cord is securely connected.
- פרייַ קשר: Ensure all connections are tight. The plug is designed for a snug fit to maintain its weatherproof seal.
- דאַמידזשד קאַמפּאָונאַנץ: If any part of the plug or cord appears damaged, discontinue use immediately and contact customer support for assistance. Do not attempt to repair damaged electrical components yourself.
ספּעסאַפאַקיישאַנז
| סאָרט | MICTUNING |
| מאָדעל | MIC-EC-140 |
| פּונקט וואָג | 7.4 אונסעס |
| פּראָדוקט דימענשאַנז | 6 X 3.7 X 3.7 אינטשעס |
| Voltage | 125 וואלטס |
| וואָסtage | 1625 וואטס |
| קאַנעקטער דזשענדער | זכר-צו-ווייַבלעך |
| צאַפּן פֿאָרמאַטירונג | טיפּ ב |

Figure 4: Product Measurement Diagram
זיכערקייַט אינפֿאָרמאַציע
Always follow basic safety precautions when using electrical products to reduce the risk of fire, electric shock, and personal injury:
- דו זאלסט נישט ייַנטונקען די פּראָדוקט אין וואַסער.
- זיכער מאַכן אַז די מאַכט מקור פּאַסט צו די פּראָדוקט'ס וואָלומעןtagE און ampויסמעקן רייטינגז.
- ניצט נישט אויב דער פּראָדוקט אָדער זײַן שנור איז געשעדיגט.
- האַלטן אויס פון דערגרייכן פון קינדער.
- Always close the protective cap when the port is not in use.
וואָראַנטי און שטיצן
MICTUNING stands behind its products with a 2-year warranty and lifetime customer service. This includes a 30-day money-back/replacement guarantee and a worry-free 24-month warranty. Expect a friendly response within 4 hours for any inquiries.
For support, please refer to the contact information provided with your purchase or visit the official MICTUNING webפּלאַץ.
נאָך פּראָדוקט Views

פּראָדוקט איבערview

Peak Performance Features

וועטערפּרוף פּלאַן