
הקדמה
This manual provides detailed instructions for the setup, operation, and maintenance of your Digoo DG-C3 Wireless Weather Station. This device integrates a hygrometer, thermometer, weather forecast station, and alarm clock functions, offering comprehensive environmental monitoring and timekeeping capabilities. Please read this manual thoroughly before using the product to ensure correct operation and to maximize its features.
פּעקל אינהאַלט
- Digoo DG-C3 Wireless Weather Station Unit
- וסב מאַכט קאַבלע
- באַניצער מאַנואַל (דעם דאָקומענט)
Note: Batteries (3x AAA) are not included and must be purchased separately.
פּראָדוקט איבערview
Familiarize yourself with the various components of your Digoo DG-C3 weather station.
פראָנט ווייַז
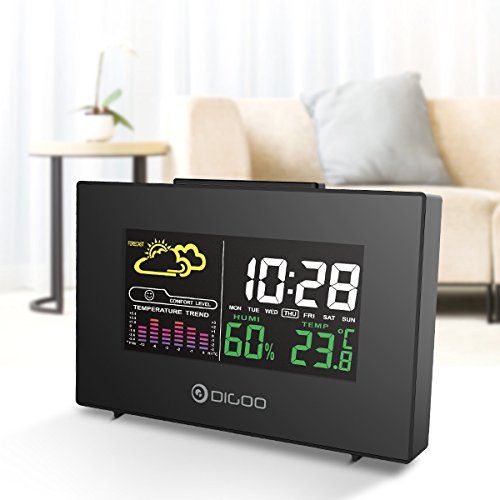
The front display features a color backlit screen showing the current time, day of the week, indoor humidity, indoor temperature, and a weather forecast icon. It also includes a comfort level indicator and a temperature trend graph.
- צייט & דאַטע: Digital display of current time and day.
- וועטער פאָרעקאַסט: Icons indicating predicted weather conditions (e.g., sunny, cloudy, rainy).
- Comfort Level: ווײַזט אויף אינעווייניקסטן קאָמפאָרט באַזירט אויף טעמפּעראַטור און הומידיטי.
- Temperature Trend: Bar graph showing recent temperature changes.
- הומידיטי: פּראָצענטtage display of indoor humidity.
- טעמפּעראַטור: Digital display of indoor temperature (Celsius or Fahrenheit).
צוריק פּאַנעל
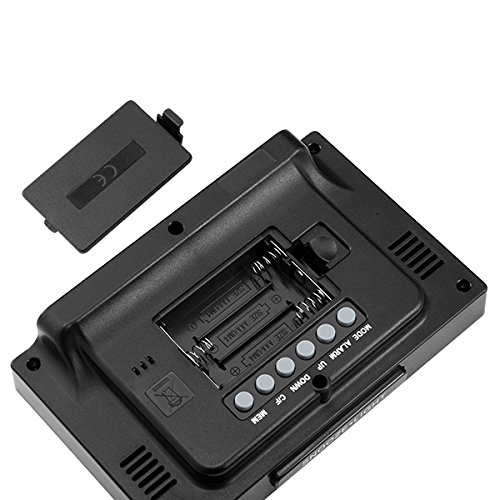
The back of the unit houses the battery compartment and various control buttons for setting the device.
- באַטערי אָפּטייל: Holds 3x AAA batteries for power backup.
- מאָדע קנעפּל: Used to switch between display modes and enter setting mode.
- ALARM קנעפּל: Used to set and activate/deactivate the alarm.
- UP קנעפּל: Used to increase values during settings or view maximum records.
- אַראָפּ קנעפּל: Used to decrease values during settings or view minimum records.
- °C/°F קנעפּל: טוישט צווישן צעלזיוס און פאַהרענהייט טעמפּעראַטור איינהייטן.
- MEM קנעפּל: געוויינט צו view memory records for temperature and humidity.
Top Panel
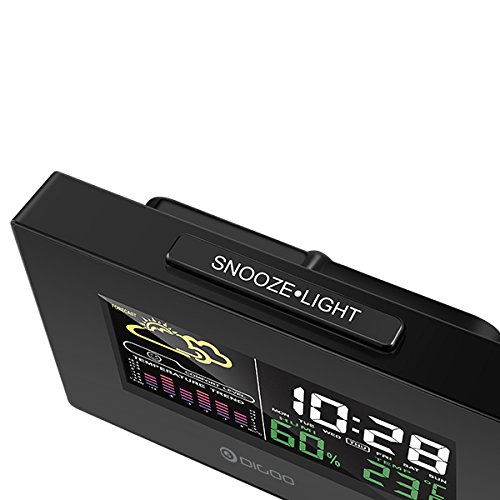
The top of the unit features a single button for snooze and backlight functions.
- SNOOZE·LIGHT Button: Press to activate the backlight or snooze the alarm.
סעטאַפּ
1. פּאַוערינג אויף
- ייַנמאָנטירונג פון באַטאַרייע: Open the battery compartment cover on the back of the unit. Insert 3x AAA batteries, ensuring correct polarity (+/-). Close the cover. Batteries provide backup power and allow for portability.
- USB Power Connection: For continuous power and backlight, connect the provided USB cable to the USB port on the unit and to a compatible USB power adapter (not included) or a computer USB port.
- The display will light up and show default settings.
2. Initial Settings (Time, Date, Unit)
- צייט באַשטעטיקן:
- דריקן און האַלטן די מאָדע קנעפּל פֿאַר אַרום 3 סעקונדעס צו אַרייַן צייט שטעלן מאָדע. די שעה ציפֿער וועט בלינקען.
- ניצן די UP or אַראָפּ קנעפּלעך צו סטרויערן די שעה.
- דרוק מאָדע again to confirm the hour and move to minute setting. The minute digit will flash.
- ניצן די UP or אַראָפּ קנעפּלעך צו סטרויערן די מינוט.
- דרוק מאָדע again to confirm and move to 12/24 hour format selection.
- ניצן די UP or אַראָפּ buttons to select 12-hour or 24-hour format.
- דרוק מאָדע צו באַשטעטיקן און פֿאַרלאָזן די צייט-אײַנשטעלונג.
- דאַטע באַשטעטיקן:
- נאָך באַשטעטיקן די צייט, דריקן מאָדע again to enter date setting mode. The year will flash.
- ניצן די UP or אַראָפּ קנעפּלעך צו סטרויערן די יאָר.
- דרוק מאָדע to confirm and move to month setting.
- ניצן די UP or אַראָפּ קנעפּלעך צו סטרויערן די חודש.
- דרוק מאָדע to confirm and move to day setting.
- ניצן די UP or אַראָפּ קנעפּלעך צו סטרויערן דעם טאָג.
- דרוק מאָדע to confirm and exit date setting.
- טעמפּעראַטור אַפּאַראַט סעלעקציע:
- דרוק די ° C / ° F button on the back of the unit to switch between Celsius (°C) and Fahrenheit (°F) temperature display.
אַפּערייטינג ינסטראַקשאַנז
1. וועקער זייגער פונקציע
- באַשטעטיקן די שרעק:
- דרוק די שרעק button once to display the current alarm time.
- דריקן און האַלטן די שרעק button for approximately 3 seconds. The hour digit will flash.
- ניצן די UP or אַראָפּ קנעפּלעך צו סטרויערן די שרעק שעה.
- דרוק שרעק again to confirm the hour and move to minute setting. The minute digit will flash.
- ניצן די UP or אַראָפּ קנעפּלעך צו סטרויערן די שרעק מינוט.
- דרוק שרעק צו באַשטעטיקן און אַרויסגאַנג שרעק באַשטעטיקן.
- אַקטאַווייטינג / דיאַקטיווייטינג די שרעק:
- בשעת אין נאָרמאַל צייט אַרויסווייַזונג מאָדע, דריק די שרעק button repeatedly to toggle the alarm ON or OFF. An alarm icon will appear on the display when the alarm is active.
- סנוז פונקציע:
- ווען דער שרעק סאָונדס, דריקן די SNOOZE·LIGHT button on the top of the unit to activate the snooze function. The alarm will temporarily stop and sound again after a few minutes (typically 5-10 minutes).
- To stop the alarm completely, press any other button on the back panel.
2. וועטער פאָרעקאַסט
The weather station provides a weather forecast based on internal atmospheric pressure changes. The forecast icons (e.g., sunny, cloudy, rainy) are predictions for the next 12-24 hours and may not always match local weather services, which use more comprehensive data.
- The forecast icon is displayed on the upper left of the screen.
- The device requires a period of stable operation (typically 24 hours) to calibrate and provide accurate forecasts.
3. טעמפּעראַטור און הומידיטי אַרויסווייַזונג
- The current indoor temperature and humidity are continuously displayed on the screen.
- Viewing Min/Max Records:
- דרוק די MEM button once to display the maximum recorded temperature and humidity.
- דרוק MEM again to display the minimum recorded temperature and humidity.
- דרוק MEM a third time to return to current readings.
- To clear the min/max records, press and hold the MEM קנעפּל פֿאַר 3 סעקונדעס בשעת viewביי די רעקאָרדס.
4. באַקלייט קאָנטראָל
- When powered by USB, the backlight will remain on.
- When powered by batteries only, press the SNOOZE·LIGHT button to temporarily activate the backlight for a few seconds.
וישאַלט
- רייניקונג: Wipe the unit with a soft, dry cloth. Do not use abrasive cleaners or solvents. Avoid getting moisture into the unit.
- באַטערי פאַרבייַט: When the display becomes dim or functions irregularly, replace the 3x AAA batteries in the back compartment. Ensure correct polarity.
- סטאָרידזש: If not using the device for an extended period, remove the batteries to prevent leakage. Store in a cool, dry place.
טראָובלעשאָאָטינג
| פּראָבלעם | מעגלעך סיבה | לייזונג |
|---|---|---|
| דער עקראַן איז ליידיק אָדער טונקל. | Low batteries or no power connection. | Replace batteries or connect the USB power cable. |
| אומרעכטע צייט/דאטום. | Time/date not set correctly after power loss or initial setup. | גייט נאך דעם "ערשטע סעטטינגס" סעקציע צו צוריקשטעלן צייט און דאטום. |
| וועטער פאָרויסזאָגן שיינט נישט ריכטיק. | Device needs calibration time; local conditions may differ from pressure-based forecast. | Allow 24 hours for calibration. Understand that the forecast is based on internal pressure changes. |
| דער אַלאַרם קלינגט נישט. | Alarm is not activated or volume is too low (if adjustable). | Ensure the alarm icon is displayed. Check alarm settings. |
ספּעסאַפאַקיישאַנז
| מאָדעל: | DG-C3 |
| קאַנעקטיוויטי: | USB (פֿאַר מאַכט) |
| מאַכט מקור: | 3x AAA Batteries (not included) or USB Power |
| ספּעציעלע פֿעיִקייטן: | Hygrometer, Thermometer, Weather Forecast, Alarm Clock, Color Backlight, Portable |
| ווייַז: | Color Backlit LCD |
| טעמפּעראַטור אַפּאַראַט: | °C / °F אויסקלייבבאר |
וואָראַנטי און שטיצן
פֿאַר וואָראַנטי אינפֿאָרמאַציע אָדער טעכנישע שטיצע, ביטע זען די דאָקומענטאַציע וואָס איז צוגעשטעלט געוואָרן ביים קויפן אָדער קאָנטאַקט דיין הענדלער. האַלט דיין קויף קוויטל ווי אַ באַווייַז פון קויפן.