
1. הקדמה
Welcome to the Philco Electronic Bread Maker user manual. This appliance is designed to simplify the bread-making process, allowing you to create a variety of delicious breads, cakes, jams, and more with minimal effort. Please read this manual carefully before using the appliance to ensure safe and efficient operation and to fully understand its features.
2. וויכטיק סאַפעטי אינסטרוקציעס
ווען ניצן עלעקטריקאַל אַפּפּליאַנסעס, יקערדיק זיכערקייַט פּריקאָשאַנז זאָל שטענדיק זיין נאכגעגאנגען צו רעדוצירן די ריזיקירן פון פייַער, עלעקטריש קלאַפּ און שאָדן צו מענטשן, אַרייַנגערעכנט די פאלגענדע:
- דו זאלסט נישט פאַרבינדן הייס סערפאַסיז. ניצן כאַנדאַלז אָדער נאַבז.
- צו באַשיצן קעגן עלעקטריש קלאַפּ, טאָן ניט ייַנטונקען שנור, פּלאַגז אָדער אַפּפּליאַנסע אין וואַסער אָדער אנדערע פליסיק.
- נאָענט השגחה איז נייטיק ווען קיין אַפּפּליאַנסע איז געניצט דורך אָדער לעבן קינדער.
- אָפּשטעקן די ווענטיל ווען ניט אין נוצן און איידער רייניקונג. לאָזן צו קילן איידער איר שטעלן אויף אָדער נעמען אַוועק טיילן.
- דו זאלסט נישט אַרבעטן קיין אַפּפּליאַנסע מיט אַ דאַמידזשד שנור אָדער צאַפּן אָדער נאָך די אַפּפּליאַנסע מאַלפאַנגקשאַנז אָדער איז דאַמידזשד אין קיין וועג.
- די נוצן פון אַקסעסערי אַטאַטשמאַנץ וואָס זענען נישט רעקאַמענדיד דורך דער פאַבריקאַנט קען פאַרשאַפן ינדזשעריז.
- דו זאלסט נישט נוצן ינ דרויסן.
- דו זאלסט נישט לאָזן די שנור הענגען איבער די ברעג פון טיש אָדער טאָמבאַנק אָדער פאַרבינדן הייס סערפאַסיז.
- צי ניט שטעלן אויף אָדער לעבן אַ הייס גאַז אָדער עלעקטריש בורנער, אָדער אין אַ העאַטעד ויוון.
- עקסטרעם וואָרענען מוזן זיין געוויינט ווען מאָווינג אַ אַפּפּליאַנסע מיט הייס ייל אָדער אנדערע הייס ליקווידס.
- צו אָפּשטעקן, דריי יעדן קאָנטראָל צו "אויס," און דערנאָך אַרויסנעמען דעם שטעקער פֿון דער וואַנט־אַויטלעט.
- דו זאלסט נישט נוצן די מיטל פֿאַר אנדערע ווי בדעה נוצן.

Image: Safety certification logos (INMETRO OCP 0040 and SGS) indicating compliance with safety standards.
3. פּראָדוקט איבערview
Familiarize yourself with the components of your Philco Electronic Bread Maker.
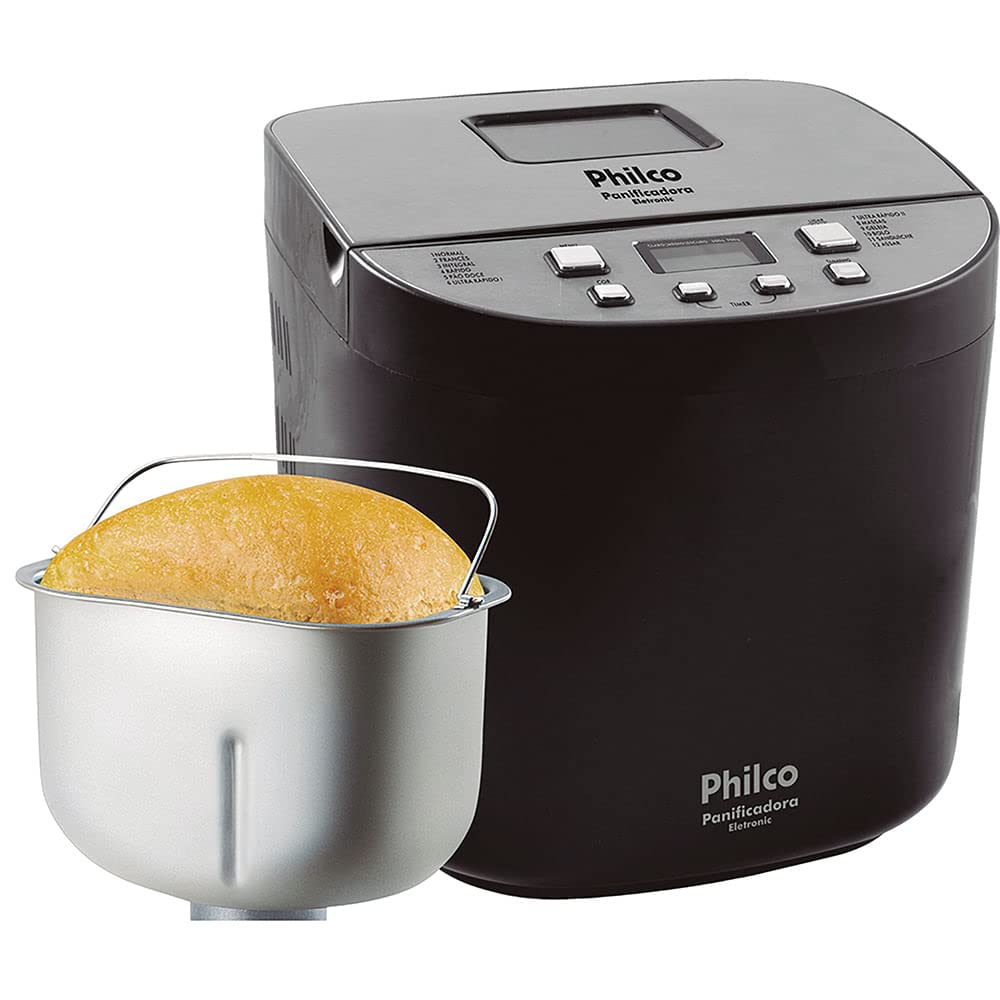
בילד: פראָנט view of the Philco Electronic Bread Maker, showing the main unit, control panel, and viewאין פֿענצטער.
קאָנטראָל פּאַנעל
The control panel allows you to select programs, adjust settings, and start/stop the bread maker.
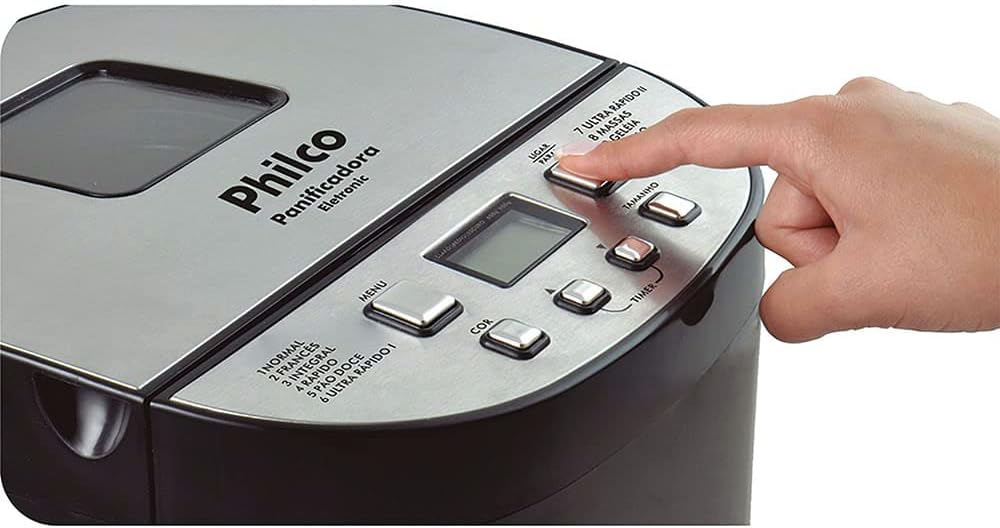
Image: Close-up of the bread maker's control panel, highlighting buttons for MENU, COLOR, TIMER, SIZE, and POWER, along with the digital display.
- MENU קנעפּל: אויסקלייבט איינע פון די 12 פארהאן פראגראמען.
- COLOR קנעפּל: Adjusts the crust color (Light, Medium, Dark).
- TIMER Buttons (+/-): Sets the delay timer for deferred baking.
- SIZE Button: Selects the loaf size (450g, 600g, 900g, 1200g).
- POWER קנעפּל: הייבט אָן אָדער שטעלט אָפּ די אויסגעקליבענע פּראָגראַם.
- LCD ווייַז: Shows program number, time remaining, and selected settings.
4. אויפשטעלן און ערשטע באנוץ
4.1 אַנפּאַקינג
Carefully remove the bread maker and all accessories from the packaging. Retain the packaging for future storage or transport. Check that all parts are present and undamaged.
4.2 ערשט רייניקונג
Before first use, clean the bread pan, kneading paddle, and measuring accessories with warm, soapy water. Rinse thoroughly and dry completely. Wipe the exterior of the appliance with a damp שטאָף.
4.3 פּלייסמאַנט
שטעלט דעם ברויט מאַשין אויף אַ סטאַבילן, פלאַכן, היץ-קעגנשטעליקן ייבערפלאַך, אַוועק פון דירעקטן זונשייַן און היץ-קוואַלן. זאָרגט אַז עס איז גענוג ווענטילאַציע אַרום דעם אַפּאַראַט.
5. אַפּערייטינג ינסטרוקטיאָנס
5.1 צולייגן צוגאבן
Always add liquid ingredients first, followed by dry ingredients. Yeast should be added last, placed in a small indentation on top of the flour, away from liquids and salt.

Image: A hand pouring dry ingredients, likely flour, into the bread maker's non-stick pan.
5.2 פּראָגראַם אויסוואַל
דרוק די MENU button repeatedly to cycle through the 12 available programs. The selected program number will be displayed on the LCD screen.
פֿאַראַן פּראָגראַמען:
- נאָרמאַל: For basic bread recipes.
- פראנצויזיש: For light bread with a crispy crust.
- גאַנץ ווייץ: For whole wheat bread, typically requiring a longer kneading time.
- RAPID: For quick bread baking, suitable for smaller loaves.
- SWEET BREAD: For breads with high sugar and fat content.
- ULTRA FAST I: For very quick baking of smaller loaves.
- ULTRA FAST II: For very quick baking of larger loaves.
- טייג: Prepares dough for rolls, pizza, or pastries without baking.
- JAM: פֿאַר מאַכן היים־געמאַכטע דזשעמס און מאַרמעלאַדעס.
- שטיקל: For baking cakes and quick breads.
- סענדוויטש: For light, fluffy sandwich bread.
- באַקן: For baking pre-made dough or for additional baking time.
5.3 Crust Color Selection
After selecting a program, press the קאָליר button to choose your desired crust color: Light, Medium, or Dark.
5.4 Loaf Size Selection
דרוק די SIZE button to select the desired loaf weight: 450g, 600g, 900g, or 1200g. Ensure your recipe quantities match the selected loaf size.
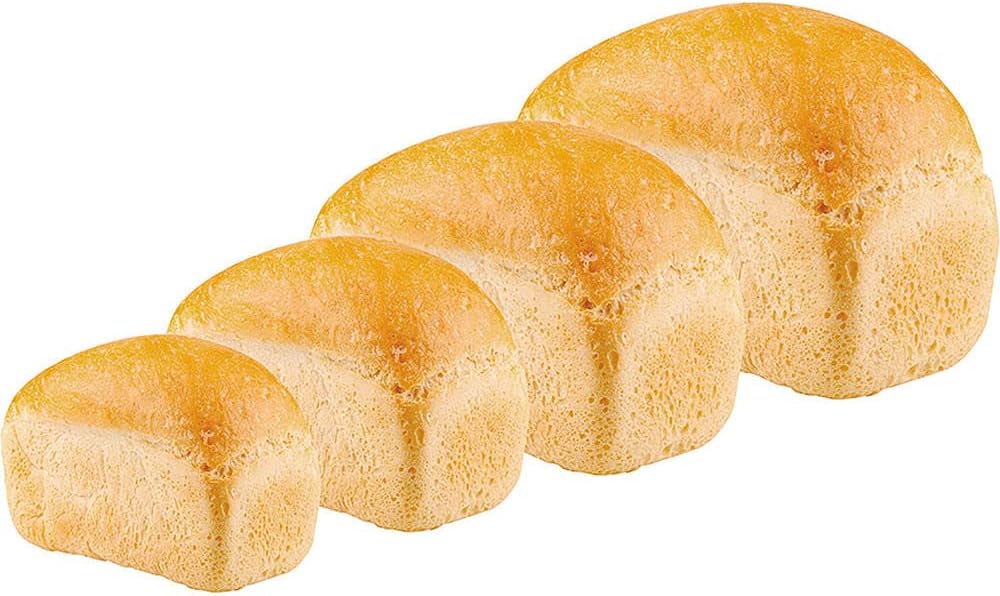
Image: Four baked loaves of bread, demonstrating the different size options available from the bread maker.
5.5 Delay Timer Function
The timer function allows you to delay the start of the baking process by up to 13 hours. After selecting the program, crust color, and loaf size, use the TIMER buttons (+/-) to set the desired delay time. The display will show the total time until the bread is ready.
5.6 האַלטן וואַרעם פֿונקציע
After the baking cycle is complete, the bread maker will automatically switch to a 60-minute keep-warm function. This keeps your bread warm until you are ready to remove it.
5.7 סטאַרטינג און סטאָפּפּינג
דרוק די מאַכט button to start the selected program. To stop a program, press and hold the מאַכט קנעפּל פֿאַר אַ ביסל סעקונדעס.
5.8 Removing the Bread
Once the program is complete and the keep-warm cycle has finished (or you have manually stopped it), unplug the appliance. Carefully remove the bread pan using oven mitts, as it will be hot. Invert the pan to release the bread. If the kneading paddle remains in the bread, remove it carefully with a non-metallic utensil.

Image: A hand carefully lifting a freshly baked loaf of bread out of the bread maker's non-stick pan using the pan's handle.
6. קער און וישאַלט
6.1 רייניקן די ברויט פאן און קנעטן פאדל
After each use, allow the bread pan and kneading paddle to cool completely. Fill the pan with warm, soapy water and let it soak for 10-15 minutes to loosen any stuck-on dough. Use a soft sponge or cloth to clean. Do not use abrasive cleaners or metal utensils, as this can damage the non-stick coating. Rinse and dry thoroughly.
6.2 רייניקונג פון די אויסערליכע זייט
ווישט אָפּ די אויסערלעכע זייט פון דער ברויט מאַשין מיט אַ ווייכן, טרוקענעם שטאָף.amp cloth. Do not immerse the appliance in water or spray it with liquids. Ensure no water enters the ventilation openings.
6.3 סטאָרידזש
Ensure the appliance is clean, dry, and completely cool before storing. Store it in a dry place, away from direct sunlight and out of reach of children.
7. טראָובלעשאָאָטינג
אויב איר טרעפט פּראָבלעמען מיט אייער ברויט מאַשין, זעט די פאלגענדע געוויינטלעכע פּראָבלעמען און לייזונגען:
| פּראָבלעם | מעגלעך סיבה | לייזונג |
|---|---|---|
| ברויט גייט נישט ארויף | אויסגעגאַנגענע הייוון, אומרעכטע וואַסער טעמפּעראַטור, צו פיל זאַלץ/צוקער. | Check yeast expiration, use lukewarm water, ensure correct ingredient measurements. |
| ברויט איז צו געדיכט | Too much flour, not enough liquid, incorrect program. | Measure ingredients precisely, ensure proper liquid-to-flour ratio, select appropriate program. |
| קנעטן פּאַדעל שטעקן אין ברויט | געוויינטלעכע געשעעניש. | Allow bread to cool slightly, then carefully remove the paddle with a non-metallic utensil. |
| אַפּאַראַט טוט זיך נישט אָן | נישט איינגעשטאכן, מאַכט אויסtagע, דעפעקטיווע אַוטלעט. | Check power cord connection, test outlet with another appliance, ensure power supply. |
| רויך אָדער ברענען שמעקן | עסן רעשטלעך אויף הייצונג עלעמענט, אינערלעכע פראבלעם. | Unplug immediately. Allow to cool and clean thoroughly. If problem persists, contact support. |
8. ספּעסאַפאַקיישאַנז
| שטריך | באַשרייַבונג |
|---|---|
| מאָדעל | Eletronic 12 Programs 700W (Part No. 054301004) |
| סאָרט | PHILCO |
| מאַכט | 700 וו |
| Voltage | 110V |
| נומער פון מגילה | 12 |
| ברויט גרייסן | 450 ג, 600 ג, 900 ג, 1200 ג |
| Crust Colors | ליכט, מיטל, טונקל |
| פאַרהאַלטן טימער | אַרויף צו 13 שעה |
| האַלטן וואַרעם פֿונקציע | קסנומקס מינוט |
| מאַטעריאַל | Stainless Steel (exterior) |
| קאָליר | שוואַרץ |
| פּראָדוקט וואָג | 5.66 ק״ג (5660 גראַם) |
| ASIN | B076HVLX2G |
9. וואָראַנטי און שטיצן
Your Philco Electronic Bread Maker is covered by a manufacturer's warranty. Please refer to the warranty card included with your purchase for specific terms and conditions. For technical support, service, or replacement parts, please contact Philco customer service through their official webזייטל אדער די קאָנטאַקט אינפֿאָרמאַציע וואָס איז צוגעשטעלט אין אייער פּראָדוקט דאָקומענטאַציע.