
Xprinter XP-Q200
Xprinter XP-Q200 Thermal Printer User Manual
Model: XP-Q200
בראַנד: Xprinter
1. הקדמה און איבערview
This manual provides detailed instructions for the setup, operation, and maintenance of your Xprinter XP-Q200 80mm Thermal Printer. The XP-Q200 is a high-speed thermal receipt printer designed for various operating systems including Windows, Android, and iOS. It offers versatile connectivity options such as USB, Bluetooth, and Ethernet, making it suitable for a wide range of business environments.

פיגורע 1.1: פראָנט view of the Xprinter XP-Q200 Thermal Printer.
2. זיכערקייַט אינפֿאָרמאַציע
Please read the following safety precautions carefully before using the printer to ensure safe and proper operation:
- Do not touch the thermal print head immediately after printing, as it may be hot.
- Use only the power adapter supplied with the printer. Using an incorrect adapter may damage the printer or cause fire.
- Do not disassemble or modify the printer. Refer all servicing to qualified personnel.
- האַלט דעם דרוקער אַוועק פון וואַסער, נעץ און דירעקט זונשייַן.
- זיכער מאַכן אַז דער דרוקער איז געשטעלט אויף אַ סטאַבילער, גלייכער ייבערפלאַך.
3. פּעקל אינהאַלט
באַשטעטיקט אַז אַלע זאכן וואָס זענען אויסגערעכנט אונטן זענען אַרייַנגערעכנט אין אייער דרוקער פּעקל:
- Xprinter XP-Q200 Thermal Printer Unit
- מאַכט אַדאַפּטער
- וסב קאַבלע
- Thermal Paper Roll (initial)
- באַניצער מאַנואַל
4. פּראָדוקט פֿעיִקייטן
The Xprinter XP-Q200 offers a range of features designed for efficient and reliable thermal printing:
- הויך-גיכקייַט דרוקן: Achieves print speeds of up to 260mm/sec with an integrated auto cutter.
- קייפל ינטערפייסיז: Equipped with USB, Bluetooth, and Ethernet connectivity for flexible integration.
- ברייט קאַמפּאַטאַבילאַטי: Supports Windows, Linux, and Android operating systems.
- Logo and Barcode Support: Allows for downloading and printing of store logos (BMP file format) and various barcode types on thermal paper.
- פּאַפּיר האַנדלינג: Designed to handle thermal paper rolls up to 80x80mm.
- International Language Support: Supports a variety of international languages and scripts.
- טעות אַלאַרמס: Features print job tips and error alarm functions for operational awareness.
- Black Mark Detection: Includes a black mark detection function for specific printing applications.
- Missing Orders Function: Incorporates a feature to help avoid "missing orders."
- מאָניטאָרינג קייפּאַבילאַטיז: Supports Ethernet and Serial port monitoring functions.
- NV Logo Storage: Provides 256K Bytes of NV Logo download storage.
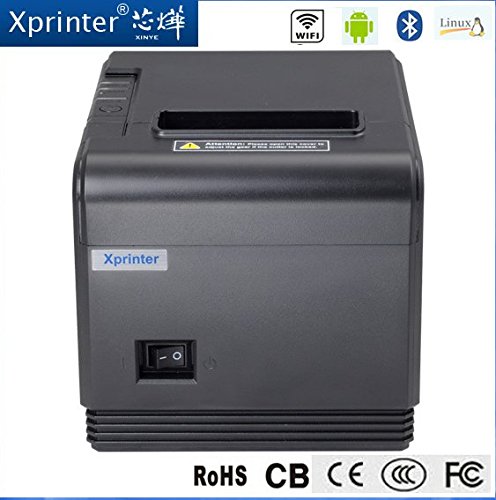
פיגורע 4.1: פראָנט view highlighting connectivity options.
5. סעטאַפּ
5.1 פיזישע אויפשטעל
- Unpack the printer and remove all protective packaging materials.
- Place the printer on a stable, flat surface near a power outlet and your host device.
- Connect the power adapter to the printer's power port and then plug it into a wall outlet.
5.2 לאָדן טערמיש פּאַפּיר
- Press the cover open button (usually located on the side or front) to open the printer's top cover.
- Insert the thermal paper roll into the paper compartment with the printing side facing the thermal print head. Ensure the roll unwinds from the bottom.
- ציעט ארויס א קליינע מאסע פאפיר פארביי דעם שניידער.
- Close the top cover firmly until it clicks into place. The printer will automatically feed the paper to the correct position.
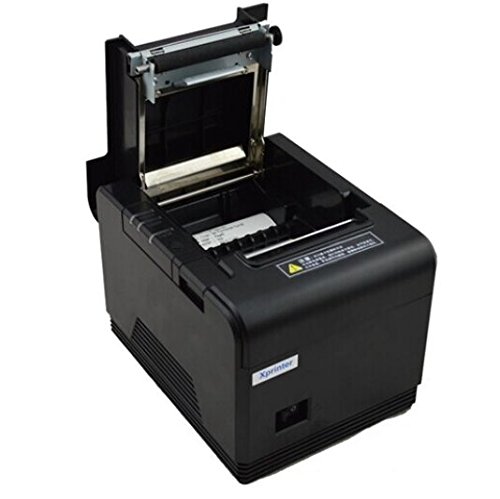
פיגור 5.1: אריינלייגן טערמישע פאפיר אין דרוקער.
5.3 קאַנעקטינג צו אַ מיטל
The XP-Q200 supports USB, Bluetooth, and Ethernet connections.

פיגורע 5.2: דערציען view of the printer with connectivity ports.
5.3.1 וסב קאַנעקשאַן
- פֿאַרבינדט איין עק פֿון דעם USB קאַבל צום דרוקער'ס USB פּאָרט און דעם אַנדערן עק צו אייער קאָמפּיוטער'ס USB פּאָרט.
- The computer should detect the printer automatically.
5.3.2 Bluetooth Connection (for Android/iOS)
- פאַרזיכערן אַז די דרוקער איז פּאַוערד אויף.
- On your Android or iOS device, go to Bluetooth settings and enable Bluetooth.
- זוכן פֿאַר available devices. The printer should appear as "XP-Q200" or similar.
- Select the printer to pair. The default PIN is usually "0000" or "1234".
- Once paired, you can select the printer from your application's print settings.
5.3.3 עטהערנעט קאַנעקשאַן
- פֿאַרבינדט אַן עטערנעט קאַבל פֿון דעם דרוקער'ס עטערנעט פּאָרט צו אייער נעץ ראַוטער אָדער סוויטש.
- The printer will obtain an IP address automatically via DHCP. For static IP configuration, refer to the advanced settings utility provided with the printer drivers.
5.4 דרייווער ינסטאַלירונג
For Windows and Linux systems, you will need to install the appropriate printer drivers. Drivers are typically available on the Xprinter official website or on a CD included with the printer. Follow the on-screen instructions during installation.
6. אַפּערייטינג ינסטרוקטיאָנס
6.1 יקערדיק פּרינטינג
Once the printer is connected and drivers are installed (if applicable), you can send print jobs from your application. Ensure the printer is powered on and has paper loaded.
- From your application (e.g., POS software, web browser), select the print option.
- Choose "Xprinter XP-Q200" from the list of available printers.
- Adjust any print settings as needed (e.g., paper size, copies).
- דריקט "דרוק" צו שיקן די ארבעט צום דרוקער.
6.2 Logo and Barcode Printing
The XP-Q200 supports custom logo and barcode printing. Refer to the printer's utility software (usually provided with drivers) for instructions on how to upload logos (BMP format) to the printer's NV memory and configure barcode printing settings.
7. וישאַלט
7.1 רייניקונג די פּרינטער
רעגולערע רייניקונג העלפט אויפהאלטן די דרוק קוואַליטעט און פארלענגערט די לעבנסדויער פונעם דרוקער.
- דרוק קאָפּ: ניצט אַ וואַטע שטעכל לײַכטampened with isopropyl alcohol to gently wipe the thermal print head. Allow it to dry completely before closing the cover. Clean the print head regularly, especially if print quality degrades.
- פּלאַטען ראָללער: Clean the rubber platen roller with a soft cloth dampמיט יסאָפּראָפּיל אַלקאָהאָל.
- עקסטעריע: Wipe the exterior of the printer with a soft, dry cloth. Do not use abrasive cleaners or solvents.
7.2 אויסרייניקן פאפיר פארשטאפטע
If a paper jam occurs:
- קער אַוועק די דרוקער.
- עפענען די שפּיץ דעקן.
- Carefully remove any jammed paper. Ensure no small pieces of paper remain inside.
- Close the top cover firmly.
- Turn the printer back on.
8. טראָובלעשאָאָטינג
This section addresses common issues you might encounter with your XP-Q200 printer.
| פּראָבלעם | מעגלעך סיבה | לייזונג |
|---|---|---|
| דרוקער גייט נישט אן | Power cable loose; Power outlet faulty; Power adapter faulty | Check power connections; Try a different outlet; Contact support if adapter is faulty. |
| קיין דרוק ארויסגאַנג | No paper; Paper loaded incorrectly; Printer offline; Driver issue | Load paper correctly; Check printer status; Reinstall drivers. |
| נעבעך דרוק קוואַליטעט | Print head dirty; Low quality paper; Print head worn out | Clean print head; Use recommended thermal paper; Contact support for service. |
| פּאַפּיר קלעם | Paper loaded incorrectly; Foreign object inside | Refer to Section 7.2 for clearing jams. |
| Bluetooth/Ethernet connection fails | Incorrect pairing; Network issue; IP address conflict | Re-pair device; Check network cables/settings; Verify IP address. |
9. ספּעסאַפאַקיישאַנז
| שטריך | באַשרייַבונג |
|---|---|
| מאָדעל נאָמען | XP-Q200 |
| דרוק טעכנאָלאָגיע | טערמאַל |
| דרוק ספּיד | 260 מם / סעק |
| דרוקער רעזולטאַט | מאָנאָטשראָמע |
| קאַנעקטיוויטי טעכנאָלאָגיע | Bluetooth, USB, Ethernet |
| בלאַט גרייס | Thermal (80mm) |
| צוויי-סיידיד דרוקן | יא |
| קאָליר | שוואַרץ |
| קאָנטראָללער טיפּ | יאָס, אַנדרויד |
| אַרייַנגערעכנט קאַמפּאָונאַנץ | פּאַפּיר |
| ספּעציעלע שטריך | וסב |
| סקאַננער טיפּ | פּאָרטאַטיוו |
Ask a question about this manual
Ask about setup, troubleshooting, compatibility, parts, safety, or missing instructions. Manuals+ will review the question and use this page’s manual context to help answer it.