
AIBOO YK-300000197
באַניצער מאַנואַל: AIBOO RF מיני ווײַטקאָנטראָל פֿאַר איין קאָליר LED לייץ
Model: YK-300000197
הקדמה
This manual provides comprehensive instructions for the AIBOO RF Mini Remote Control, designed for single color LED strip lights, 12V DC LED ribbons, LED neon signs, and dimmable 3528/5050 under cabinet puck lights. This wireless remote control system offers convenient dimming and timing functions for your LED lighting setups.
פּעקל אינהאַלט
ביטע באַשטעטיקן אַז אַלע זאכן וואָס זענען ליסטעד אונטן זענען אַרייַנגערעכנט אין דיין פּעקל:
- 1 x RF Mini Remote Control
- 1 x LED Controller (Receiver)
- 1 x Remote Bracket
- 1 x Two-Sided Sticker (for bracket installation)

ספּעסאַפאַקיישאַנז
| שטריך | באַשרייַבונג |
|---|---|
| פּראָדוקט דימענשאַנז | 5 X 0.35 X 0.2 אינטשעס |
| פּונקט וואָג | 0.3 אונסעס |
| נומער מאָדעל נומער | YK-300000197 |
| באַטעריז | 1 CR2 באַטאַרייע פארלאנגט (אַרייַנגערעכנט) |
| פאַבריקאַנט | AIBOO |
| ספּעציעלע שטריך | ווירעלעסס קאָנטראָל |
| קאָליר | ווייַס |
| מאַקס נומער פון שטיצט דעוויסעס | 1 (פּער קאָנטראָללער) |
| קאַמפּאַטאַבאַל דעוויסעס | LED strip lights, LED under cabinet puck lights, LED neon signs |
| ווייַט דיסטאַנסע | 15M at open area |
| ברייטנאַס לעוועלס | 10 levels, 1-100% dimmable |
| טיימינג פאַנגקשאַנז | 4 choices (1H, 2H, 4H, 8H) |

סעטאַפּ און ינסטאַלירונג
1. Connecting the LED Controller
The LED controller acts as the receiver for the remote control signals. It should be connected between your 12V DC power supply and the LED lights.
- Connect the output of your 12V DC power supply to the input port of the LED controller.
- Connect your single color LED strip lights, puck lights, or neon sign to the output port of the LED controller.
- פאַרזיכערן אַז אַלע קאַנעקשאַנז זענען זיכער איידער אַפּלייינג מאַכט.

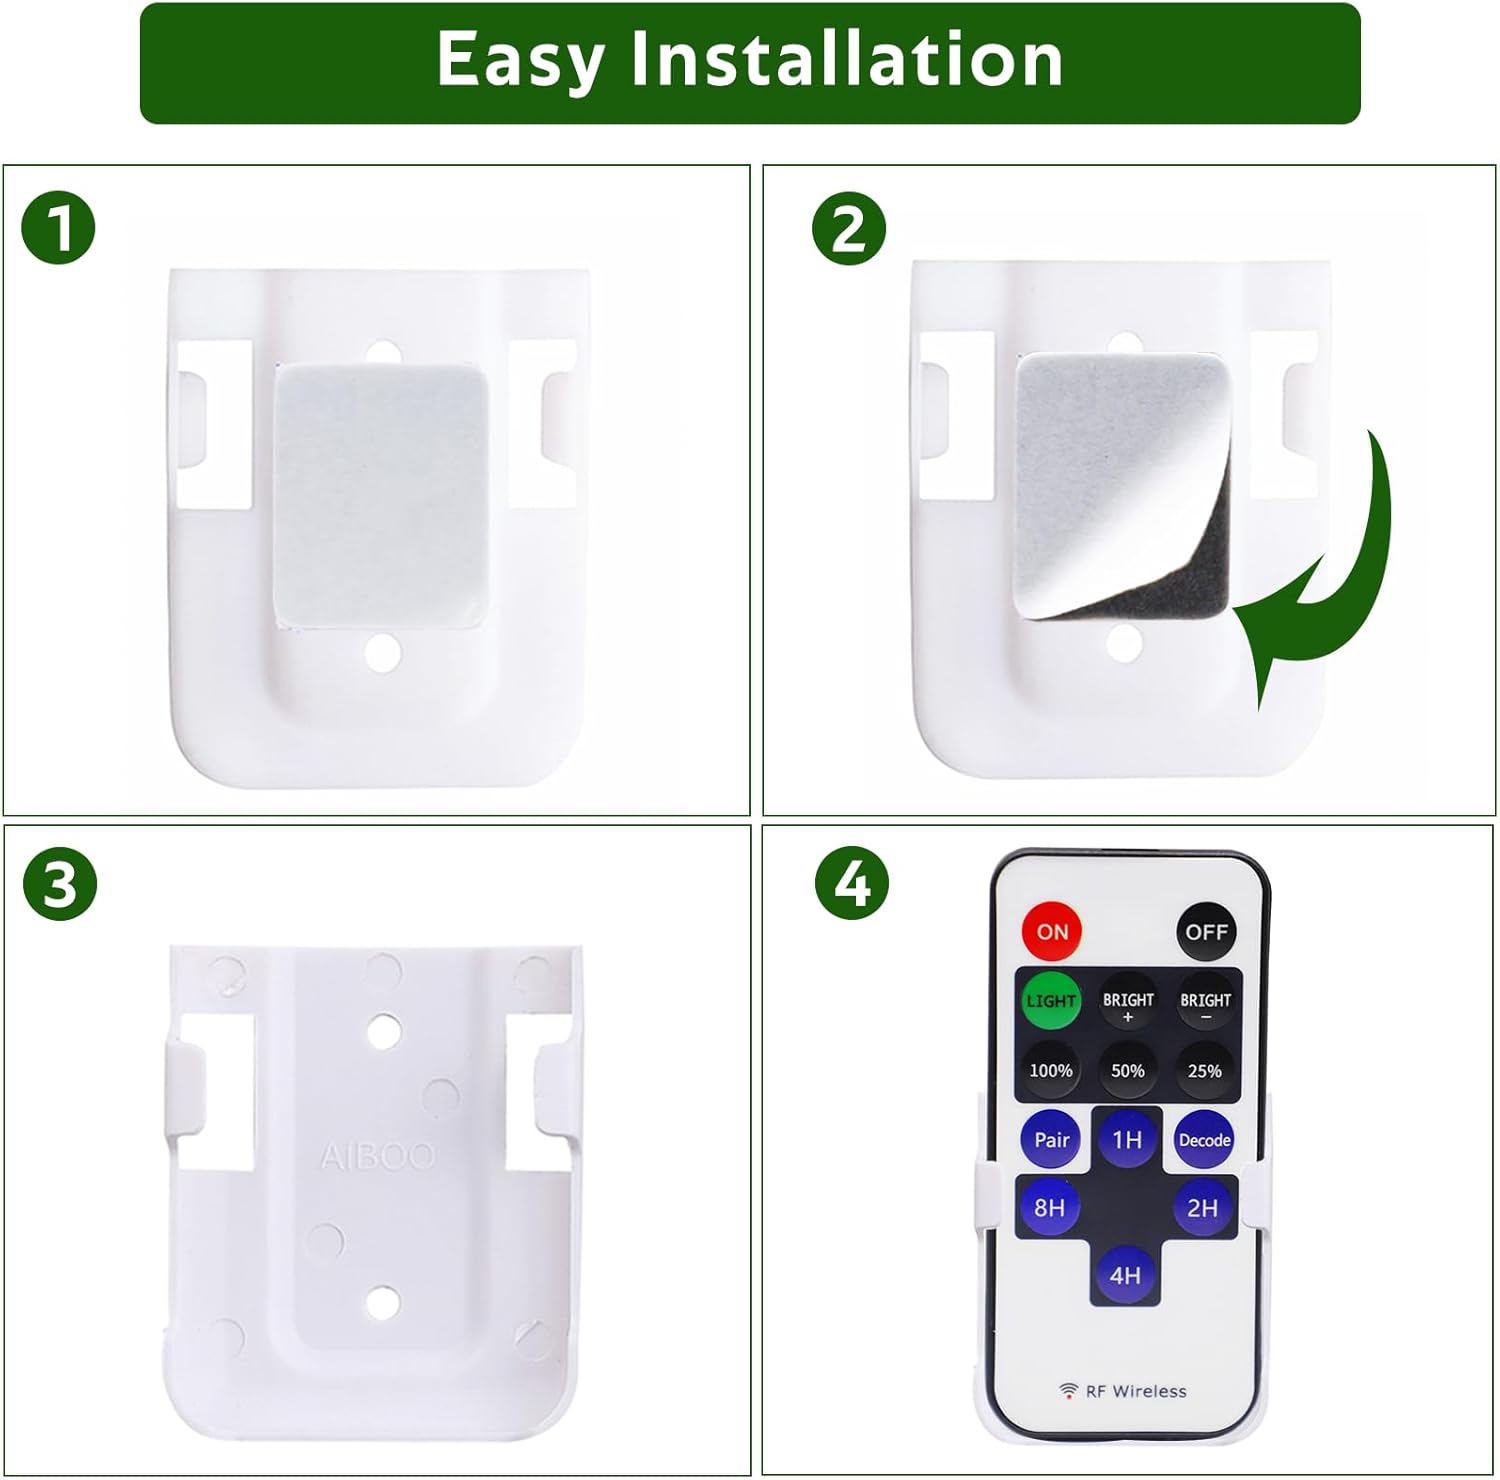
2. Installing the Remote Bracket
The included remote bracket allows for convenient storage and access to your RF Mini Remote Control.
- Clean the surface where you intend to mount the bracket.
- Peel off the protective film from one side of the two-sided sticker and apply it firmly to the back of the remote bracket.
- Peel off the protective film from the other side of the sticker.
- Press the bracket onto the desired wall or surface and hold firmly for a few seconds to ensure adhesion.
- Insert the RF Mini Remote Control into the mounted bracket.
3. Remote Pairing Instructions
The remote control uses RF (Radio Frequency) technology, allowing it to operate without direct line-of-sight to the controller. It supports both 1-to-1 and 1-to-many pairing.

1-to-1 Pairing (Pairing one remote to one controller):
- Ensure only the specific LED controller you wish to pair is powered on. Disconnect power from any other controllers nearby.
- With the controller powered on, press the "פּאָר" button on the remote control.
- The connected LED lights will flash to indicate successful pairing.
1-to-Many Pairing (Pairing one remote to multiple controllers):
- Ensure all LED controllers you wish to control with a single remote are powered on.
- דריק די "דעקאָדע" button on the remote control.
- All connected LED lights will flash to indicate successful pairing. This remote will now control all decoded controllers synchronously.
Video: Pairing Instructions
Watch this video for a visual guide on how to pair your remote control with single or multiple LED light sets.
אַפּערייטינג ינסטראַקשאַנז
רימאָוט קאָנטראָל פאַנגקשאַנז:
- אנצינדן אויסלעשן: Press the red "ON" button to turn the lights on, and the black "OFF" button to turn them off.
- ברייטנאַס אַדזשאַסטמאַנט: Use the "BRIGHT +" and "BRIGHT -" buttons to gradually increase or decrease the brightness. There are 10 brightness levels available.
- פאָראויסגעשטעלטע ברייטקייט: Quickly set brightness to 100%, 50%, or 25% using the dedicated buttons.
- צייט פונקציע: The remote features 4 timing choices: 1H (1 hour), 2H (2 hours), 4H (4 hours), and 8H (8 hours). Press the corresponding button to set the lights to automatically turn off after the selected duration.

The controller has an auto-save function, remembering your last light mode setting when you switch the lights on again.
וישאַלט
- Keep the remote control and LED controller dry. Moisture can damage electronic components.
- Clean the devices with a soft, dry cloth. Do not use abrasive cleaners or solvents.
- פֿאַרמײַדן אויסצושטעלן די דעווײַסעס צו עקסטרעמע טעמפּעראַטורן אָדער דירעקטע זון פֿאַר פֿאַרלענגערטע פּעריאָדן.
- Replace the CR2 battery in the remote control when its performance degrades.
טראָובלעשאָאָטינג
- Problem: Lights do not respond to the remote control.
- Ensure the LED controller is properly connected to the power supply and LED lights.
- Check if the remote control battery (CR2) needs replacement.
- Re-pair the remote control with the LED controller following the "1-to-1 Pairing" instructions. Ensure only the target controller is powered during pairing.
- Problem: Lights are flickering or not dimming properly.
- Verify that your power supply is sufficient for the connected LED lights. An undersized power supply can cause flickering.
- Ensure all connections are secure and free from loose wires.
- If the issue persists, try re-pairing the remote.
- Problem: Remote controls multiple light sets unintentionally.
- This indicates the remote was likely paired using the "1-to-Many Pairing" (Decode) function.
- To control sets separately, you must re-pair each remote to its specific controller using the "1-to-1 Pairing" method. Remember to only power on the controller you are currently pairing.
קונה שטיצן
For further assistance or inquiries, please contact AIBOO Lighting customer support. We are committed to providing reliable service.
- U.S. Live Customer Support: Monday - Friday, 9 AM - 5 PM (EST)
- Visit the AIBOO Store for more products and information: AIBOO Store

Ask a question about this manual
Ask about setup, troubleshooting, compatibility, parts, safety, or missing instructions. Manuals+ will review the question and use this page’s manual context to help answer it.