הקדמה
This manual provides detailed instructions for the installation, operation, and maintenance of your Venstar T1900 Residential Slimline Platinum Thermostat. Please read this manual thoroughly before attempting to install or operate the thermostat to ensure proper function and to avoid potential damage.
וויכטיק סאַפעטי אינפֿאָרמאַציע
- Always turn off power to the heating/cooling system at the main circuit breaker or fuse box before installing or servicing the thermostat.
- This thermostat operates on 24 Volts AC. Do not connect to line voltagE (120 וו אָדער 240 וו).
- Installation should be performed by a qualified technician if you are unfamiliar with electrical wiring.
- Do not short circuit the terminals on the gas valve or at the system control to test the thermostat. This will damage the thermostat and void the warranty.
- Ensure all wiring connections are secure and insulated to prevent short circuits.
פּעקל אינהאַלט
באַשטעטיקן אַז דיין פּעקל כּולל די פאלגענדע זאכן:
- Venstar T1900 Thermostat Unit
- מאָנטירונג האַרדווער (שרויף און וואַנט אַנקערס)
- באַניצער מאַנואַל (דעם דאָקומענט)
פּראָדוקט איבערview
The Venstar T1900 is a 7-day programmable digital thermostat designed for residential use. It offers precise temperature control and energy-saving scheduling capabilities. This thermostat is compatible with heat/cool, heat pump, and dual-fuel systems, controlling up to three heat stagעס און צוויי קיל סtages.
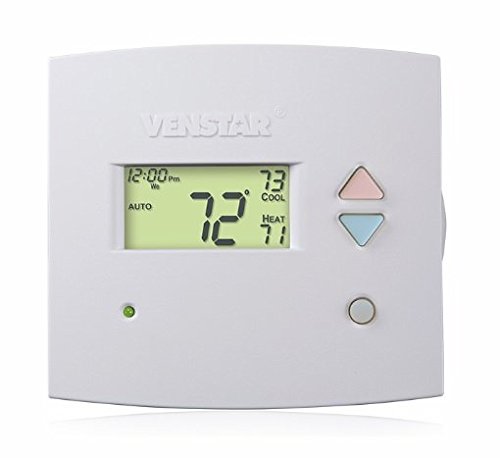
פיגורע 1: פראָנט view of the Venstar T1900 Thermostat. This image displays the thermostat's LCD screen and control buttons, indicating its slimline design.
שליסל פֿעיִקייטן:
- 7-טאָג פּראָגראַמירבאַרקייט: ערמעגליכט קאַסטאַמייזד הייצונג און קילונג סקעדזשולז פֿאַר יעדן טאָג פון דער וואָך.
- סיסטעם קאַמפּאַטאַבילאַטי: Works with heat/cool, dual-fuel, and heat pump systems.
- מולטי-זtagE קאָנטראָל: Manages up to three heat stagעס און צוויי קיל סtages.
- רימאָוט קאָנטראָל פיייקייט: Controllable by phone using an optional add-on (sold separately).
- Automatic or Manual Operation: Provides flexibility for scheduled or on-demand temperature adjustments.
ינסטאַללאַטיאָן גייד
מכשירים פארלאנגט:
- שרויפנציהער (פיליפּס און/אדער פלאַכעדיגער)
- באָר מיט אַ פּאַסיקן באָר־ביט (אויב מען אינסטאַלירט נײַע וואַנט־אַנקערס)
- ווירע סטריפּערז
- בלייַער
- מדרגה (אַפּשאַנאַל)
1. קער אַוועק מאַכט
Locate the circuit breaker or fuse box that controls your heating and cooling system. Turn off the power completely before proceeding with any wiring.
2. Remove Old Thermostat (if applicable)
- פֿאָרזיכטיק אַראָפּנעמען דעם דעקל פֿון אײַער אַלטן טערמאָסטאַט.
- Take a picture of the existing wiring connections for reference.
- Label each wire with the terminal designation it was connected to (e.g., R, G, Y, W).
- Disconnect the wires and remove the old thermostat's mounting plate from the wall.
3. Mount the New Thermostat Base
- Separate the front cover of the T1900 thermostat from its base plate.
- Position the base plate on the wall where you want to install the thermostat. Ensure it is level.
- מארק די מאַונטינג האָלעס מיט אַ בלייַער.
- באָערט פּילאָט לעכער אויב נייטיק און אַרײַנשטעלט וואַנט אַנקערס.
- Secure the thermostat base plate to the wall using the provided screws.
4. וויירינג
Connect the wires from your HVAC system to the corresponding terminals on the T1900 thermostat base. Refer to the wiring diagram provided with your specific HVAC system for precise connections. Ensure wires are stripped approximately 3/8 inch and securely fastened under the terminal screws.
Common Terminal Designations:
- ר/רק/רה: 24V Power (Heating/Cooling)
- C: Common (24V return)
- G: פאָכער
- יאָר/יאָר 1: קאַמפּרעסער זtagE 1 (קאָאָלינג)
- י 2: קאַמפּרעסער זtagE 2 (קאָאָלינג)
- W/W1: היץ StagE 1 (באַהיצונג)
- וו2: היץ StagE 2 (באַהיצונג)
- אָ / ב: Reversing Valve (Heat Pumps)
Note: The T1900 supports various system types. Consult the detailed wiring diagrams in the full installation manual for specific configurations (e.g., heat pump with auxiliary heat, conventional multi-stage systems).
5. Attach Thermostat to Base
Once wiring is complete and verified, carefully align the thermostat front cover with the mounted base plate and snap it into place.
6. ומקערן פּאָווער
Return to your circuit breaker or fuse box and restore power to your heating and cooling system.
ערשט סעטאַפּ
Upon initial power-up, the thermostat may prompt you to configure basic settings. Follow the on-screen instructions to set the current date, time, and system type (e.g., Conventional, Heat Pump).
System Type Configuration:
It is crucial to correctly configure the thermostat for your specific HVAC system. Incorrect settings can lead to improper operation or damage. Access the installer settings menu (refer to the full installation guide for specific button sequences) to select:
- סיסטעם טיפּ: Heat/Cool, Heat Pump, Dual Fuel
- נומער פון היץ Stages
- נומער פון קיל Stages
- Reversing Valve Operation: O (קילונג) אדער B (הייצן)
אַפּערייטינג ינסטראַקשאַנז
פֿאַרשטיין די ווייַז:
The LCD screen displays the current temperature, set temperature, system mode, fan mode, time, and programming status. Refer to the icons and indicators on the screen for current operational status.
Setting System Mode:
דרוק די מאָדע קנעפּל צו דורכגיין די פאַראַנען סיסטעם מאָדעס:
- היץ: The system will operate to maintain the heating setpoint.
- קיל: The system will operate to maintain the cooling setpoint.
- אָטאַמאַטיק: The thermostat automatically switches between heating and cooling as needed to maintain the set temperature range.
- OFF: די הייצונג און קיל סיסטעם איז אויסגעלאשן.
Setting Fan Mode:
דרוק די פאָכער קנעפּל צו דורכגיין די ווענטילאַטאָר מאָדעס:
- אָטאַמאַטיק: דער ווענטילאַטאָר אַרבעט נאָר ווען די הייצונג אָדער קיל סיסטעם איז אַקטיוו.
- אויף: דער ווענטילאַטאָר לויפֿט קאָנטינויִערלעך, נישט קוקנדיק אויף די היץ אָדער קילונג רופן.
אַדזשאַסטינג טעמפּעראַטור:
ניצן די UP און אַראָפּ arrow buttons to adjust the desired temperature setpoint. In programmable modes, this will temporarily override the schedule until the next scheduled change.
Programming Schedules (7-Day):
The T1900 allows for 7-day programming, enabling different schedules for each day of the week. This feature helps save energy by adjusting temperatures when you are away or asleep.
- דרוק די פּראָגראַם קנעפּל צו אַרייַן פּראָגראַממינג מאָדע.
- ניצן די טאָג button to select the day or group of days you wish to program (e.g., Mon-Fri, Sat-Sun, or individual days).
- ניצן די צייט button to cycle through the four available periods: Wake, Leave, Return, Sleep.
- ניצן די UP און אַראָפּ arrow buttons to set the desired temperature for each period.
- ניצן די האַלטן button to exit programming mode or save changes.
Refer to the detailed programming section in the full user guide for advanced options and specific button sequences.
Remote Control (Optional Add-on):
The Venstar T1900 thermostat can be controlled remotely via a phone using an optional add-on module (sold separately). This module connects to the thermostat and allows for remote access and control through a dedicated application. Installation and setup instructions for the remote control module are provided with the module itself.
וישאַלט
רייניקונג פון דעם טערמאָסטאַט:
To maintain the appearance and functionality of your thermostat, periodically wipe the exterior with a soft, damp שטאָף. ניצט נישט קיין שרײַבנדיקע רייניגער, סאָלווענטן, אדער כעמישע שפּריץ, ווײַל די קענען שאַטן די פּלאַסטיק און עלעקטראָנישע קאָמפּאָנענטן.
באַטערי פאַרבייַט:
The Venstar T1900 thermostat does not require batteries for operation as it is powered by the 24V AC system.
טראָובלעשאָאָטינג
If you experience issues with your Venstar T1900 thermostat, consult the following common problems and solutions:
| פּראָבלעם | מעגלעך סיבה | לייזונג |
|---|---|---|
| טערמאַסטאַט אַרויסווייַזן איז ליידיק | קיין שטראָם צום טערמאָסטאַט. | Check the circuit breaker for your HVAC system. Ensure all wiring connections are secure. |
| Heating/Cooling system does not respond | אומרעכט סיסטעם מאָדע אויסגעקליבן; וויירינג פּראָבלעם; סיסטעם לאַקאַוט. | Verify the system mode (HEAT/COOL/AUTO). Check wiring connections. Wait 5 minutes for system lockout to reset. |
| טעמפּעראַטור מעסטונג מיינט נישט ריכטיק | Thermostat location; sensor obstruction. | Ensure the thermostat is not exposed to direct sunlight, drafts, or heat sources. Clean any dust from the thermostat vents. |
| Programming schedule is not working | Program not saved; temporary override active; incorrect time/day setting. | Ensure programs are saved. Check if a temporary override is active and cancel it. Verify current time and day settings. |
| דער ווענטילאַטאָר לויפֿט קאָנטינויִערלעך אין אויטאָ מאָדע | Fan mode set to ON; wiring issue. | Press the FAN button to ensure it is set to AUTO. Check fan wiring. |
If these solutions do not resolve the issue, please contact customer support or a qualified HVAC technician.
ספּעסאַפאַקיישאַנז
| שטריך | באַשרייַבונג |
|---|---|
| סאָרט | ווענסטאַר |
| מאָדעל נאָמען | Venstar T1900 |
| קאָנטראָללער טיפּ | דרוק קנעפּל |
| ספּעציעלע שטריך | פּראָגראַממאַבלע |
| קאָליר | ווייַס |
| ספּעציפיש ניצט פֿאַר פּראָדוקט | Heat Pump, Heater |
| טעמפּעראַטור קאָנטראָל טיפּ | Programmable, Smart/Remote (with add-on) |
| Voltage | 24 וואלטס אַק |
| ווייַז טיפּ | לקד אָדער געפירט |
| קאָנטראָל מעטאָד | Remote (with add-on) |
| באַקלייט | יא |
| פּראָדוקט דימענשאַנז | 5.3 X 2 X 2 אינטשעס |
| פּונקט וואָג | 0.01 אונס |
| באַטעריז פארלאנגט? | ניין |
וואָראַנטי אינפֿאָרמאַציע
Venstar products are manufactured to high-quality standards. This product is covered by a limited warranty against defects in materials and workmanship. The specific terms and duration of the warranty may vary. Please refer to the warranty card included with your product or visit the official Venstar webזייטל פֿאַר דעטאַלירטע וואָראַנטי אינפֿאָרמאַציע און רעגיסטראַציע פּראָצעדורן.
קונה שטיצן
For technical assistance, troubleshooting, or warranty inquiries, please contact Venstar customer support. You can typically find contact information, including phone numbers and email addresses, on the official Venstar webפּלאַץ (www.venstar.com) אדער אויף דער פּראָדוקט פּאַקאַדזשינג.
When contacting support, please have your thermostat model number (T1900) and any relevant purchase information ready.