
1. הקדמה
This manual provides essential information for the safe and efficient operation of your KitchenAid 5KMT223GER 2-Slot Automatic Toaster. Please read all instructions carefully before first use and retain for future reference.

בילד 1.1: פראָנט view of the KitchenAid 5KMT223GER 2-Slot Automatic Toaster.
2. וויכטיק סאַפעטי אינסטרוקציעס
ווען ניצן עלעקטריקאַל אַפּפּליאַנסעס, יקערדיק זיכערקייַט פּריקאָשאַנז זאָל שטענדיק זיין נאכגעגאנגען, אַרייַנגערעכנט די פאלגענדע:
- לייענען אַלע ינסטראַקשאַנז.
- דו זאלסט נישט פאַרבינדן הייס סערפאַסיז. ניצן כאַנדאַלז אָדער נאַבז.
- כדי צו באַשיצן קעגן עלעקטרישע קלאַפּן, טונקט נישט איין דעם שנור, פּלאַגז, אדער טאָסטער אין וואַסער אדער אַנדערע פליסיקייט.
- נאָענט השגחה איז נייטיק ווען קיין אַפּפּליאַנסע איז געניצט דורך אָדער לעבן קינדער.
- אָפּשטעקן די ווענטיל ווען ניט אין נוצן און איידער רייניקונג. לאָזן צו קילן איידער איר שטעלן אויף אָדער נעמען אַוועק טיילן.
- Do not operate any appliance with a damaged cord or plug, or after the appliance malfunctions or has been dropped or damaged in any manner. Return appliance to the nearest authorized service facility for examination, repair, or adjustment.
- די נוצן פון אַקסעסערי אַטאַטשמאַנץ וואָס זענען נישט רעקאַמענדיד דורך דער פאַבריקאַנט קען פאַרשאַפן ינדזשעריז.
- דו זאלסט נישט נוצן ינ דרויסן.
- דו זאלסט נישט לאָזן די שנור הענגען איבער די ברעג פון טיש אָדער טאָמבאַנק, אָדער אָנרירן הייס סערפאַסיז.
- צי ניט שטעלן אויף אָדער לעבן אַ הייס גאַז אָדער עלעקטריש בורנער, אָדער אין אַ העאַטעד ויוון.
- צו אָפּשטעקן, דריי יעדן קאָנטראָל צו "אויס," און דערנאָך אַרויסנעמען דעם שטעקער פֿון דער וואַנט־אַויטלעט.
- דו זאלסט נישט נוצן די מיטל פֿאַר אנדערע ווי בדעה נוצן.
- אָוווערסייז פודז, מעטאַל פויל פּאַקאַדזשאַז אָדער יוטענסאַלז מוזן נישט זיין ינסערטאַד אין אַ צוברוינער ווייַל זיי קען אַרייַנציען אַ ריזיקירן פון פייַער אָדער עלעקטריש קלאַפּ.
- א פייער קען פארקומען אויב טאוסטערס זענען באדעקט אדער בארירן ברענעוודיקן מאטעריאל, אריינגערעכנט קערטאַנז, דראַפּעריעס, ווענט, און ענלעכע, ווען אין אָפּעראַציע.
- דו זאלסט נישט פּרווון צו דיסלאָדזש עסנוואַרג ווען צוברוינער איז פּלאַגד אין.
- דו זאלסט נישט אַרבעטן אַנאַטענדיד.
- Always remove the crumb tray for cleaning. Do not operate the toaster without the crumb tray in place.
3. פּאַרץ און פֿעיִקייטן
Familiarize yourself with the components of your KitchenAid 2-Slot Automatic Toaster:
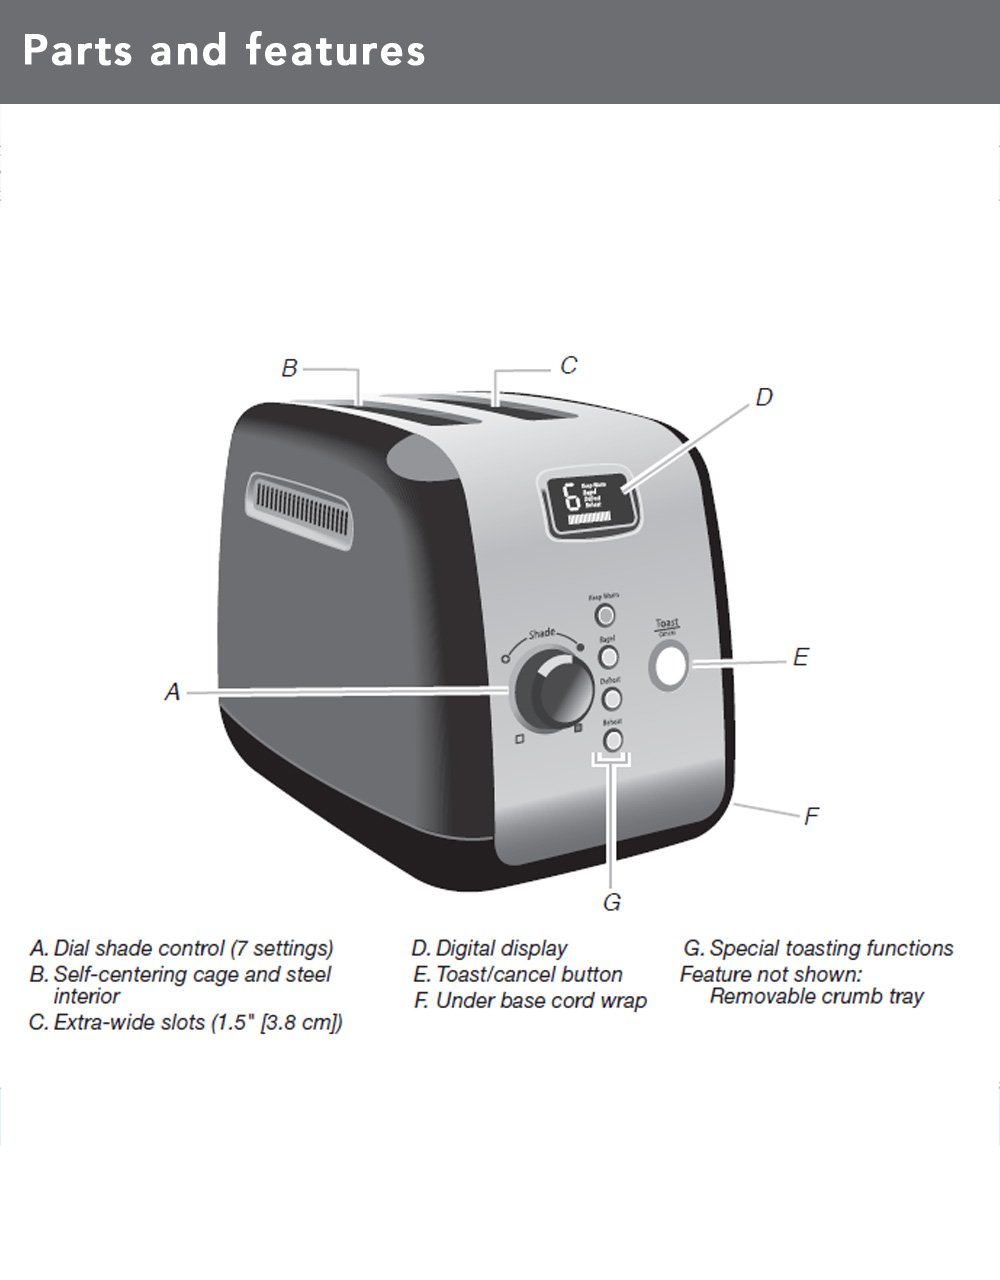
Image 3.1: Diagram illustrating the main parts and features of the toaster.
- Shade Control Dial (A): Adjusts the browning level with 7 settings.
- Self-Centering Bread Racks (B): Automatically centers bread for even toasting.
- Extra-Wide Slots (C): 3.8 cm (1.5 inches) wide slots accommodate various bread types.
- Digital Display (D): Shows selected shade setting and a countdown timer for toasting progress.
- Toast/Cancel Button (E): Initiates or cancels the toasting cycle. Features motorized lift.
- Under Base Cord Wrap (F): For convenient cord storage.
- Special Toasting Functions (G): Includes Keep Warm, Bagel, Defrost, and Reheat buttons.
- רימווואַבאַל פּיצל טאַץ: Located at the back for easy cleaning (not shown in diagram).
4. סעטאַפּ
Before using your toaster for the first time:
- ונפּאַק די צוברוינער און אַראָפּנעמען אַלע פּאַקקאַגינג מאַטעריאַלס.
- ווישן די יקסטיריער פון די צוברוינער מיט אַדamp שטאָף. מאַכט זיכער אַז עס איז גאָר טרוקן איידער איר שטעקט עס אין.
- Place the toaster on a stable, flat, heat-resistant surface, away from flammable materials.
- Ensure the crumb tray is properly inserted at the back of the toaster.
- פארן ערשטן באַנוץ, זאָלט איר לאָזן דעם טאָסטער אָן ברויט אויף דער העכסטער שאָטן שטאַפּל (7) כדי צו פֿאַרברענען אַלע פּראָדוקציע רעשטלעך. אַ קליינער שמעק אָדער רויך קען זיין פֿאַראַן; דאָס איז נאָרמאַל. לאָזט דעם טאָסטער גאָר אָפּקילן.
5. אַפּערייטינג ינסטרוקטיאָנס
Follow these steps to toast bread and use the special functions:

Image 5.1: Bread slices inserted into the toaster's extra-wide slots.
5.1 גרונטלעכע טאָסטינג
- Plug the toaster into a grounded electrical outlet.
- Place bread slices into the toasting slots. The self-centering racks will automatically adjust.
- קער די שאָטן קאָנטראָל רעדל to select your desired browning level (1 for lightest, 7 for darkest). The digital display will show the selected shade.
- דרוק די Toast/Cancel Button. The motorized lift will lower the bread into the slots, and the toasting cycle will begin. The digital display will show a countdown.
- Once the cycle is complete, the toaster will automatically raise the toasted bread.
- צו אפשטעלן דעם טאָוסטינג ציקל אין יעדער צייט, דריק די Toast/Cancel Button. The bread will be raised.
5.2 ספּעציעלע פאַנגקשאַנז
Your toaster includes dedicated buttons for specialized toasting needs:
- האַלטן וואַרעם: Press this button after a toasting cycle to keep toasted food warm for up to one minute. The toaster will gently lower and raise the bread after the warming period.
- באַגעל: This function toasts the cut-side of a bagel while gently warming the outer surfaces. Insert bagels with the cut side facing inwards. Select your desired shade, then press the BAGEL קנעפּל נאכגעגאנגען דורך די Toast/Cancel Button.
- אָפּרוען: Use this function to defrost and toast frozen food. Select your desired shade, then press the דעפרוסט קנעפּל נאכגעגאנגען דורך די Toast/Cancel Button. The toaster will automatically adjust the toasting time.
- וואַרעמען: This function quickly reheats previously toasted food without further browning. Press the REHEAT קנעפּל נאכגעגאנגען דורך די Toast/Cancel Button.
6. רייניקונג און וישאַלט
רעגולערע רייניקונג גאַראַנטירט אָפּטימאַלע פאָרשטעלונג און פאַרלענגערט די לעבן פון דיין טאָסטער.
6.1 פּיצל טאַץ

Image 6.1: The removable crumb tray for easy cleaning.
- שטענדיק ארויסנעמען דעם טאָסטער פון עלעקטרישן נעץ און לאָזן אים גאָר אָפּקילן איידער איר רייניקט אים.
- Pull out the removable crumb tray located at the back of the toaster.
- Discard crumbs. The crumb tray can be washed in the top rack of a dishwasher or by hand with warm, soapy water. Rinse thoroughly and dry completely before reinserting.
- Never operate the toaster without the crumb tray properly inserted.
6.2 עקסטעריאָר
- ווישן די יקסטיריער פון די צוברוינער מיט אַדamp שטאָף און טרוקן ונ דורך.
- ניצט נישט קיין שרײַבנדיקע רייניגער אָדער שרײַבענדיקע פּאַדס, ווײַל זיי קענען קראַצן די ייבערפֿלאַך.
- קיינמאָל טונקען די צוברוינער אין וואַסער אָדער קיין אנדערע פליסיק.
7. טראָובלעשאָאָטינג
If you experience issues with your toaster, refer to the following table for common problems and solutions:
| פּראָבלעם | מעגלעך סיבה | לייזונג |
|---|---|---|
| דער טאָסטער צינדט זיך נישט אָן. | נישט איינגעשטאכן; מאַכט אויסtage; קרייז ברעיקער האט אויסגעלאָשן. | זיכער מאַכן אַז דער טאָסטער איז זיכער אַרייַנגעשטעקט אין אַ אַרבעטנדיקן אַוטלעט. קאָנטראָלירט דעם הויזגעזינדלעכן קרייַז ברעאַקער. |
| Bread does not lower or raise. | Toaster not powered; Toast/Cancel button not pressed; food jammed. | Ensure power is on. Press Toast/Cancel button. Unplug toaster and carefully remove any jammed food. |
| אומגלייכע טאָסטינג. | נישט קאָנסיסטענט ברויט גרעב; קרומל אויפבוי. | Ensure bread slices are of similar thickness. Clean crumb tray regularly. |
| רויך אדער ברענענדיקער שמעק. | Food jammed; crumb buildup; high shade setting. | Immediately press Cancel. Unplug and allow to cool. Remove jammed food or clean crumb tray. Reduce shade setting for next use. |
If the problem persists after attempting these solutions, please contact KitchenAid customer support.
8. ספּעסאַפאַקיישאַנז
| שטריך | דעטאַל |
|---|---|
| מאָדעל נומער | 5KMT223GER |
| וואָסtage | 1100 וואטס |
| Voltage | 220 וואלטס |
| Slot Count | 2 |
| שאָטן סעטטינגס | 7 |
| ספּעציעלע פאַנגקשאַנז | Keep Warm, Bagel, Defrost, Reheat, Cancel |
| מאַטעריאַל | מעטאַל |
| פּראָדוקט דימענשאַנז (ד רענטגענ וו רענטגענ ה) | 25D x 34W x 25.5H סענטימעטער |
| פּונקט וואָג | 2200 גראַמז |
| אַרייַנגערעכנט קאַמפּאָונאַנץ | Pop-up Toaster, Removable Crumb Tray |
9. וואָראַנטי און שטיצן
Your KitchenAid 5KMT223GER 2-Slot Automatic Toaster is covered by a 2-יאָר לימיטעד וואָראַנטי פֿון דעם קויפֿדאַטום. די וואָראַנטי דעקט חסרונות אין מאַטעריאַלן און אַרבעט אונטער נאָרמאַל הויזגעזינד נוצן.
For warranty service, technical support, or to order replacement parts, please contact KitchenAid customer service. Keep your purchase receipt as proof of purchase for warranty claims.