
הקדמה
א דאנק פארן קויפןasing the STOGA Ubox STV040 Dual Lens Car DVR Camera. This manual provides detailed instructions for the proper installation, operation, and maintenance of your device. Please read this manual thoroughly before using the product to ensure optimal performance and safety.
פּעקל אינהאַלט
ביטע קאָנטראָלירט דעם אינהאַלט פֿון דער פּאַקעט בײַם עפֿענען. אויב עס פֿעלן אָדער זענען געשעדיגט עפּעס, קאָנטאַקטירט אײַער פֿאַרקויפֿער.
- 1 x STOGA Ubox STV040 Car DVR Camera
- 1 x מאַשין טשאַרדזשער
- 1 x Car Mount
- 1 x External GPS Module
- 1 x באַניצער מאַנואַל
פּראָדוקט איבערview
Familiarize yourself with the components and features of your STOGA Ubox STV040 Car DVR Camera.

פיגורע 1: פראָנט view of the DVR camera with the display screen active.

פיגורע 2: פראָנט view detailing the dual wide-angle lenses and surrounding controls.
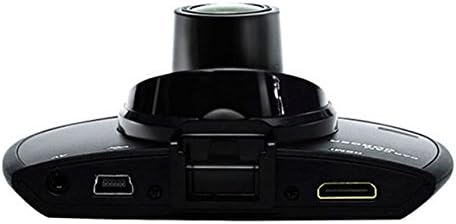
פיגורע 3: Top view illustrating the connectivity ports (HDMI, USB, AV).
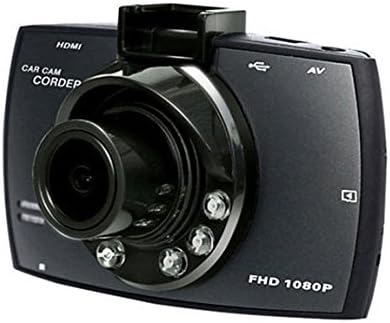
פיגורע 4: Angled perspective of the DVR camera, showing its compact design.
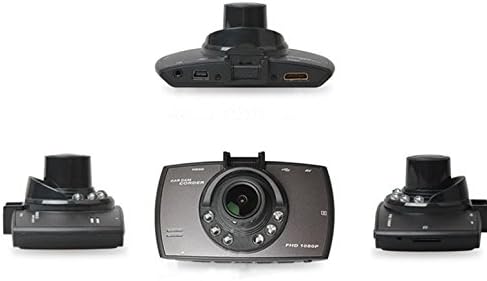
פיגורע 5: פולשטענדיק view of the DVR camera from various angles.
סעטאַפּ
1. Installing the Micro SD Card
Insert a Micro SD card (Class 6 or higher, 4GB-32GB) into the designated slot on the DVR camera. Ensure the card is inserted correctly until it clicks into place. The device supports continuous loop recording and emergency event recording.
2. מאָונטינג די קאַמעראַ
- Attach the car mount to the windshield in a position that does not obstruct your view.
- Securely attach the DVR camera to the car mount.
- Adjust the camera angle to ensure both lenses capture the desired view (front and interior/side). The dual lenses are 180-degree rotatable.
3. מאַכט קאַנעקשאַן
Connect the car charger to the DVR camera's power input and plug the other end into your vehicle's 12V power outlet (cigarette lighter socket). The camera will typically power on automatically when the vehicle starts and power off when the vehicle is turned off.
4. GPS Module Connection (Optional)
Connect the external GPS module to the designated GPS port on the DVR camera. This enables GPS logging, recording location data along with video footage.
אַפּערייטינג ינסטראַקשאַנז
מאַכט אויף / אַוועק
- אָטאַמאַטיק: The camera powers on and starts recording automatically when the car engine starts. It powers off automatically when the engine is turned off.
- מאַנואַל: Press and hold the power button to manually turn the device on or off.
רעקאָרדינג מאָדעס
- שלייף רעקאָרדינג: The camera continuously records video in segments. When the memory card is full, it automatically overwrites the oldest unlocked footage.
- נויטפאַל רעקאָרדינג (G-סענסאָר): The built-in G-Sensor detects sudden impacts or collisions. In such an event, the current video segment is automatically locked and protected from being overwritten.
מעניו נאַוויגאַציע
Use the control buttons located on the device to navigate through the menu options on the 2.0" TFT LCD screen. Adjust settings such as video resolution, date/time stamp, language (English, Chinese, Japanese, Russian), and G-Sensor sensitivity.
פּלייַבאַקק
- Stop recording if currently active.
- Enter playback mode via the menu.
- סעלעקטירן דעם געוואלט ווידעא file for playback on the device screen.
- Alternatively, remove the Micro SD card and insert it into a computer to view files.
שפּריכוואָרט פּראַטעקשאַן
The device supports password protection to prevent unauthorized access to recordings. Refer to the on-screen menu for setting up and managing this feature.
וישאַלט
- רייניקונג: Use a soft, dry cloth to clean the camera lenses and screen. Avoid abrasive cleaners or solvents.
- מיקראָ סד קאַרד: Format the Micro SD card regularly (e.g., once a month) to ensure optimal performance and prevent data corruption. Back up important files איידער פאָרמאַטטינג.
- טעמפּעראַטור: פֿאַרמײַדט אויסשטעלן דעם אַפּאַראַט צו עקסטרעמע טעמפּעראַטורן, דירעקטע זונשײַן פֿאַר פֿאַרלענגערטע פּעריאָדן, אָדער הויכע פֿײַכטקייט.
- Firmware דערהייַנטיקונגען: קוק די פאַבריקאַנט ס webזוכט דעם וועבזייטל פון צייט צו צייט פאר אלע פארהאן פירמווער דערהייַנטיקונגען צו פארבעסערן די פאָרשטעלונג און צולייגן פֿעיִקייטן.
טראָובלעשאָאָטינג
| פּראָבלעם | מעגלעך סיבה / לייזונג |
|---|---|
| די קאַמעראַ גייט נישט אָן. |
|
| די אויפנאמע שטעלט זיך אפ אומגעריכט. |
|
| נעבעך ווידעא קוואַליטעט. |
|
| די דזשי-פי-עס ארבעט נישט. |
|
| די באַטעריע האַלט נישט די אָפּצאָל. |
|
ספּעסאַפאַקיישאַנז
| שטריך | דעטאַל |
|---|---|
| מאָדעל נומער | Ubox STV040 |
| ווייַז | 2.0" TFT LCD (960 x 240 pixels) |
| לענסעס | Dual 140-degree A+ wide-angle, 180-degree rotatable |
| סענסאָר | קמאָס |
| ווידעא האַכלאָטע | 1280 x 480 @ 30 fps, 640 x 480 @ 30 fps |
| ווידעא פֿאָרמאַט | AVI |
| בילד פֿאָרמאַט | M-JPG |
| נאַכט זעאונג | ינפרערעד נאַכט זעאונג פונקציאָנירן |
| סטאָרידזש | Micro TF (SD HC) card, 4GB-32GB, Class 6 and above |
| גפּס | Supports external GPS module |
| ג-סענסאָר | Integrated, supports emergency event recording lock |
| מיקראָפאָן / רעדנער | ינטעגראַטעד |
| רעזולטאַט | CVBS (Video Output) |
| באַטערי | 3.7V 700mA Lithium-Polymer battery |
| אַפּערייטינג סיסטעם קאַמפּאַטאַבילאַטי | Windows 2000/XP/Vista/Windows 7 |
| שטיצט שפּראַכן | English, Chinese, Japanese, Russian |
וואָראַנטי און שטיצן
For warranty information and technical support, please refer to the documentation provided with your purchase or contact your retailer. Keep your purchase receipt as proof of purchase for warranty claims.
For further assistance, you may also visit the official STOGA website (if available) or contact their customer service department.