
1. הקדמה
This instruction manual provides essential information for the safe and efficient operation of your Nuwave Pro Plus Infrared Oven. Please read all instructions thoroughly before initial use to ensure proper function and to prevent injury or damage. Keep this manual for future reference.
2. וויכטיק סאַפעטי אינסטרוקציעס
ווען ניצן עלעקטריקאַל אַפּפּליאַנסעס, יקערדיק זיכערקייַט פּריקאָשאַנז זאָל שטענדיק זיין נאכגעגאנגען צו רעדוצירן די ריזיקירן פון פייַער, עלעקטריש קלאַפּ און שאָדן צו מענטשן, אַרייַנגערעכנט די פאלגענדע:
- לייענען אַלע ינסטראַקשאַנז איידער איר נוצן דעם אַפּפּליאַנסע.
- דו זאלסט נישט פאַרבינדן הייס סערפאַסיז. ניצן כאַנדאַלז אָדער נאַבז.
- כדי צו באַשיצן קעגן עלעקטרישע קלאַפּן, טונקט נישט איין דעם שנור, פּלאַגז, אדער דעם אַפּאַראַט אין וואַסער אדער אַנדערע פליסיקייטן.
- נאָענט השגחה איז נייטיק ווען קיין אַפּפּליאַנסע איז געניצט דורך אָדער לעבן קינדער.
- אָפּשטעקן די ווענטיל ווען ניט אין נוצן און איידער רייניקונג. לאָזן צו קילן איידער איר שטעלן אויף אָדער נעמען אַוועק טיילן.
- דו זאלסט נישט אַרבעטן קיין אַפּפּליאַנסע מיט אַ דאַמידזשד שנור אָדער צאַפּן, אָדער נאָך די אַפּפּליאַנסע מאַלפאַנגקשאַנז אָדער איז דאַמידזשד אין קיין שטייגער.
- די נוצן פון אַקסעסערי אַטאַטשמאַנץ וואָס זענען נישט רעקאַמענדיד דורך דער פאַבריקאַנט קען פאַרשאַפן ינדזשעריז.
- דו זאלסט נישט נוצן ינ דרויסן.
- דו זאלסט נישט לאָזן די שנור הענגען איבער די ברעג פון טיש אָדער טאָמבאַנק, אָדער אָנרירן הייס סערפאַסיז.
- צי ניט שטעלן אויף אָדער לעבן אַ הייס גאַז אָדער עלעקטריש בורנער, אָדער אין אַ העאַטעד ויוון.
- עקסטרעם וואָרענען מוזן זיין געוויינט ווען מאָווינג אַ אַפּפּליאַנסע מיט הייס ייל אָדער אנדערע הייס ליקווידס.
- שטענדיק צושטעלט דעם שטעקער ערשט צום עלעקטרישן אפאראט, דערנאך שטעקט דעם שנור אריין אין דער וואנט-אויסגאבע. כדי צו אפשטעלן, דרייט יעדן קאנטראל צו 'אויסגעלאשן', און דערנאך נעמט ארויס דעם שטעקער פון דער וואנט-אויסגאבע.
- דו זאלסט נישט נוצן די מיטל פֿאַר אנדערע ווי בדעה נוצן.
3. פּראָדוקט קאַמפּאָונאַנץ
The Nuwave Pro Plus Infrared Oven consists of several key components designed for efficient cooking.

Figure 3.1: The Nuwave Pro Plus Infrared Oven, shown with its instruction manual and a recipe CD.
- מאַכט קאָפּ: אנטהאלט דעם הייצונג עלעמענט, ווענטילאַטאָר, און קאָנטראָל פּאַנעל.
- קופל: A transparent, heat-resistant dome that covers the cooking area.
- קוקינג געשטעל: Used to elevate food for even cooking.
- Base Pan: Collects drippings and holds the cooking rack.
- דיגיטאַל קאָנטראָל פּאַנעל: For setting time, temperature, and other functions.

פיגורע 3.2: נאָענט-אַרויף view of the heating element and internal fan located within the power head.
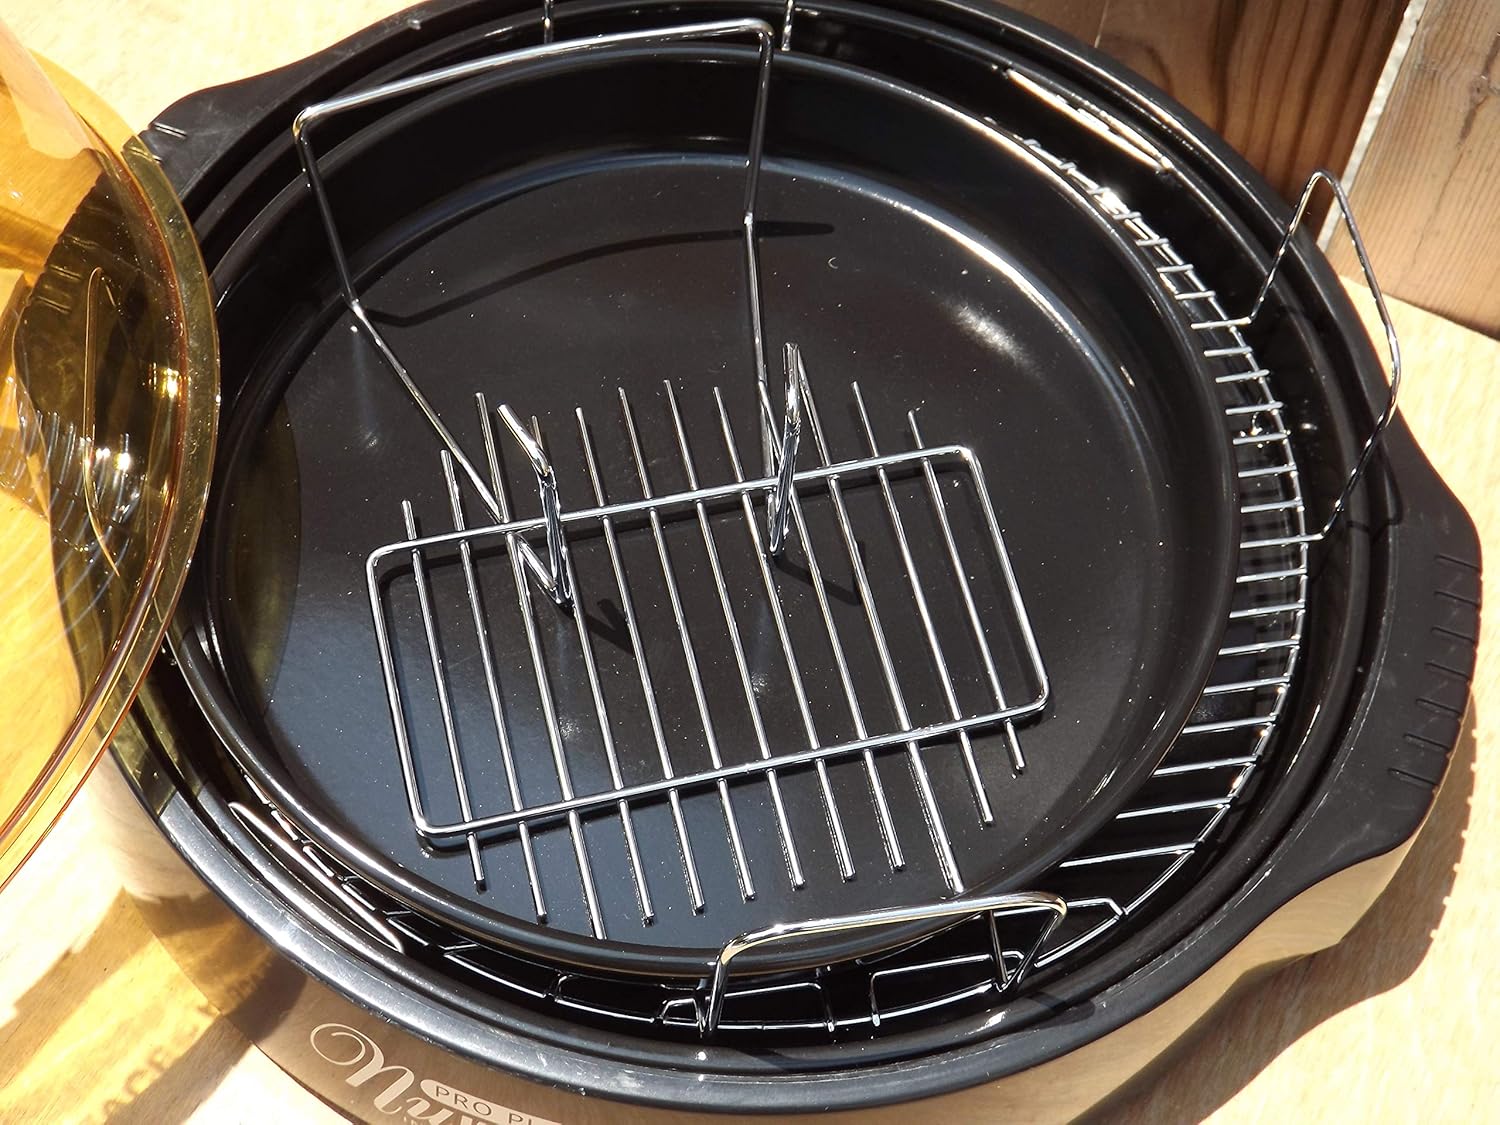
Figure 3.3: The cooking racks positioned within the oven's base pan, ready for food placement.
4. סעטאַפּ
Before first use, ensure all packaging materials are removed and the appliance is assembled correctly.
- אַנפּאַק: קערפאַלי באַזייַטיקן אַלע קאַמפּאָונאַנץ פון די פּאַקקאַגינג.
- ריין: Wash the dome, cooking rack, and base pan with warm, soapy water. Rinse thoroughly and dry completely. The power head should only be wiped with a damp שטאָף.
- אַסעמבאַל: Place the base pan on a stable, heat-resistant surface. Insert the desired cooking rack into the base pan. Place the food on the rack. Carefully position the dome over the base pan. Finally, place the power head securely on top of the dome.
- מאַכט קשר: צאַפּן די מאַכט שנור אין אַ נאָרמאַל 120 וו אַק עלעקטריקאַל ווענטיל.
5. אַפּערייטינג ינסטרוקטיאָנס
The Nuwave Pro Plus Infrared Oven features a digital control panel for precise cooking.

Figure 5.1: The digital control panel with buttons for Cook Time, Cook Temp, Reheat, Warm, Delay, Pause/Clear, Start, and numerical input.
- מאַכט אויף: Once plugged in, the display will illuminate.
- שטעלן קאָכן צייט: Press the 'Cook Time' button. Use the numerical keypad to enter the desired cooking duration in minutes. Press 'Start' to confirm.
- Set Cooking Temperature: Press the 'Cook Temp' button. Use the numerical keypad to enter the desired temperature in degrees Fahrenheit. Press 'Start' to confirm.
- אָנהייב קוקינג: After setting time and temperature, press the 'Start' button to begin the cooking cycle.
- Pause/Clear: To temporarily stop cooking, press 'Pause/Clear'. Press 'Start' to resume. To cancel the current program, press 'Pause/Clear' twice.
- רעהיט פֿונקציע: Press the 'Reheat' button for a preset reheating cycle. Adjust time if necessary using 'Cook Time'.
- וואַרעם פֿונקציע: Press the 'Warm' button to keep food warm after cooking.
- פאַרהאַלטן פֿונקציע: Press the 'Delay' button to set a delayed start time for cooking. Follow on-screen prompts to set the delay duration.
Always monitor food during cooking. Cooking times may vary based on food type, quantity, and desired doneness.
6. וישאַלט און רייניקונג
Regular cleaning ensures optimal performance and extends the life of your Nuwave Pro Plus Infrared Oven.
- אַרויסנעמען און אָפּקילן: Always unplug the oven from the power outlet and allow all components to cool completely before cleaning.
- Dome, Rack, and Base Pan: These components are dishwasher safe or can be washed by hand with warm, soapy water. Use a non-abrasive sponge or cloth. Rinse thoroughly and dry completely.
- מאַכט קאָפּ: The power head contains electrical components and should NEVER be immersed in water. Wipe the exterior with a damp cloth. For stubborn stains, use a mild detergent on the cloth, then wipe with a clean, damp cloth. Ensure it is completely dry before storage or next use.
- סטאָרידזש: האַלט דעם אויוון אין אַ ריינעם, טרוקענעם אָרט ווען ער איז נישט אין באַנוץ.
7. טראָובלעשאָאָטינג
זעט דעם אָפּטייל פֿאַר געוויינטלעכע פּראָבלעמען און זייערע לייזונגען.
| פּראָבלעם | מעגלעך סיבה | לייזונג |
|---|---|---|
| ויוון טוט נישט קער אויף. | נישט איינגעשטאכן; מאַכט אויסtage; דעפעקטיווע אַוטלעט. | זיכער מאַכן אַז דער עלעקטרישער שנור איז גוט איינגעשלאָסן. קאָנטראָלירט דעם קרייז-ברעכער. פּרוּווט אַן אַנדער אַוטלעט. |
| עסן קאָכט נישט גלייך. | Improper food placement; too much food; incorrect temperature/time. | Ensure food is placed on the rack and not directly on the base. Do not overcrowd the oven. Adjust cooking time or temperature as needed. |
| רויך אדער אומגעווענליכער שמעק בעתן אפעראציע. | Food drippings on heating element; residue from previous cooking. | Unplug immediately. Allow to cool and clean all components thoroughly. Ensure no food particles are on the heating element. |
| קאָנטראָל פּאַנעל רעאַגירט נישט. | Temporary electrical glitch; power head not seated correctly. | Unplug the oven for 1 minute, then plug back in. Ensure the power head is securely placed on the dome. |
8. ספּעסאַפאַקיישאַנז
Detailed technical specifications for the Nuwave Pro Plus Infrared Oven.
- סאָרט: Nuwave
- מאָדעל נאָמען: Nu-Wave Oven
- קאָנטראָל טיפּ: Knob (Digital Keypad)
- טיר סטייל: Side Swing (Dome Lift)
- אַרייַנגערעכנט קאַמפּאָונאַנץ: Crumb Tray (Base Pan), Cooking Rack
- ענדיקן טיפּ: פּאַינטעד
- טיר מאַטעריאַל טיפּ: Stainless Steel (referring to internal components/accents)
- מאַכט מקור: אַק אַדאַפּטער
- נומער פון שעלוועס: 1 (Cooking Rack)
- גרייס: מיטל
- נומער וואָג: 14.26 פונט
- פּעקל דימענשאַנז: 15.8 X 14.9 X 12.1 אינטשעס
- ASIN: B00IXC09QC
- UPC: 652185206021
9. וואָראַנטי און שטיצן
For warranty information and customer support, please refer to the documentation included with your purchase or visit the official Nuwave webזייטל. האַלט אייער קויף קוויטל ווי אַ באַווייַז פון קויפן פֿאַר קיין וואָראַנטי קליימז.
For further assistance, you may contact Nuwave customer service directly. Contact details are typically found on the product packaging or the manufacturer's official webפּלאַץ.