
1. פּראָדוקט איבערview
The HP ProDisplay P17A is a 17-inch LED-backlit LCD monitor designed for general computing tasks. It features a 5:4 aspect ratio with a maximum resolution of 1280 x 1024 pixels, providing clear and consistent visuals. This monitor is equipped with both VGA and HDMI connectivity options, offering versatility for various system configurations. Its compact design and energy-efficient LED backlighting make it suitable for a range of environments.

פיגורע 1: פראָנט view of the HP ProDisplay P17A monitor, showcasinג זײַן אַרויסשטעלונג און שטאַנד.
2. סעטאַפּ אינסטרוקציעס
2.1 אַנפּאַקינג די מאָניטאָר
נעמט פֿאָרזיכטיק אַרויס אַלע קאָמפּאָנענטן פֿון דער פּאַקעט. מאַכט זיכער אַז די פֿאָלגנדיקע זאַכן זענען פֿאַראַן:
- HP ProDisplay P17A Monitor
- Monitor Stand (base and neck)
- מאַכט קאַבלע
- VGA Cable (may vary by region/package)
- HDMI Cable (may vary by region/package)
2.2 צוזאַמענשטעלן דעם שטאַנד
- לייגט דעם מאָניטאָר מיטן פּנים אַראָפּ אויף אַ ווייכער, ריינער ייבערפלאַך צו פאַרמייַדן קראַצן.
- Attach the stand neck to the back of the monitor, aligning the tabs and pushing until it clicks into place.
- Attach the stand base to the bottom of the stand neck, securing it with the captive screw if present.
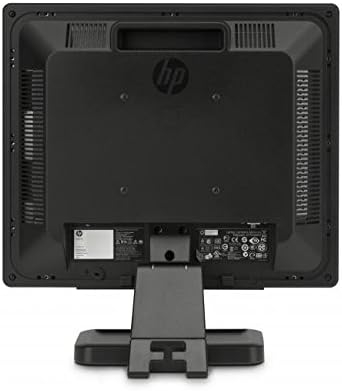
פיגורע 2: דערציען view of the monitor, illustrating the stand attachment point and various connectivity ports.
2.3 קאַנעקטינג קאַבלעס
- מאַכט קשר: פֿאַרבינדט דעם מאַכט קאַבל צום מאָניטאָר'ס מאַכט אַרייַנגאַנג און דערנאָך צו אַ געערדטער עלעקטרישער ווענטיל.
- ווידעא קשר:
- For VGA: Connect one end of the VGA cable to the VGA port on the monitor and the other end to the VGA port on your computer. Tighten the screws on the VGA connector.
- For HDMI: Connect one end of the HDMI cable to the HDMI port on the monitor and the other end to the HDMI port on your computer.
- מאַכן זיכער אַז אַלע קאַנעקשאַנז זענען זיכער.
3. אַפּערייטינג ינסטרוקטיאָנס
3.1 פּאַוערינג אויף / אַוועק
דריק דעם מאַכט קנעפּל וואָס געפינט זיך אויף דער פראָנט בעזעל פון דעם מאָניטאָר צו עס אנצינדן אָדער אויסלעשן. די מאַכט אינדיקאַטאָר ליכט וועט זיך אָנצינדן ווען דער מאָניטאָר איז אנגעצינדן.
3.2 Adjusting Display Settings (OSD Menu)
The On-Screen Display (OSD) menu allows you to adjust various monitor settings. Use the buttons on the front bezel to navigate and select options.
- מעניו קנעפּל: אָפּענס די OSD מעניו.
- נאַוויגאַציע קנעפּלעך (+ / - or Up/Down): Move through menu options and adjust values.
- אויסקלייַבן / OK קנעפּל: באַשטעטיקט אַן אויסוואַל אָדער גייט אַרײַן אין אַ סובמעניו.
- אַרויסגאַנג קנעפּל: פֿאַרלאָזט דעם איצטיקן מעניו אָדער OSD.
געוויינטלעכע אַדזשאַסטאַבאַל סעטטינגס אַרייַננעמען:
- ברייטנאַס / קאַנטראַסט: Adjusts the overall luminance and difference between light and dark areas.
- קאָליר קאָנטראָל: Allows adjustment of color temperature, RGB levels, or preset color modes.
- אַרייַנשרייַב אויסקלייַבן: Manually switches between VGA and HDMI input sources.
- בילד קאָנטראָל: Adjusts sharpness, aspect ratio, and auto-adjustment for analog signals.
- פאַרוואַלטונג: Power-saving options, OSD timeout, language selection.
4. וישאַלט
4.1 רייניקונג די מאָניטאָר
- שטענדיק אויסלעשן דעם מאָניטאָר און אַרויסציען דעם עלעקטרישן שנור איידער איר רייניגט עס.
- ניצן אַ ווייך, לינט-פֿרייַ שטאָף לייטלי דampגעוואשן מיט וואַסער אָדער אַ ניט-אַברייסיוו פאַרשטעלן רייניגער.
- שפריצט נישט קיין רייניגער גלייך אויפן עקראַן אדער מאָניטאָרasing.
- Avoid using benzene, thinner, ammonia-based cleaners, or abrasive materials, as these can damage the surface.
4.2 אַלגעמיינע קער
- ויסמיידן פּלייסינג די מאָניטאָר אין דירעקט זונשייַן אָדער לעבן היץ קוואלן.
- זיכער מאַכן אַז עס איז גענוג ווענטילאַציע אַרום דעם מאָניטאָר.
- דו זאלסט נישט פאַרשפּאַרן ווענטאַליישאַן אָופּאַנינגז.
- באַשיצן דעם עקראַן פון שאַרפע אָביעקטן אָדער איבערגעטריבענעם דרוק.
5. טראָובלעשאָאָטינג
Before contacting support, try the following basic troubleshooting steps:
5.1 קיין בילד נישט אויפן עקראַן
- Ensure the monitor's power cable is securely connected to both the monitor and a working electrical outlet.
- Verify the power indicator light on the monitor is on. If not, press the power button.
- Check that the video cable (VGA or HDMI) is securely connected to both the monitor and the computer.
- Ensure the correct input source is selected on the monitor (use the OSD menu to switch inputs).
- ריסטאַרט דיין קאָמפּיוטער.
5.2 שלעכטע בילד קוואַליטעט
- Fuzzy or Blurry Image: זיכער מאַכן אַז די דיספּליי רעזאָלוציע אויף דיין קאָמפּיוטער איז געשטעלט צו די מאָניטאָר'ס נאַטירלעכע רעזאָלוציע (1280 x 1024).
- אומרעכטע פארבן: Adjust color settings through the OSD menu or your computer's display settings.
- Image Off-Center/Incorrect Size (VGA only): Use the "Auto Adjust" function in the OSD menu.
- פליקער: Check the refresh rate setting on your computer; ensure it is set to 60 Hz.
5.3 Monitor Not Responding to Buttons
- Unplug the monitor's power cable, wait 10 seconds, then plug it back in and try again.
- Ensure no buttons are stuck.
6. טעכניש ספּעסאַפאַקיישאַנז
| שטריך | באַשרייַבונג |
|---|---|
| סאָרט | HEWLETT PACKARD |
| מאָדעל נאָמען | HP P17A |
| מאָדעל נומער | F4M97AAABA |
| פאַרשטעלן גרייס | 17 אינטשעס |
| ווייַז טיפּ | געפירט באַקקליט לקד |
| געבוירן האַכלאָטע | 1280 X 1024 (SXGA) |
| אַספּעקט פאַרהעלטעניש | 5:4 |
| קאַנטראַסט פאַרהעלטעניש | 1000:1 |
| דערפרישן קורס | 60 הז |
| ענטפער צייט | 5 מיליסעקאַנדז |
| Viewינג אַנגלע | 170 דיגריז |
| קאַנעקטיוויטי | 1x VGA, 1x HDMI |
| מאַכט קאַנסאַמשאַן | 25 וואטס (מאקסימום) |
| נומער דימענשאַנז (ד רענטגענ וו רענטגענ ה) | 8.12"ד רענטגענ 14.85"וו רענטגענ 15.24"ה |
| פּונקט וואָג | 8.2 פונט |
| מאַונטינג טיפּ | וואַנט מאָונט (VESA קאָמפּאַטיבל) |
| נאָך פֿעיִקייטן | אַנטי גלער פאַרשטעלן |

Figure 3: Dimensions of the HP ProDisplay P17A monitor.
7. וואָראַנטי און שטיצן
7.1 וואָראַנטי אינפֿאָרמאַציע
This product is often sold as a refurbished item. Refurbished products typically come with a limited warranty provided by the refurbisher or seller. Please refer to your purchase documentation for specific warranty terms and conditions, including duration and coverage details.
7.2 טעכניש שטיצן
For technical assistance, troubleshooting beyond this manual, or warranty claims, please contact the vendor or HP customer support. Have your monitor's model number (F4M97AAABA) and serial number ready when contacting support.
You can find additional support resources, drivers, and documentation on the official HP support webפּלאַץ.