
סופּערסאַניק סק-25
SuperSonic SC-25 2.0 Channel DVD Player with USB Input User Manual
מאָדעל: סק-25
הקדמה
א דאנק פארן קויפןasing the SuperSonic SC-25 2.0 Channel DVD Player with USB Input. This manual provides essential information for the safe and efficient operation of your new device. Please read it thoroughly before use and retain it for future reference.
זיכערקייַט פּריקאָשאַנז
- שטעלט נישט אויס דעם אַפּאַראַט צו רעגן אָדער פייכטקייט כּדי צו פאַרמייַדן פייער אָדער עלעקטרישע קלאַפּן.
- נישט עפענען דעם סיasinז. איבערגעבן אלע סערוויסינג צו קוואַליפֿיצירטע פּערסאָנעל.
- פאַרזיכערן געהעריק ווענטאַליישאַן אַרום די אַפּאַראַט.
- פֿאַרמײַדן צו שטעלן דעם אַפּאַראַט אויף נישט־סטאַבילע ייבערפֿלאַכן.
- טרענט אפ דעם עלעקטרישן שנור בעת בליץ-שטורעמס אדער ווען עס ווערט נישט גענוצט פאר לאנגע צייטן.
פּעקל אינהאַלט
Before setup, please verify that all items are present:
- 1 SuperSonic SC-25 DVD Player Unit
- 1 רימאָוט קאָנטראָל
- 1 באַניצער מאַנואַל (דאָס דאָקומענט)
- מאַכט קאַבלע
- Audio/Video (AV) Cable
סעטאַפּ אינסטרוקציעס
1. Connecting to a Television
- Ensure both the DVD player and your television are powered off.
- Connect one end of the AV cable (red, white, yellow connectors) to the corresponding output jacks on the back of the DVD player.
- Connect the other end of the AV cable to the corresponding input jacks on your television.
- For optimal video quality, ensure the television input is set to the correct AV channel (e.g., Video 1, AV1). The player supports NTSC video format.
2. מאַכט קאַנעקשאַן
- Plug the power cable into the AC IN port on the back of the DVD player.
- שטעקט אריין דעם אנדערן עק פונעם עלעקטרישן קאבל אין א געווענליכן עלעקטרישן אויסגאבע.
3. ערשטע איינשאַלטונג
- Press the Power button on the front panel of the DVD player or on the remote control.
- Turn on your television and select the correct input source (e.g., AV1, Video 1) to see the DVD player's display.
אַפּערייטינג ינסטראַקשאַנז
1. דיסק ווידערשפּיל
- Press the OPEN/CLOSE button on the front panel or remote control to open the disc tray.
- Place a compatible disc (DVD, CD, VCD, SVCD, MP3, Picture CD, CD-R, CD-RW) onto the disc tray with the label side facing up.
- Press the OPEN/CLOSE button again to close the disc tray. The player will automatically begin reading the disc.
- Use the PLAY, PAUSE, STOP, FAST FORWARD, and REWIND buttons on the remote control to manage playback.
- The player supports multi-level fast forward and backward scan functionalities.
2. וסב פּלייַבאַקק
- Insert a USB flash drive into the USB input port on the front of the DVD player.
- The player should automatically detect the USB device and display its contents. If not, use the SOURCE or USB button on the remote to switch to USB mode.
- נאַוויגירן דורך דיין files using the arrow keys and SELECT/ENTER button on the remote.
- The player supports MP3 file format for audio playback.
3. Language and Subtitle Settings
- During DVD playback, press the AUDIO button on the remote to cycle through available audio languages (up to 8 languages supported).
- Press the SUBTITLE button on the remote to cycle through available subtitle languages (up to 32 subtitles supported).
וישאַלט
1. רייניקן דעם אַפּאַראַט
- Wipe the exterior of the DVD player with a soft, dry cloth.
- Do not use liquid cleaners or aerosol sprays, as they may damage the finish or internal components.
2. Cleaning Discs
- האַלט אָן די דיסקס ביי זייערע ברעגן צו פֿאַרמייַדן פֿינגער־אָפּדרוקן.
- אויב אַ דיסק איז שמוציק, ווישט עס אָפּ לײַכט פֿון צענטער אַרויס מיט אַ ווייכן, לינט-פֿרײַעם שטאָף.
- Do not use abrasive cleaners or solvents on discs.
3. סטאָרידזש
- Store the DVD player in a cool, dry place away from direct sunlight and extreme temperatures.
- When not in use, store discs in their cases to protect them from dust and scratches.
טראָובלעשאָאָטינג
| פּראָבלעם | מעגלעך סיבה | לייזונג |
|---|---|---|
| קיין מאַכט | עלעקטרישע שנור נישט פארבונדן; עלעקטרישע ווענטיל נישט אקטיוו. | זיכער מאַכן אַז דער עלעקטרישער שנור איז גוט איינגעשלאָסן. פּרוביר די אַוטלעט מיט אַן אַנדער מיטל. |
| קיין בילד אָדער געזונט | AV cables incorrectly connected; Incorrect TV input selected. | Check AV cable connections. Select the correct input source on your TV. |
| די דיסק איז נישט פּלייינג | Disc is dirty or scratched; Disc is incompatible; Disc inserted incorrectly. | Clean the disc. Ensure the disc type is supported. Insert disc with label side up. |
| USB מיטל נישט דערקענט | USB device not properly inserted; Unsupported file format on USB. | Re-insert the USB device. Ensure fileס זענען אין mp3 פֿאָרמאַט. |
ספּעסאַפאַקיישאַנז
- סאָרט: סופּערסאַניק
- מאָדעל נומער: סק-25
- מעדיע טיפּ: CD, DVD (Compatible with DVD/CD/VCD/SVCD/MP3/Picture/CD-R/CD-RW)
- קאַנעקטיוויטי טעכנאָלאָגיע: Powerline (Implies standard AC power connection)
- קאָליר: שוואַרץ
- נומער וואָג: 1.9 פונט
- קאַמפּאַטאַבאַל דעוויסעס: טעלעוויזיע
- Input Video Compatibility: NTSC
- נומער פון טשאַנאַלז: 2
- אַנאַלאָג ווידעא פֿאָרמאַט: NTSC
- קאָנטראָללער טיפּ: ווייַט קאָנטראָל
- File Format (USB): mp3
- UPC: 639131000254
- פאַבריקאַנט: SUPERSONIC INC.
- פּעקל דימענשאַנז: 7.874 ה x 24.13 ל x 24.13 וו (סענטימעטער)
- פּעקל וואָג: 2.160 פונט
- לאַנד פון אָריגין: כינע
וואָראַנטי און שטיצן
This SuperSonic SC-25 DVD Player is covered by a פאַבריקאַנט וואָראַנטי. For specific details regarding warranty terms and conditions, please refer to the documentation included with your purchase or contact SuperSonic customer support.
For technical assistance or customer service inquiries, please visit the official SuperSonic website or contact their support channels. Keep your purchase receipt for warranty claims.
פּראָדוקט איבערview
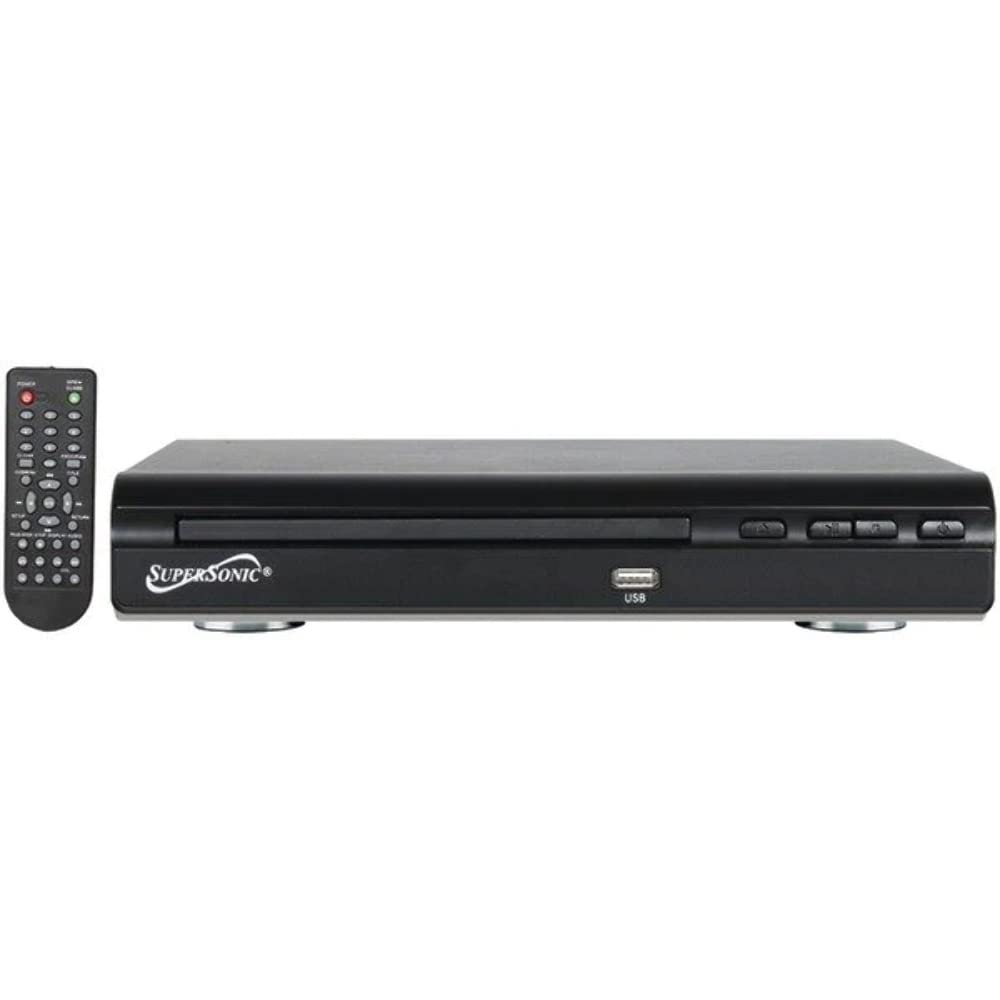
פראָנט view of the SuperSonic SC-25 DVD player, showing the disc tray, USB port, and control buttons.
Ask a question about this manual
Ask about setup, troubleshooting, compatibility, parts, safety, or missing instructions. Manuals+ will review the question and use this page’s manual context to help answer it.