
ICY DOCK MB996SP-6SB
ICY DOCK ToughArmor MB996SP-6SB User Manual
Full Metal 6 x 2.5" SAS/SATA HDD/SSD Mobile Rack Enclosure for 5.25" Bay
Model: MB996SP-6SB
הקדמה
This manual provides detailed instructions for the installation, operation, and maintenance of your ICY DOCK ToughArmor MB996SP-6SB mobile rack enclosure. This device is designed to fit six 2.5-inch SAS/SATA HDDs or SSDs (from 5mm to 9.5mm in height) into a single external 5.25-inch bay, offering a robust solution for high-performance RAID applications in various computing environments.
1. סעטאַפּ
1.1 פּעקל אינהאַלט
איידער איר גייט ווייטער מיט דער אינסטאַלאַציע, ביטע זיכער מאַכן אַז אַלע קאָמפּאָנענטן זענען פאַראַן אין דער פּאַקעט:
- MB996SP-6SB Enclosure
- Hard Drive Trays (6 units)
- Mounting Screws for Enclosure
- Mounting Screws for Drives
- 2x 4-pin to 15-pin SATA Power Adapters
- באַניצער מאַנואַל

פיגורע 1.1: Package Contents. The image displays the MB996SP-6SB enclosure, two bags of screws (for trays and case), two 4-pin to 15-pin power adapters, and the user manual.
1.2 Physical Installation of the Enclosure
- Prepare your computer case: Ensure your computer is powered off and unplugged. Open the computer case to access the 5.25-inch drive bays.
- Insert the enclosure: Slide the MB996SP-6SB enclosure into an available external 5.25-inch drive bay. Ensure it is fully seated and aligned with the screw holes.
- Secure the enclosure: Use the provided mounting screws to secure the enclosure to the computer case. Typically, four screws are used, two on each side.

פיגורע 1.2: פראָנט view of the ICY DOCK ToughArmor MB996SP-6SB enclosure, showing six drive bays with green activity LEDs, ready for drive installation.
1.3 Drive Installation (EZ-Slide Mini Tray System)
The MB996SP-6SB utilizes a removable EZ-Slide Mini tray system for easy drive installation and maintenance.
- Remove a drive tray: Press the release latch on the front of an empty drive bay and pull the tray out.
- Install the 2.5" drive: Place your 2.5-inch SAS/SATA HDD or SSD into the tray. Ensure the drive's connectors align with the tray's internal connectors. Secure the drive to the tray using the provided screws from the bottom of the tray. The enclosure supports drives from 5mm to 9.5mm in height.
- Insert the tray: Slide the loaded drive tray back into the enclosure until it clicks into place. The Eagle-Hook mechanism will secure the drive, preventing accidental ejection and reducing vibration.

פיגורע 1.3: Drive Insertion. An illustration showing a 2.5-inch hard drive being slid into one of the EZ-Slide Mini trays of the enclosure.

פיגורע 1.4: Eagle-Hook Mechanism. A three-step diagram illustrating how the Eagle-Hook mechanism unlocks, moves, and locks a drive tray, protecting it from movement and vibration.

פיגורע 1.5: Sturdy Drive Trays. An image showing the underside of a drive tray with screws securing a 2.5-inch drive, highlighting the heavy-duty metal construction and EMI grounding points.
1.4 קאַנעקטינג קאַבלעס
After installing the enclosure and drives, connect the necessary data and power cables.
- SATA דאַטן קייבאַלז: Connect one 7-pin SATA data cable (not included) from each installed drive bay on the rear of the enclosure to an available SATA port on your motherboard or RAID controller. The enclosure supports SATA 6Gbps or SAS 12Gbps (single channel).
- מאַכט קאַבלעס: Connect the two 15-pin SATA power connectors on the rear of the enclosure to your power supply unit (PSU). If your PSU only has 4-pin Molex connectors, use the included 4-pin to 15-pin power adapters.

פיגורע 1.6: Rear Connections. The image displays the rear panel of the enclosure with six SATA data ports (SATA-1 to SATA-6), two power input ports (POWER-1, POWER-2), a fan, and a fan speed control switch. Also shown are the included 4-pin to 15-pin power adapters and a representation of a 7-pin SATA data cable.
2. אַפּערייטינג ינסטרוקטיאָנס
2.1 Powering On and Drive Activity
Once all connections are secure, power on your computer. The enclosure features Active Power Technology:
- Each drive bay has an LED indicator that illuminates when a drive is inserted and powered.
- The cooling fan will also become active only when a drive is inserted into the enclosure.
פיגורע 2.1: Active Power Technology. This image illustrates the enclosure with drives inserted (HDD IN), showing the fan spinning and LEDs active, compared to an enclosure with drives removed (HDD OUT), where the fan is off and LEDs are inactive.
2.2 פאַן ספּיד קאָנטראָל
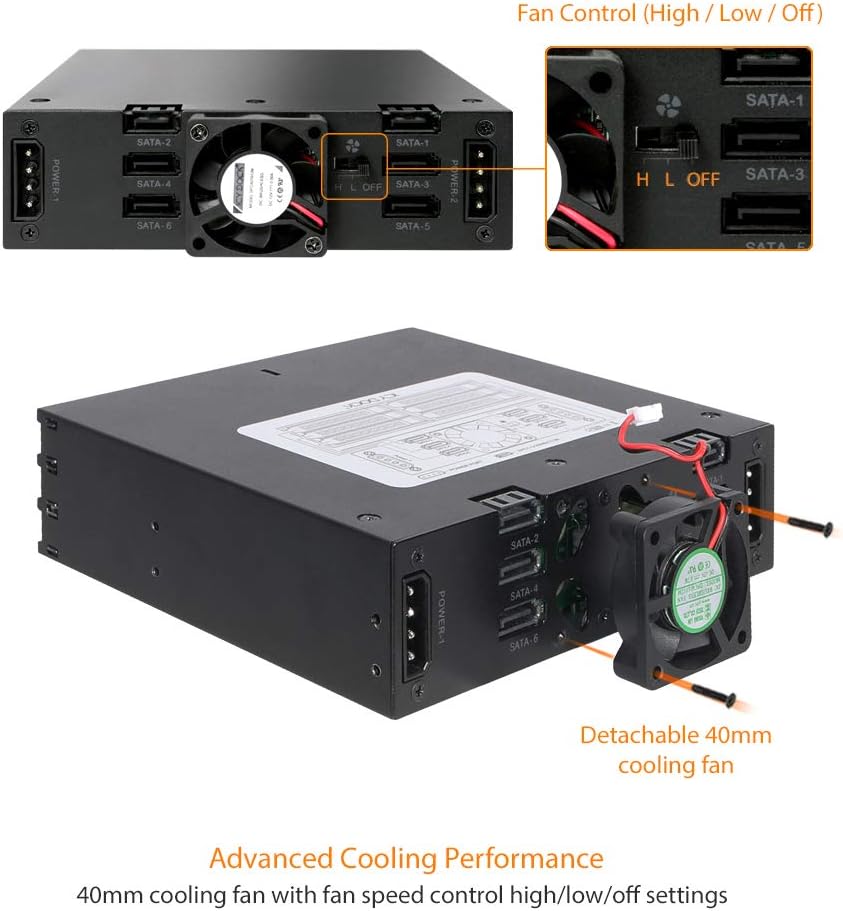
The MB996SP-6SB includes a 40mm cooling fan with a 3-mode fan speed control switch located on the rear panel. This allows you to adjust cooling settings based on your needs:
- H (הויך): Provides maximum cooling performance.
- ל (נידעריק): Offers quieter operation with reduced airflow.
- OFF: Disables the fan entirely. This setting is generally recommended only for SSDs, which generate less heat than HDDs.

פיגורע 2.2: Fan Control. The image shows the rear of the enclosure with a close-up of the fan and the 'H L OFF' switch for fan speed control. It also depicts the detachable 40mm cooling fan.
3. וישאַלט
3.1 Drive Removal
To remove a drive, ensure the system is prepared for hot-swapping if enabled, or power down the system if not. Press the release latch on the front of the desired drive bay and pull the tray out. The EZ-Slide Mini tray system allows for quick and easy drive replacement.
3.2 רייניקונג
Periodically, you may need to clean the enclosure to ensure optimal performance and airflow. Use a soft, dry cloth to wipe down the exterior. For internal cleaning, especially the fan, ensure the system is powered off and unplugged. Use compressed air to gently remove dust from the fan blades and vents. Avoid using liquid cleaners directly on the device.
4. טראָובלעשאָאָטינג
- דרייוו נישט דעטעקטירט:
- Ensure the drive tray is fully inserted and locked into the bay.
- Verify that both SATA data and power cables are securely connected to the enclosure and the computer's motherboard/PSU.
- Check the drive itself by testing it in another known working enclosure or directly connecting it to the motherboard.
- Confirm that the drive is properly seated and screwed into the EZ-Slide Mini tray.
- Fan is noisy or not spinning:
- Check the fan speed control switch on the rear of the enclosure. Ensure it is not set to 'OFF' if cooling is desired.
- If the fan is noisy, try setting it to 'L' (Low) mode.
- Ensure a drive is inserted into the enclosure, as the fan activates with Active Power Technology.
- Clean any dust accumulation from the fan blades.
- לאַנגזאַמע דאַטן טראַנספער גיכקייטן:
- Ensure you are using SATA 6Gbps compatible drives and SATA data cables.
- Verify that your motherboard or RAID controller supports SATA 6Gbps or SAS 12Gbps.
- Check for proper driver installation for your SATA/SAS controller.
- Enclosure not fitting in 5.25" bay:
- Ensure the 5.25" bay is clear of obstructions.
- Some cases may require removal of a front bezel or adapter.
5. ספּעסאַפאַקיישאַנז
| שטריך | באַשרייַבונג |
|---|---|
| מאָדעל נומער | MB996SP-6SB |
| פאָר קאַמפּאַטאַבילאַטי | 6 x 2.5" SAS/SATA HDD/SSD (5mm to 9.5mm height) |
| האָסט צובינד | 7-pin SATA (x6) |
| דרייוו טיפּ | 2.5" SAS/SATA HDD/SSD |
| אַריבערפירן קורס | Up to 6 Gbps (SATA) / 12 Gbps (SAS, single channel) |
| מאַכט קאַנעקטער | 15-pin SATA Power (x2) |
| קאָאָלינג סיסטעם | 40mm cooling fan with 3-mode speed control (H/L/OFF) |
| מאַטעריאַל | Full Metal Construction |
| דימענסיעס (L X W X H) | 5.25"ל x 5.75"ברייט x 1.63"ה (אומגעפער 133.35 x 146.05 x 41.4 מ"מ) |
| וואָג | 1.7 פונט (אומגעפער 0.77 ק"ג) |
| Compatible Bay | Single external 5.25" bay |
6. וואָראַנטי אינפֿאָרמאַציע
The ICY DOCK ToughArmor MB996SP-6SB comes with an industry-leading 5-יאָר לימיטעד וואָראַנטי. This warranty covers defects in materials and workmanship under normal use. For specific terms and conditions, please refer to the official ICY DOCK webפּלאַץ אָדער קאָנטאַקט קונה שטיצן.
7. שטיצן
For further assistance, technical support, or to download the latest drivers and firmware, please visit the official ICY DOCK website. You can also access the official user manual in PDF format:
דאַונלאָוד באַניצער מאַנואַל (PDF)
For direct customer support, please refer to the contact information provided on the ICY DOCK official webפּלאַץ.
Ask a question about this manual
Ask about setup, troubleshooting, compatibility, parts, safety, or missing instructions. Manuals+ will review the question and use this page’s manual context to help answer it.