
1. הקדמה
This manual provides detailed instructions for the assembly, operation, and maintenance of your Sauder Palladia Credenza, Model 412079. Please read all instructions carefully before beginning assembly or use to ensure proper function and longevity of your furniture.
שליסל פֿעיִקייטן:
- Top surface with full-length cord pass-through for convenient device charging.
- Sliding top and faux drawer fronts on full-extension ball bearing slides, revealing compartmentalized storage for electronics.
- Adjustable shelf behind each door for flexible storage configurations.
- Storage areas behind doors designed to accommodate computer or media components.
- Pull-out, adjustable center shelf for printer or other office equipment.
2. זיכערקייַט אינפֿאָרמאַציע
ביטע האַלטן די פאלגענדע זיכערהייט גיידליינז בעת אַסעמבאַלינג און נוצן:
- צוויי-מענטש פֿאַרזאַמלונג רעקאָמענדירט: Due to the size and weight of the components, assembly by two adults is strongly recommended to prevent injury and damage to the product.
- ניצן אויף גלייכער ייבערפלאַך: Assemble and place the credenza on a flat, level surface to ensure stability and prevent tipping.
- געהעריק ליפטינג טעקניקס: When moving the credenza, lift with your legs, not your back, and seek assistance for heavy components.
- זיכער מאַכן אַלע פאַסטערז: Ensure all screws, cams, and other fasteners are securely tightened according to the assembly instructions. Periodically check and retighten as needed.
- וואָג לימאַץ: Do not exceed the recommended weight limits for shelves and the top surface. Overloading can cause structural failure.
- שנור מאַנאַגעמענט: Utilize the integrated cord management features to prevent tripping hazards and ensure proper ventilation for electronic devices.
- קינדער און פּעץ: האַלט קליינע קינדער און חיות אַוועק פון דער פֿאַרזאַמלונג געגנט. קליינע טיילן קענען זיין אַ דערשטיקונג געפאַר.
3. פּעקל אינהאַלט
Verify that all components are present before beginning assembly. Refer to the included assembly instructions for a detailed list of parts and hardware.
- פֿאַרזאַמלונג ינסטראַקשאַנז
- Hardware kit (screws, cams, dowels, etc.)
- Engineered wood panels and components
4. אַסעמבלי אינסטרוקציעס
Assembly is required for this product. Please follow the step-by-step instructions provided in the separate assembly manual included in your package. The process typically involves:
- אַנפּאַק און דורכקוק: Carefully unpack all components and inspect for any damage. Report any damaged or missing parts immediately to customer support.
- ידענטיפיצירן טיילן: Lay out all panels and hardware, matching them to the diagrams in the assembly manual.
- צוזאַמענשטעלן באַזע סטרוקטור: Begin by assembling the main frame and base of the credenza.
- Install Shelves and Dividers: Insert fixed and adjustable shelves, and any internal dividers.
- Attach Door Hinges and Doors: Secure hinges to the doors and then attach doors to the credenza frame. Adjust as necessary for proper alignment.
- Install Sliding Mechanisms: Attach the full-extension ball bearing slides for the top and faux drawer fronts.
- צוטשעפּען הינטערשטע פּאַנעל: Secure the back panel to the credenza.
- לעצטע טינגז: Install handles, level the unit, and clean any dust or debris.

Figure 4.1: Product Dimensions. The credenza measures 29.61 inches in height, 62.05 inches in width, and 22.01 inches in depth.

Figure 4.2: Detail of the full-extension ball bearing slide. These slides ensure smooth operation of the sliding top and faux drawer fronts.
5. אַפּערייטינג ינסטרוקטיאָנס
5.1. Sliding Top and Hidden Storage
The top surface of the credenza, along with the two faux drawer fronts, is designed to slide forward on full-extension ball bearing slides. This action reveals a hidden compartment for cord management and storage of electronic devices such as laptops, tablets, and phones.
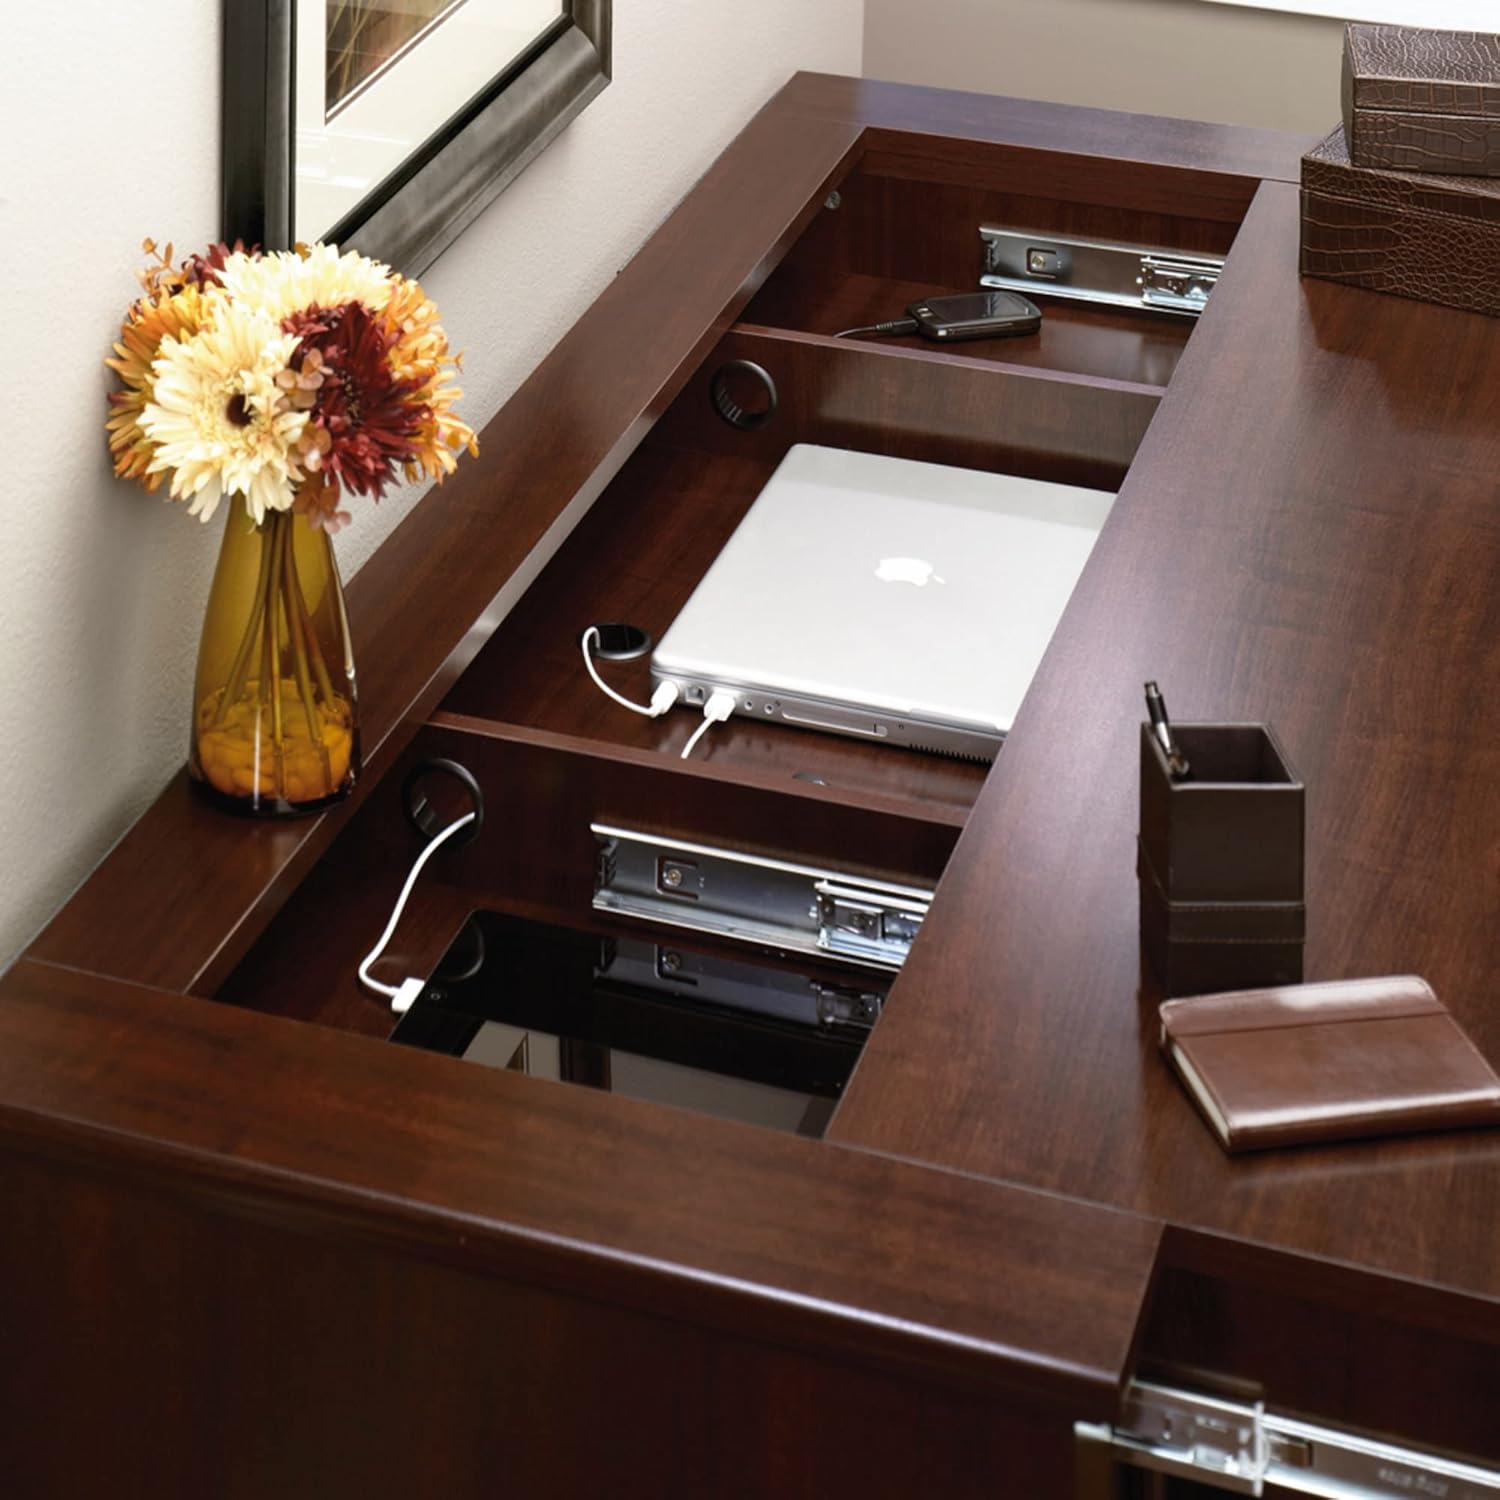
Figure 5.1: The credenza top slides open to reveal a spacious storage area, ideal for laptops and other devices.
5.2. Cord Management and Charging
The hidden compartment includes integrated cord pass-throughs to facilitate easy tabletop charging of mobile devices. Route power cords through these openings to keep your charging area organized and clutter-free.

Figure 5.2: Integrated cord management allows for neat routing of charging cables for various devices.
5.3. אַדזשאַסטאַבאַל שעלוועס
Behind each of the two doors, there is a storage area with an adjustable shelf. To adjust the shelf height, remove the shelf and reposition the shelf pins to the desired level. Ensure all four pins are securely inserted before placing the shelf back.
5.4. Pull-Out Printer Shelf
The center section of the credenza features a pull-out shelf, specifically designed to accommodate a printer or other office equipment. This shelf also offers adjustability for optimal positioning.

Figure 5.3: The pull-out shelf provides easy access for a printer or other office devices.
6. וישאַלט
6.1. רייניקונג
- ווישן סערפאַסיז מיט אַ ווייך, דamp שטאָף. פֿאַרמײַדט שרײַבנדיקע רייניקונגס־מיטלען אָדער שאַרפֿע כעמיקאַלן, וואָס קענען שאַטן דעם ענדיקונג.
- פֿאַר פֿאַרגיסונגען, ווישט גלייך מיט אַ ריינעם, טרוקענעם שטאָף.
6.2. אַלגעמיינע קער
- פֿאַרמײַדט צו לייגן הייסע זאַכן גלייך אויף דער ייבערפֿלאַך. ניצט אונטערשטע טיילן אָדער שוץ־פּאַדס.
- Keep the credenza away from direct sunlight and heat sources to prevent fading or warping.
- פּעריִאָדיש קאָנטראָלירן און פֿאַרשטאַרקן אַלע האַרדווער צו ענשור סטרוקטורעלע אָרנטלעכקייט.
7. טראָובלעשאָאָטינג
7.1. Credenza is Wobbly
- Ensure the credenza is placed on a level surface.
- Check all cam locks and screws to ensure they are fully tightened.
7.2. Sliding Top/Drawers Do Not Operate Smoothly
- Inspect the ball bearing slides for any obstructions or debris.
- Ensure the slides are properly aligned and securely attached.
- Avoid overloading the hidden compartment, which can impede movement.
7.3. Doors Are Misaligned
- Adjust the hinges according to the instructions in the assembly manual. Most hinges allow for vertical, horizontal, and depth adjustments.
7.4. פעלנדיקע אדער געשעדיגטע טיילן
- Refer to the warranty and support section for information on obtaining replacement parts.
8. ספּעסאַפאַקיישאַנז
| אַטריביוט | דעטאַל |
|---|---|
| סאָרט | Sauder |
| מאָדעל נומער | 412079 |
| קאָליר | Select Cherry Finish |
| דימענשאַנז (די רענטגענ וו x ה) | 22.01" x 62.05" x 29.61" |
| וואָג | 171 פונט |
| מאַטעריאַל | ענדזשאַנירד האָלץ |
| ענדיקן טיפּ | Select Cherry Finish |
| מאַונטינג טיפּ | Freestanding |
| אָרט טיפּ | לעבעדיק צימער, אָפיס |
| טיר סטייל | Drawer (faux) |
| נומער פון שעלוועס | 2 (אַדזשאַסטאַבאַל) |
| נומער פון קאַמפּאַרטמאַנץ | 2 (behind doors) |
| אַסעמבלי פארלאנגט | יא |
| ספּעציעלע שטריך | Adjustable Shelf, Cord Management, Sliding Top |
9. וואָראַנטי און שטיצן
9.1. וואָראַנטי אינפֿאָרמאַציע
Sauder products typically come with a limited warranty covering defects in materials and workmanship. Please refer to the warranty card included with your product or visit the official Sauder webזייטל פֿאַר ספּעציפֿישע וואָראַנטי טערמינען און באַדינגונגען.
9.2. קונה שטיצן
For assistance with assembly, missing parts, or any other product-related inquiries, please contact Sauder customer support. They offer various support options:
- לעבן שמועסן: On-demand support available through the Sauder webפּלאַץ.
- Assembly Tip Videos: Helpful video guides for assembly.
- פאַרבייַט טיילן: Quick shipping for replacement parts.
- Domestic Call Center: Ready to assist with your questions.
באַזוכן די Sauder Store on Amazon or the official Sauder webזייטל פֿאַר קאָנטאַקט דעטאַלן און ווייטערדיקע שטיצע רעסורסן.
10. פּראָדוקט ווידעאָס
No relevant official product videos from the seller were available for embedding in this manual.