
1. הקדמה
Thank you for choosing the Cameo Light CLMPAR2 Compact LED Light System. This manual provides essential information for the safe and efficient operation of your device. Please read it thoroughly before initial use and keep it for future reference.
The CLMPAR2 is a versatile lighting solution featuring four flat PAR cans, each equipped with 7 super bright 3-watt TRI LEDs. It offers various control modes including DMX, master/slave, and standalone operation, making it suitable for a wide range of applications.
2. זיכערקייַט אינסטרוקציעס
שטענדיק אָבסערווירן די פאלגענדע זיכערהייט מיטלען צו פאַרמייַדן עלעקטרישע קלאַפּ, פייַער אָדער שאָדן:
- לייענען אַלע ינסטראַקשאַנז קערפאַלי איידער אַפּערייטינג די מיטל.
- פאַרזיכערן די מאַכט צושטעלן וואָלtage שטימט מיט די באדערפענישן וואס זענען ספעציפירט אויף דער איינהייט.
- עפֿנט נישט דעם קעסטל. עס זענען נישטאָ קיין טיילן וואָס דער באַניצער קען סערוויסן אינעווייניק. לאָזט איבער אַלע סערוויסינג צו קוואַליפֿיצירטע פּערסאָנעל.
- ויסמיידן דירעקט אויג ויסשטעלן צו די ליכט מקור.
- Keep the device away from moisture, rain, and liquids.
- זיכער מאַכן גענוג ווענטילאַציע אַרום דעם אַפּאַראַט צו פאַרמייַדן איבערהיצונג.
- בארג די מיטל סיקיורלי ניצן די צונעמען ייַזנוואַרג.
- Disconnect from the mains power before cleaning or maintenance.
3. פּעקל אינהאַלט
באַשטעטיקן אַז אַלע זאכן זענען פאַראַן און אין גוטן צושטאַנד ביים אויספּאַקן:
- 4 x Flat PAR Cans with TRI LEDs
- 1 x Light Bar
- 1 x Transport Bag/Case
- 1 x אינסטרוקציע מאַנואַל (דאָס דאָקומענט)
- מאַכט קאַבלע
- Mounting Hardware (e.g., tripod mount adapter)

Image: The Cameo Light CLMPAR2 system neatly packed within its dedicated transport case, showcasing the four PAR cans, the light bar, and accessories.
4. פּראָדוקט איבערview
The Cameo Light CLMPAR2 system consists of a central light bar with four adjustable PAR cans. Each PAR can features 7 x 3W TRI LEDs, capable of producing a wide spectrum of colors.
4.1 פראָנט View

בילד: פראָנט view of the Cameo Light CLMPAR2 LED system. Four individual PAR cans are attached to a horizontal bar, each emitting a different color (yellow, blue, green, purple), demonstrating the TRI-LED capabilities.
4.2 דערציען View און קאַנעקשאַנז

בילד: הינטערשטע view of the Cameo Light CLMPAR2 LED system. The central light bar features the control panel with an LCD display, DMX input/output ports, and power connections. The back of the four PAR cans are also visible.
The rear panel provides access to the control interface and various input/output connections:
- מאַכט אַרייַנשרייַב: פֿאַרבינדט זיך צום הויפּט עלעקטריציטעט.
- DMX IN/OUT: 3-pin XLR connectors for DMX control.
- קאָנטראָל ווייַז: LCD screen for menu navigation and settings.
- קאָנטראָל קנעפּלעך: MODE, ENTER, UP, DOWN for navigating the menu and adjusting settings.
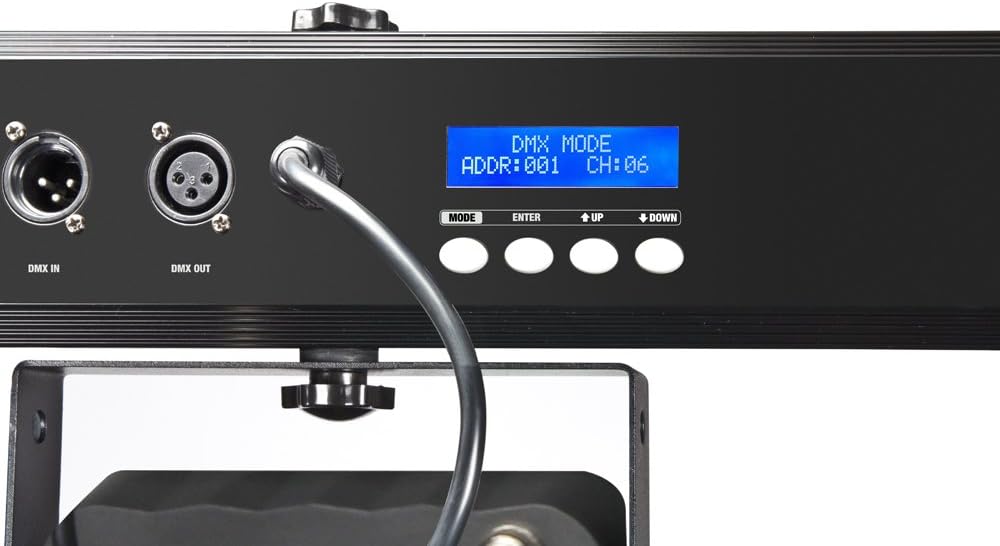
בילד: נאָענט-אַרויף view of the control panel on the Cameo Light CLMPAR2. The LCD display shows "DMX MODE ADDR:001 CH:06", indicating DMX address and channel settings. Buttons for MODE, ENTER, UP, and DOWN are clearly visible.
5. סעטאַפּ
5.1 מאַונטינג
The CLMPAR2 system is designed for easy mounting on a standard lighting tripod or truss system. It includes a tripod mount adapter compatible with 28mm TV outlets.
- Attach the light bar securely to a stable tripod or truss using the provided mounting hardware.
- Ensure all connections are tight and the system is balanced.
- Adjust the angle of each PAR can as desired.

Image: The Cameo Light CLMPAR2 system is shown mounted on a tall, silver tripod. The four PAR cans are illuminated with different colors. A foot controller is visible on the ground, connected to the system.
5.2 מאַכט קאַנעקשאַן
Connect the supplied power cable to the power input on the rear of the light bar, then plug it into a suitable mains power outlet.
6. אָפּעראַציע
The CLMPAR2 offers multiple operating modes:
6.1 סטאַנדאַלאָנע מאָדע
In standalone mode, the system operates using its internal programs without external control. Use the MODE, ENTER, UP, and DOWN buttons on the rear panel to select desired programs, colors, or sound-activated modes.
- דרוק די מאָדע button to cycle through available standalone programs.
- ניצן די UP און אַראָפּ buttons to adjust parameters (e.g., speed, sensitivity).
- דרוק אַרייַן צו באַשטעטיקן סאַלעקשאַנז.
6.2 האר / שקלאַף מאָדע
Connect multiple CLMPAR2 units using DMX cables. Set one unit as the "Master" and others as "Slave" units. The slave units will mirror the master's operation.
- פֿאַרבינדט דעם DMX OUT פֿון דעם Master Unit צום DMX IN פֿון דעם ערשטן Slave Unit.
- Daisy-chain subsequent Slave units by connecting DMX OUT to DMX IN.
- Configure the Master unit to its desired standalone program.
- Set all Slave units to "Slave" mode via their control panels.
6.3 דמקס קאָנטראָל מאָדע
For advanced control, connect the CLMPAR2 to a DMX controller. The system supports various DMX channel modes.
- Connect the DMX OUT of your DMX controller to the DMX IN of the CLMPAR2.
- If using multiple DMX devices, daisy-chain them: DMX OUT of the first device to DMX IN of the next.
- Set a unique DMX start address for each CLMPAR2 unit using the control panel (refer to the display image in Section 4.2).
- Select the desired DMX channel mode (e.g., 3-channel, 6-channel) on the CLMPAR2 control panel to match your DMX controller's settings.
- Consult your DMX controller's manual for specific programming instructions.
7. וישאַלט
Regular maintenance ensures optimal performance and longevity of your CLMPAR2 system.
- רייניקונג: Disconnect the unit from power. Use a soft, lint-free cloth to wipe the exterior. For lenses, use a specialized lens cleaner and cloth. Do not use abrasive cleaners or solvents.
- דורכקוק: Periodically check cables, connectors, and mounting hardware for any signs of wear or damage. Replace damaged components immediately.
- סטאָרידזש: When not in use, store the system in its transport case in a dry, dust-free environment.
8. טראָובלעשאָאָטינג
| פּראָבלעם | מעגלעך סיבה | לייזונג |
|---|---|---|
| קיין מאַכט | Power cable disconnected; faulty outlet | קאָנטראָלירט די פֿאַרבינדונג פֿון דער מאַכט קאַבל; פּרובירט די אַוטלעט מיט אַן אַנדער אַפּאַראַט. |
| Lights not responding to DMX | Incorrect DMX address; wrong DMX mode; faulty DMX cable; DMX controller issue | Verify DMX address and mode settings; check DMX cable connections; test with a different DMX controller or cable. |
| Lights flickering or inconsistent | Loose connections; power fluctuations; DMX signal interference | Check all power and DMX connections; ensure stable power supply; use DMX terminator if necessary. |
| אָוווערכיטינג | Blocked ventilation; prolonged use in high ambient temperature | Ensure clear airflow around the unit; operate in a cooler environment if possible. |
9. ספּעסאַפאַקיישאַנז
| סאָרט | קאַמעאָ |
| מאָדעל נומער | CLMPAR2 |
| פאַבריקאַנט | קאַמעאָ ליכט |
| ליכט מקור | 28 x 3W TRI Colour LEDs (7 LEDs per PAR can) |
| גאַנץ וואַטtage | 3 Watts (per LED, total system wattage not specified but implied by 28x3W) |
| קאָנטראָל מאָדעס | DMX control, Standalone, Master/Slave |
| מאַטעריאַל | אַלומינום |
| מאַכט מקור | מיינס פּאַוערד |
| מאַונטינג טיפּ | Rack mounting, Tripod mount (28mm TV outlets) |
| פּונקט וואָג | 10 קילאָגראַמס |
| פּעקל דימענשאַנז | 110.4 X 37.2 X 17 סענטימעטער |
| ASIN | B007IFHXV4 |
| ערשטער דאַטע בנימצא | 8 אויגוסט |
10. וואָראַנטי און שטיצן
For warranty information and technical support, please refer to the documentation provided with your purchase or visit the official Cameo Light webזייטל. האַלט דיין קויפן באַווייַז פֿאַר וואָראַנטי קליימז.
פאַבריקאַנט: קאַמעאָ ליכט
Webפּלאַץ: www.cameolight.com (עקסampדער לינק, דער פאקטישער לינק קען זיין אנדערש)