
SparkFun 1350
Micro Maestro 6-channel USB Servo Controller User Manual
מאָדעל: 1350
1. הקדמה
The SparkFun Micro Maestro 6-channel USB Servo Controller is a compact and versatile device designed for precise control of servos and general I/O operations. It offers high-performance servo control with 0.25µs resolution, including built-in speed and acceleration control. This controller is suitable for various applications, from robotics to interfacing with sensors and Electronic Speed Controls (ESCs).
It supports three primary control methods: direct USB connection to a computer, TTL serial communication for embedded systems, and internal scripting for autonomous operation without a host controller. Its channels can be configured as servo outputs, digital outputs, or analog inputs, providing flexibility for diverse projects.

Figure 1: The Micro Maestro 6-channel USB Servo Controller, showcasing its compact design with a USB mini-B port and multiple pin headers for connections.
2. סעטאַפּ און ייַנמאָנטירונג
2.1 ייַזנוואַרג קאַנעקשאַנז
Before connecting the Micro Maestro to your computer or embedded system, ensure all necessary components are available:
- Micro Maestro 6-channel USB Servo Controller
- USB A male to 5-pin USB mini-B cable (for USB connection)
- Servos, sensors, or other devices to be controlled
- External power supply (if powering servos or other high-current devices; USB power may be insufficient for multiple servos)
Connect the Micro Maestro to your computer using a USB A male to 5-pin USB mini-B cable. The device will draw power from the USB connection for its internal logic. For powering servos, an external power supply should be connected to the designated power input pins. Refer to the pinout diagram for correct connections.
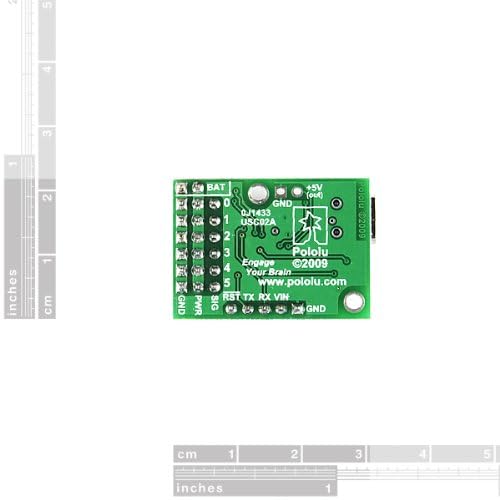
Figure 2: Pinout diagram of the Micro Maestro, indicating connections for battery, ground, 5V output, power input, signal pins, reset, and serial communication (TX/RX).
2.2 ווייכווארג ינסטאַלירונג
To configure and control the Micro Maestro via USB, you will need to install the appropriate software and drivers. These are typically available for download from the manufacturer's official website (Pololu). Follow the instructions provided on their website for your specific operating system (Windows, Linux, macOS).
- Visit the Pololu website and navigate to the Micro Maestro product page.
- Download the latest Maestro Control Center software and drivers.
- Install the drivers first, then the Maestro Control Center application.
- Connect the Micro Maestro to your computer via USB. The operating system should recognize the device.
באַמערקונג: Some operating systems, particularly macOS, may have limited or no official programming support. Verify compatibility on the manufacturer's webפּלאַץ.
3. אַפּערייטינג ינסטרוקטיאָנס
3.1 קאָנטראָל מעטהאָדס
The Micro Maestro supports three main control methods:
- וסב קאָנטראָל: Use the Maestro Control Center software on a computer to directly control servo positions, configure channel settings, and upload scripts.
- TTL Serial Control: Interface with embedded systems (e.g., microcontrollers like Arduino) using TTL (5V) serial commands. This allows for dynamic control from a host device.
- Internal Scripting: Program the Micro Maestro to execute sequences of commands autonomously. Scripts can be uploaded via USB and run without a host computer, making it ideal for self-contained applications.
3.2 קאַנאַל קאַנפיגיעריישאַן
Each of the six channels on the Micro Maestro can be independently configured for different functions:
- Servo Output: For controlling standard RC servos or Electronic Speed Controls (ESCs).
- דיגיטאַל רעזולטאַט: For controlling digital devices (e.g., LEDs, relays).
- אַנאַלאָג אַרייַנשרייַב: For reading analog sensor values (e.g., potentiometers, light sensors).
Configuration is performed using the Maestro Control Center software, where you can set the mode for each channel, define pulse width limits, and adjust other parameters.
3.3 Servo Control Parameters
For servo outputs, the Micro Maestro offers fine-grained control:
- Pulse Width Resolution: 0.25µs for precise positioning.
- דויפעק קורס: Configurable from 33 Hz to 100 Hz.
- Pulse Range: Wide range of 64µs to 3280µs, accommodating various servo types.
- Speed and Acceleration Control: Individual control for each channel to achieve smooth, controlled movements, preventing sudden jerks and extending servo lifespan.
These parameters can be adjusted in the Maestro Control Center software to match the requirements of your specific servos and application.
4. וישאַלט
The Micro Maestro is a robust electronic device, but proper handling and care will ensure its longevity:
- ינווייראַנמענאַל טנאָים: Operate the device within typical indoor temperature and humidity ranges. Avoid extreme temperatures, direct sunlight, and high humidity.
- גשמיות באַהאַנדלונג: Handle the board by its edges to avoid touching components, especially the integrated circuits, which can be sensitive to static discharge.
- רייניקונג: If necessary, gently clean the board with a soft, dry brush or compressed air to remove dust. Do not use liquids or abrasive cleaners.
- מאַכט צושטעלן: Always ensure your external power supply for servos is correctly rated and connected to prevent damage to the board or connected devices. Over-voltagע אדער פארקערטע פּאָלאַריטעט קען פאַראורזאַכן שטענדיקע שאָדן.
5. טראָובלעשאָאָטינג
If you encounter issues with your Micro Maestro, consider the following common troubleshooting steps:
- אפאראט נישט דערקענט דורך קאמפיוטער:
- Ensure the USB cable is securely connected to both the Micro Maestro and your computer.
- Verify that the correct drivers have been installed. Reinstall them if necessary.
- פּרוּווט אַ אַנדערש וסב פּאָרט אָדער קאַבלע.
- ריסטאַרט דיין קאָמפּיוטער.
- Servos Not Responding or Behaving Erratically:
- Check that an adequate external power supply is connected to the Micro Maestro for the servos. USB power alone is often insufficient for multiple or powerful servos.
- Ensure servos are correctly wired to the signal, power, and ground pins.
- Verify servo pulse width settings in the Maestro Control Center match your servo's specifications.
- קוק פֿאַר פרייַ קאַנעקשאַנז אָדער דאַמידזשד ווירעס.
- Maestro Control Center Software Issues:
- Ensure you have the latest version of the software.
- Run the software as an administrator (on Windows) if experiencing permission issues.
- Consult the Pololu forums or documentation for specific software errors.
- Scripting Problems:
- Review your script for syntax errors or logical flaws.
- Use the Maestro Control Center's debugging features to step through the script.
For more detailed troubleshooting guides and community support, visit the official Pololu website and their support forums.
6. ספּעסאַפאַקיישאַנז
| שטריך | דעטאַל |
|---|---|
| מאָדעל נומער | 1350 |
| טשאַנאַלז | 6 (configurable as servo, digital I/O, or analog input) |
| קאָנטראָל מעטהאָדס | USB, TTL Serial (5V), Internal Scripting |
| Servo Pulse Width Resolution | 0.25 µs |
| Configurable Pulse Rate | 33 הז צו 100 הז |
| פּולס קייט | 64µs to 3280µs |
| Speed and Acceleration Control | Individual per channel |
| פּראָדוקט דימענשאַנז | 0.85" x 1.20" (21.6 mm x 30.5 mm) |
| וואָג | 0.11 אונס (בעערעך 3.1 גראַמז) |
| פאַבריקאַנט | Pololu |
| ערשטער דאַטע בנימצא | 13טן דעצעמבער 2010 |

Figure 3: The Micro Maestro shown alongside a US quarter coin, illustrating its compact size.
7. וואָראַנטי און שטיצן
For warranty information, technical support, and additional resources, please refer to the official website of the manufacturer, Pololu, or the brand, SparkFun. Their websites provide comprehensive documentation, FAQs, forums, and contact information for customer assistance.
פאַבריקאַנט: Pololu
סאָרט: SparkFun
For the latest support resources, visit the SparkFun Store on Amazon or the official Pololu webפּלאַץ.
Ask a question about this manual
Ask about setup, troubleshooting, compatibility, parts, safety, or missing instructions. Manuals+ will review the question and use this page’s manual context to help answer it.