
הקדמה
The OptiMATE 6 Ampmatic is a sophisticated 9-step 12V 5A sealed battery saving charger and maintainer designed to optimize the performance and lifespan of various 12V lead-acid batteries, including AGM, GEL, and STD types. This microprocessor-controlled device automatically diagnoses, recovers, charges, tests, and maintains your battery, ensuring it remains in optimal condition.
It is engineered to save deeply discharged batteries, provide continuous charging tailored to battery size, and offer 24/7 protection against discharge, making it suitable for motorcycles, cars, trucks, marine craft, and RVs.
זיכערקייַט אינפֿאָרמאַציע
Always read and understand all safety warnings and instructions before using the OptiMATE 6 Ampmatic charger. Failure to follow these instructions may result in electric shock, fire, or serious injury.
- Use the charger only for 12V lead-acid batteries (AGM, GEL, STD, Starter, Deep Cycle). Do not use for lithium batteries.
- Ensure proper ventilation during charging. Do not operate in a confined area or restrict ventilation.
- Avoid open flames or sparks near the battery. Batteries can produce explosive gases.
- טראָגן אויג שוץ און פּראַטעקטיוו קליידער ווען ארבעטן מיט באַטעריז.
- Disconnect the AC power before making or breaking the connections to the battery.
- Do not expose the charger to rain or excessive moisture. The unit is fully sealed but not designed for submersion.
- האַלטן אויס פון דערגרייכן פון קינדער.
- If the battery is frozen, do not charge it. Allow it to thaw first.
וואָס איז אין די קעסטל
ביים עפענען דעם פעקל, זיכער מאכן אז אלע קאמפאנענטן זענען דא:
- אָפּטימאַטע 6 Ampmatic Battery Charger Unit
- Battery Lead (with SAE connector)
- Battery Clips (alligator clamps)
- Eyelet Terminal Connector (for permanent connection)

Image: The OptiMATE 6 Ampmatic charger shown with its standard accessories, including the main unit, power cord, battery clip leads, and permanent eyelet terminal leads.
סעטאַפּ
Before connecting the charger, ensure the battery is clean and free of corrosion. If necessary, clean the battery terminals.
- קלייבט אויס קאנעקשאן מעטאד:
- Battery Clips: For temporary connections. Connect the red clip to the positive (+) battery terminal and the black clip to the negative (-) battery terminal.
- Eyelet Terminal Connector: For permanent connection to the battery, ideal for long-term maintenance. Secure the red eyelet to the positive (+) terminal and the black eyelet to the negative (-) terminal.
- פאַרבינדן צו באַטאַרייע:
Ensure the charger is NOT plugged into AC power during this step.

Image: The OptiMATE 6 Ampmatic connected to a small 12V battery using the provided battery clips, demonstrating a typical setup.
For in-vehicle batteries, connect the positive (+) lead first, then the negative (-) lead to the battery or a chassis ground point away from the battery. If disconnecting, reverse the order.
- פאַרבינדן צו AC מאַכט: Plug the charger's AC cord into a standard wall outlet. The charger will automatically begin its diagnostic and charging process.
אַפּערייטינג ינסטראַקשאַנז
The OptiMATE 6 Ampmatic operates through a fully automatic 9-step program. The LEDs on the unit indicate the current stage of the charging process.
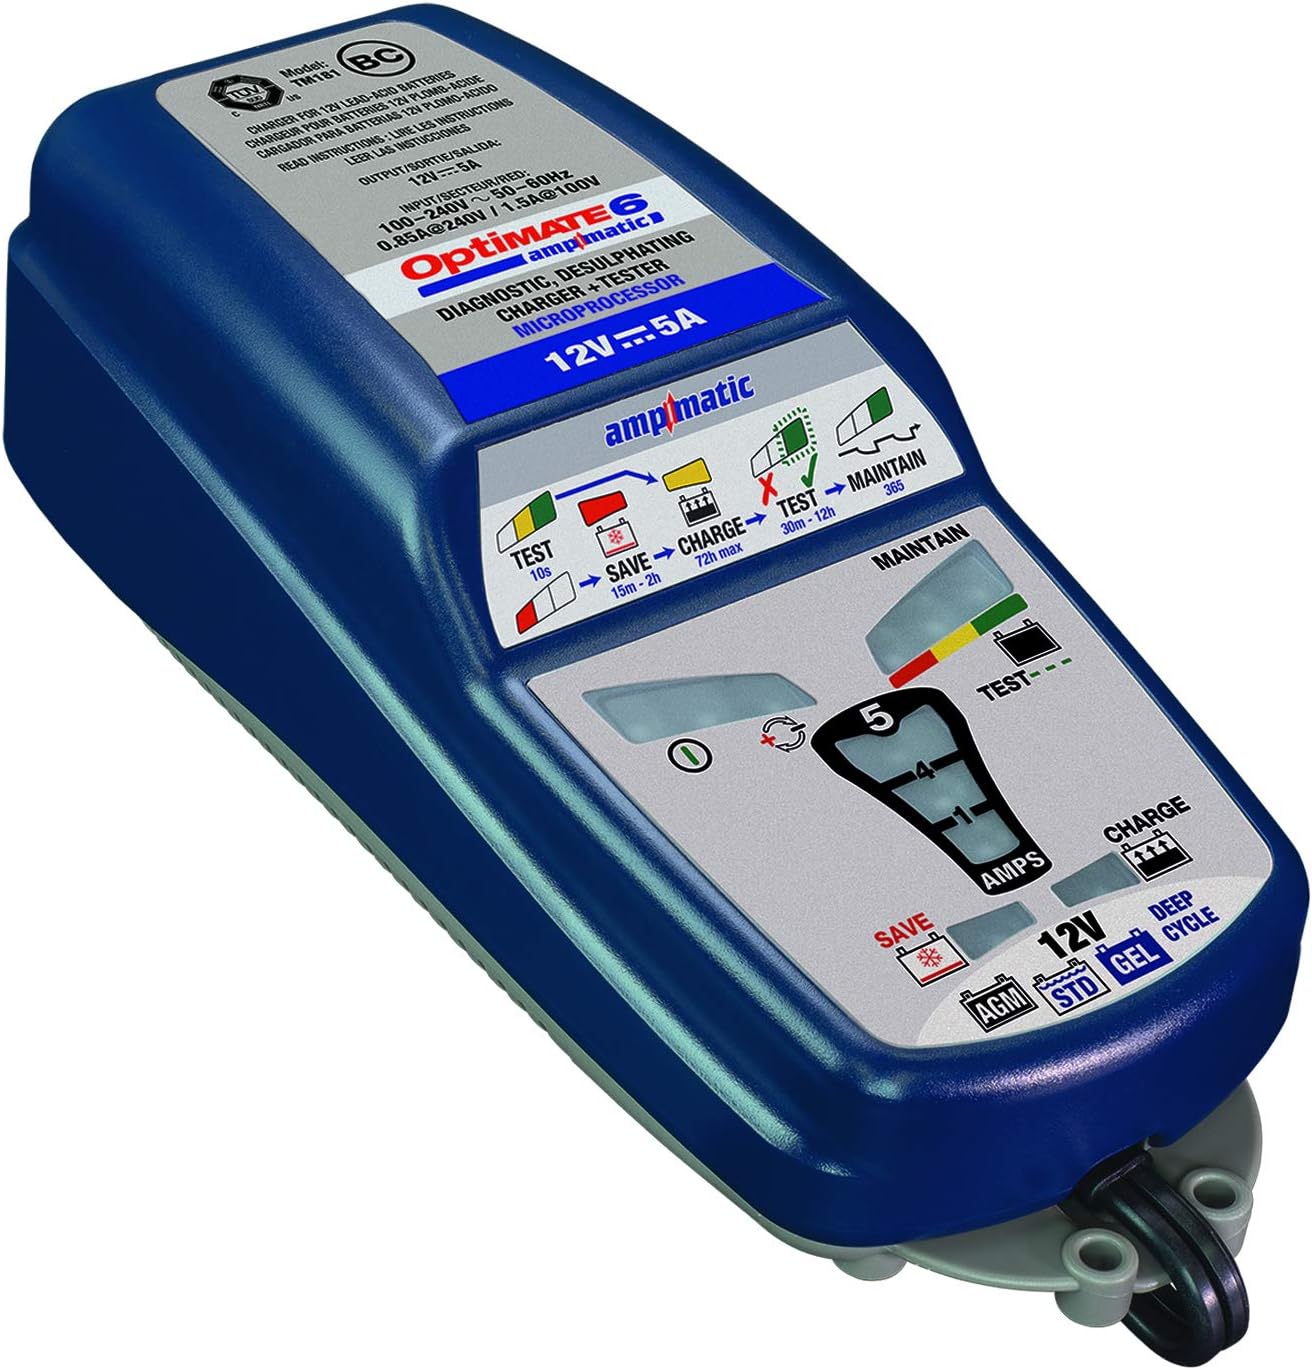
בילד: א דעטאַלירטע view of the OptiMATE 6 Ampmatic's top panel, showing the various LED indicators for Test, Save, Charge, and Maintain stages, along with battery type selection.
Charging Process (9 Steps)
- Pre-qualification: טשעקס באַטאַרייע וואָלtagE און פּאָולעראַטי.
- Save (0.5V+): Recovers severely discharged batteries from as low as 0.5V.
- Ampmatic Charge: Delivers current based on battery size and condition, up to 5A.
- אַבזאָרפּשאַן: Brings the battery to full charge.
- Voltage Retention Test: מאָניטאָרס באַטאַרייע וואָלtage without charging to detect internal issues.
- Charge Retention Test: Checks battery's ability to hold charge.
- Maintain (Float): Provides a constant, low-current charge to keep the battery topped off.
- Pulse Maintenance: Delivers small pulses of charge to prevent self-discharge during long-term connection.
- באַטערי געזונט טעסט: Periodically re-tests the battery to ensure it remains healthy.
געפירט ינדיקאַטאָרס
| געפירט ינדיקאַטאָר | טייַטש |
|---|---|
| Green (Test) | Battery is undergoing initial testing or voltage retention test. |
| Red (Save) | Battery is deeply discharged and undergoing recovery. |
| Yellow (Charge) | Battery is actively charging. |
| Green (Maintain) | Battery is fully charged and in maintenance mode. |
| Red/Yellow/Green (Test/Maintain) | Indicates battery health during maintenance. Green is excellent, Yellow is good, Red indicates a weaker battery. |
| Reverse Polarity / Fault | Indicates incorrect connection or a severe battery fault. |
The charger will automatically proceed through these steps. Once the green "Maintain" LED is solid, the battery is fully charged and can be left connected for long-term maintenance.
וישאַלט
The OptiMATE 6 Ampmatic is designed for minimal maintenance. However, proper care will ensure its longevity and optimal performance.
- רייניקונג: Disconnect the charger from AC power and the battery before cleaning. Wipe the unit with a dry or slightly damp שטאָף. דו זאלסט נישט נוצן האַרב קעמיקאַלז אָדער אַברייסיוו קלינערז.
- סטאָרידזש: האַלט דעם טשאַרדזשער אין אַ קיל, טרוקן אָרט ווען נישט אין באַנוץ. האַלט די קאַבלען אָרדנטלעך איינגעוויקלט צו פאַרמייַדן שעדיקן.
- קאַבלע דורכקוק: Periodically inspect the AC cord, battery leads, and connectors for any signs of damage, fraying, or corrosion. Do not use the charger if any part is damaged.
טראָובלעשאָאָטינג
If you encounter issues with your OptiMATE 6 Ampmatic, refer to the following common problems and solutions:
| פּראָבלעם | מעגלעך סיבה | לייזונג |
|---|---|---|
| קיין לעדס ליכט אַרויף. | No AC power; faulty connection. | Check AC outlet and ensure charger is securely plugged in. Verify battery connections. |
| Reverse polarity LED (if present) or fault indicator lights up. | Incorrect battery connection (positive to negative, etc.). | Disconnect from AC power, then correct the battery connections (red to +, black to -). Reconnect AC power. |
| Charger stays in "Save" mode for a long time. | Battery is deeply discharged or heavily sulfated. | This is normal for very flat batteries. Allow the charger to continue. If it doesn't progress after 24 hours, the battery may be beyond recovery. |
| Charger does not reach "Maintain" (Green) LED. | Battery may have an internal fault or short circuit. | The charger's test function may indicate a faulty battery. Consider having the battery professionally tested or replaced. |
| דער טשאַרדזשער ווערט וואַרעם בעת אָפּעראַציע. | נאָרמאַל אָפּעראַציע. | This is normal, especially during the bulk charging phase. Ensure adequate ventilation around the unit. |
If problems persist after attempting these solutions, contact Tecmate customer support or refer to the full user manual available online.
ספּעסאַפאַקיישאַנז
| שטריך | דעטאַל |
|---|---|
| מאָדעל | טם-181 |
| אַרייַנשרייַב וואָלtage | 100-240 וו אַק, 50-60 הז |
| רעזולטאַט חלקtage | 12 וואלטס דק |
| טשאַרדזשינג קראַנט | 5 Ampס (Ampmatic) |
| באַטערי טייפּס | 12V Lead-Acid (STD, AGM, GEL, Deep Cycle) |
| באַטערי קאַפּאַציטעט ראַנגע | 3 אַה צו 240 אַה |
| Recovery Voltage | Starts from 0.5V |
| דימענסיעס (איינהייט) | בעערעך. 12.28 רענטגענ 7.05 רענטגענ 3.35 אינטשעס |
| פּונקט וואָג | בעערעך. 3 פונט |
| אָפּצוימונג רייטינג | Fully sealed case (splash-proof) |
| זיכערקייַט קאָמפּליאַנסע | סע סערטאַפייד |
וואָראַנטי און שטיצן
For warranty information, technical support, or further assistance, please refer to the official Tecmate webוועבזייטל אדער די פולע באַניצער גייד וואָס איז צוגעשטעלט מיט אייער פּראָדוקט.
You can also find the official user guide PDF דאָ.
פֿאַר נאָך פּראָדוקט אינפֿאָרמאַציע און שטיצע, באַזוכט די Tecmate Store on Amazon.