
1. הקדמה
This manual provides instructions for the installation, operation, and maintenance of your StarTech.com SLIMDVDRW8U2 External Slim USB 2.0 DVD+/-RW Dual Layer Drive. This device allows you to read and write data to DVD and CD media using a standard USB 2.0 connection, offering portability and convenience for laptops and desktop PCs without an internal optical drive.
2. פּעקל אינהאַלט
באַשטעטיקן אַז דיין פּעקל כּולל די פאלגענדע זאכן:
- 1x StarTech.com SLIMDVDRW8U2 External Slim USB 2.0 DVD+/-RW Drive
- 1x USB 2.0 A to B Cable
- 1x ינסטרוקטיאָן מאַנואַל
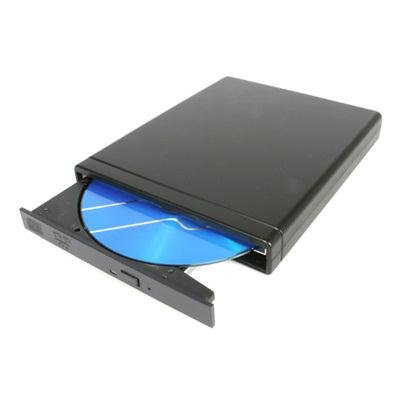
Image: The StarTech.com SLIMDVDRW8U2 external slim DVD+/-RW drive, shown with its sleek black casing and USB port.
3. סיסטעם רעקווירעמענץ
Before installing the drive, ensure your system meets the following requirements:
- Available USB 2.0 port (or higher, compatible with USB 2.0)
- Operating System: Windows XP/Vista/7/8/10/11, macOS, or Linux (with USB mass storage device support)
- For DVD/CD burning, compatible burning software may be required (not included).
4. סעטאַפּ
Follow these steps to connect and prepare your external DVD drive for use:
- פאַרבינדן די וסב קאַבלע: Plug the USB Type-B connector of the provided USB cable into the corresponding port on the external DVD drive.
- פאַרבינדן צו קאָמפּיוטער: Plug the USB Type-A connector of the cable into an available USB 2.0 port on your computer (laptop or desktop PC).
- דרייווער ינסטאַלירונג: The drive is plug-and-play. Your operating system should automatically detect and install the necessary drivers. This process may take a few moments.
- וועראַפאַקיישאַן: Once drivers are installed, the drive will appear as an optical drive in "My Computer" (Windows) or "Finder" (macOS).
5. אַפּערייטינג ינסטרוקטיאָנס
This section details how to use your external DVD drive for reading and writing optical media.
5.1. אריינלייגן א דיסק
- Ensure the drive is connected to your computer and powered on (indicated by an LED, if present).
- Press the eject button on the front of the drive. The disc tray will open.
- Carefully place a CD or DVD onto the tray, ensuring it is centered with the label side facing up.
- Gently push the tray back into the drive until it clicks shut. The drive will begin to read the disc.
5.2. Ejecting a Disc
- Software Eject (Recommended): Right-click on the optical drive icon in "My Computer" (Windows) or drag the disc icon to the Trash (macOS) and select "Eject".
- האַרדווער אַרויסוואַרפן: Press the eject button on the front of the drive. If the disc is in use, the tray may not open. Ensure no applications are accessing the disc before using the hardware eject button.
5.3. Reading Data from a Disc
Once a disc is inserted and recognized by your operating system, you can access its contents. Double-click the drive icon to browse files, or use media player software to play audio CDs or video DVDs.
5.4. Writing Data to a Disc (Burning)
To write data to a blank CD-R/RW or DVD-R/RW disc, you will need compatible burning software. Many operating systems include basic burning capabilities, or you can use third-party software. Follow the instructions provided with your chosen burning software.
- Insert a blank, recordable disc (CD-R/RW, DVD-R/RW, DVD+R/RW, DVD+R DL).
- Open your burning software and select the type of project (data disc, audio CD, video DVD, etc.).
- לייג די files or media you wish to burn to the disc.
- Initiate the burning process. Do not disconnect the drive or interrupt the process until completion.
6. וישאַלט
Proper care ensures the longevity and optimal performance of your drive.
- רייניקונג די יקסטיריער: Use a soft, dry, lint-free cloth to wipe the exterior of the drive. Avoid abrasive cleaners or solvents.
- רייניקונג די לענס: Do not attempt to clean the internal optical lens manually. Use a specialized CD/DVD lens cleaning disc if necessary.
- דיסק האַנדלינג: Always handle discs by their edges. Avoid touching the data surface. Store discs in protective cases when not in use.
- סטאָרידזש: האַלט דעם דרייוו אין אַ קיל, טרוקן אָרט אַוועק פון דירעקט זונשייַן און עקסטרעמע טעמפּעראַטורן.
- ויסמיידן שטויב: Keep the drive in a clean environment to prevent dust accumulation, which can affect performance.
7. טראָובלעשאָאָטינג
If you encounter issues with your external DVD drive, refer to the following common problems and solutions:
7.1. Drive Not Recognized by Computer
- טשעק קאַנעקשאַנז: Ensure the USB cable is securely connected to both the drive and your computer's USB port.
- פּרוּווט אן אנדער וסב פּאָרט: Connect the drive to a different USB port on your computer.
- ריסטאַרט קאָמפּיוטער: מאנchmal קען א פשוטע ריסטאַרט אויפלעזן דעטעקציע פראבלעמען.
- קוק אויף דיווייס מענעדזשער (ווינדאָוס): Open Device Manager and look for "DVD/CD-ROM drives." If there's an exclamation mark, try updating or reinstalling the driver.
- Check System Information (macOS): Go to Apple Menu > About This Mac > System Report > USB. Check if the drive is listed.
7.2. Disc Read Errors or Slow Performance
- Clean Disc: Inspect the disc for scratches, smudges, or dirt. Gently clean it with a soft, lint-free cloth from the center outwards.
- Try Another Disc: Test with a different, known-good disc to determine if the issue is with the drive or the disc itself.
- לענס רייניקונג: Use a specialized CD/DVD lens cleaning disc.
- רעסורסן באַניץ: Close other demanding applications that might be consuming system resources.
7.3. Disc Tray Does Not Open/Close
- מאַכט טשעק: זיכער מאַכן אַז דער דרייוו איז ריכטיק פארבונדן און באַקומט מאַכט.
- ווייכווארג ארויסווארפן: Attempt to eject the disc through your operating system's software interface first.
- Manual Eject: If the tray is stuck, locate the small emergency eject hole (often near the eject button). Insert a straightened paperclip into the hole and push gently to manually open the tray.
8. ספּעסאַפאַקיישאַנז
| שטריך | באַשרייַבונג |
|---|---|
| מאָדעל נומער | SLIMDVDRW8U2 |
| ייַזנוואַרג צובינד | וסב 2.0 |
| אָפּטישע סטאָרידזש שרייבן גיכקייט | 8x (DVD), 24x (CD) |
| Optical Storage Read Speed | 8x (DVD), 24x (CD) |
| ייַזנוואַרג פּלאַטפאָרמע | לאַפּטאַפּ, פּיסי |
| קאַמפּאַטאַבאַל דעוויסעס | Most personal computers and laptops with a USB 2.0 port |
| קאַנעקטיוויטי טעכנאָלאָגיע | וסב |
| פאָרם פאַקטאָר | Slim External |
| פּונקט וואָג | 1.92 פונט (אומגעפער 0.87 ק"ג) |
| מאַכט מקור | USB Powered |
9. וואָראַנטי און טעכניש שטיצן
StarTech.com provides a comprehensive warranty for its products. For specific warranty details, please refer to the warranty information included with your product or visit the official StarTech.com webפּלאַץ.
For technical support, troubleshooting assistance, or to download the latest drivers and manuals, please visit the StarTech.com support webזייטל אדער קאנטאקטירן זייער קאסטומער סערוויס דעפארטמענט. קאנטאקט אינפארמאציע קען געווענליך געפונען ווערן אויף דער פראדוקט פארפאקונג אדער די אפיציעלע webפּלאַץ.
Webפּלאַץ: www.startech.com/support